How to Enable or Disable Windows Security Account Protection Notifications
This tutorial shows you how to turn account protection notifications on or off in Windows Security. These notifications help you stay informed about your account’s safety.
Why Would You Want to Do This?
Windows Security can send you notifications about problems with your account. It alerts you if there are issues with Windows Hello (facial recognition or fingerprint login) or Dynamic Lock (automatic screen lock when you leave your computer). Sometimes you might want these notifications. Other times, they might get annoying and you’ll want to turn them off.
What Notifications Can You Control?
- Problems with Windows Hello
- Problems with Dynamic lock
Reference: Windows Security App Settings – Microsoft Support
Learn how to configure settings for the Windows Security app.
Option One: Using Windows Security Settings
Turn On or Off Account Protection Notifications in Windows Security
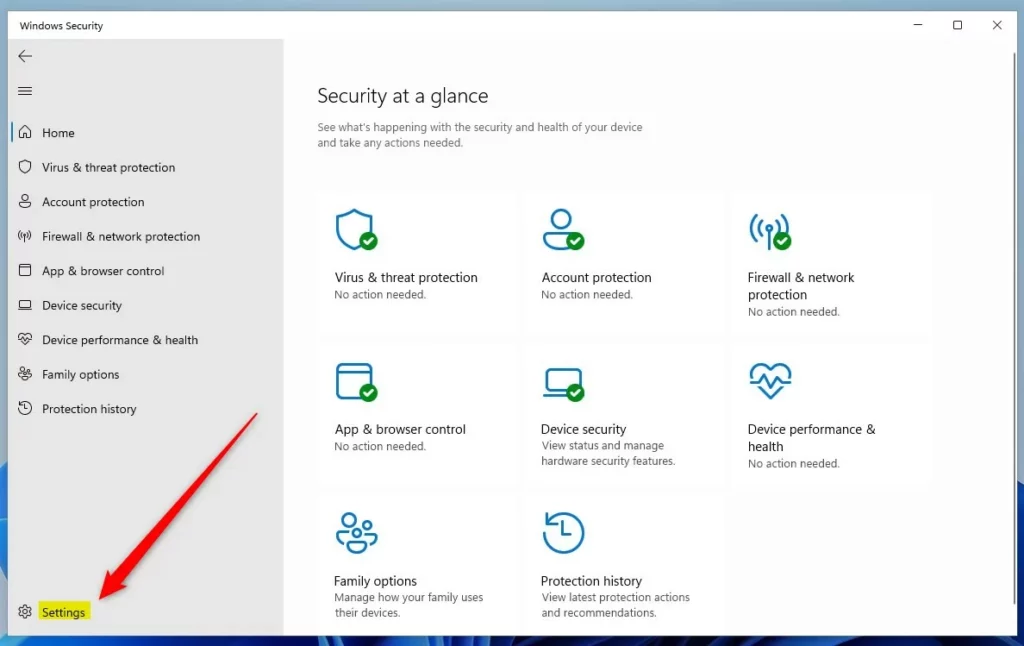
- Open Windows Security. Windows Security
- Click on Settings.
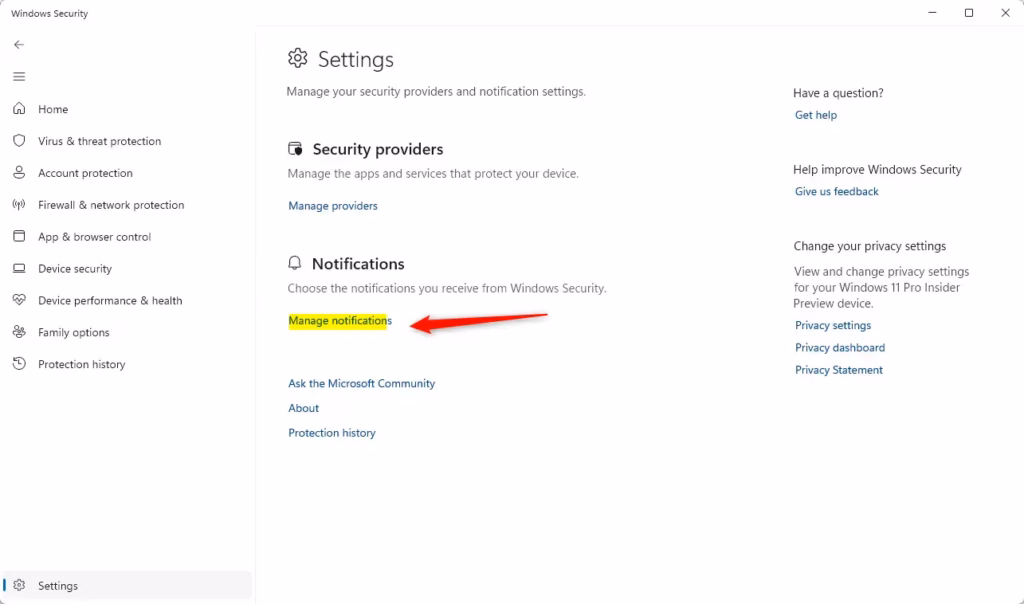
- Click on the Manage notifications link under Notifications.
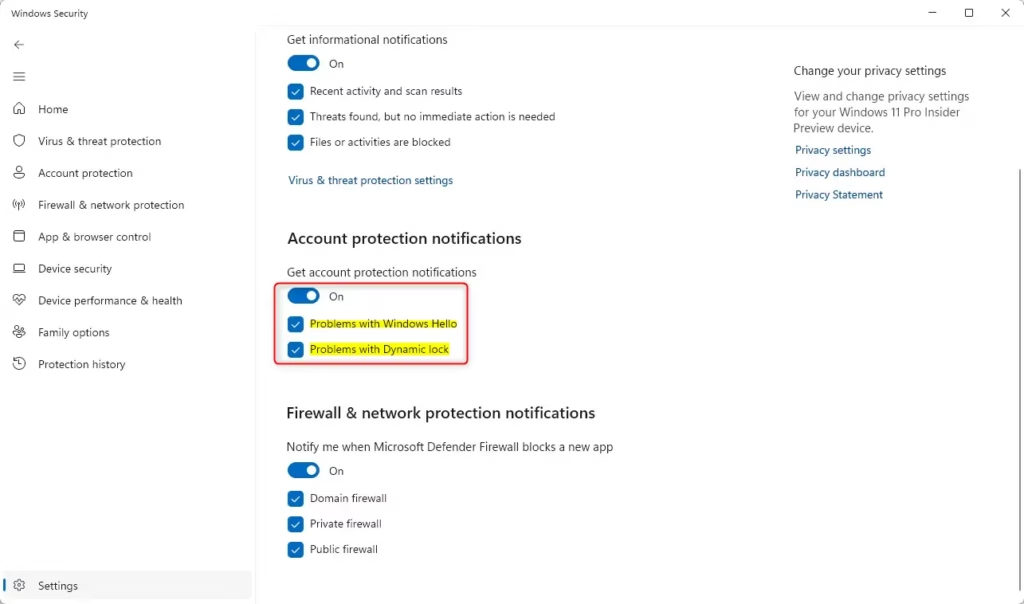
- Choose what you want to do:
- Turn off Get account protection notifications completely.
- Turn on Get account protection notifications (this is the default), then check or uncheck Problems with Windows Hello and/or Problems with Dynamic lock.
- You can now close Windows Security.
Option Two: Using Registry (Advanced)
⚠️ Admin privileges required
Open the Terminal app as administrator and run the commands below.
Turn ON All Account Protection Notifications
This is the default setting:
reg add "HKCU\Software\Microsoft\Windows Defender Security Center\Account protection" /v DisableNotifications /t REG_DWORD /d 0 /f
reg add "HKCU\Software\Microsoft\Windows Defender Security Center\Account protection" /v DisableWindowsHelloNotifications /t REG_DWORD /d 0 /f
reg add "HKCU\Software\Microsoft\Windows Defender Security Center\Account protection" /v DisableDynamiclockNotifications /t REG_DWORD /d 0 /f
Turn OFF All Account Protection Notifications
reg add "HKCU\Software\Microsoft\Windows Defender Security Center\Account protection" /v DisableNotifications /t REG_DWORD /d 1 /f
reg add "HKCU\Software\Microsoft\Windows Defender Security Center\Account protection" /v DisableWindowsHelloNotifications /t REG_DWORD /d 1 /f
reg add "HKCU\Software\Microsoft\Windows Defender Security Center\Account protection" /v DisableDynamiclockNotifications /t REG_DWORD /d 1 /f
Turn On or Off Specific Account Protection Notifications
For Windows Hello notifications only:
reg add "HKCU\Software\Microsoft\Windows Defender Security Center\Account protection" /v DisableNotifications /t REG_DWORD /d 0 /f
reg add "HKCU\Software\Microsoft\Windows Defender Security Center\Account protection" /v DisableWindowsHelloNotifications /t REG_DWORD /d 0 /f
OR
reg add "HKCU\Software\Microsoft\Windows Defender Security Center\Account protection" /v DisableNotifications /t REG_DWORD /d 0 /f
reg add "HKCU\Software\Microsoft\Windows Defender Security Center\Account protection" /v DisableWindowsHelloNotifications /t REG_DWORD /d 1 /f
Turn On or Off “Problems with Dynamic lock” Notifications
reg add "HKCU\Software\Microsoft\Windows Defender Security Center\Account protection" /v DisableNotifications /t REG_DWORD /d 0 /f
reg add "HKCU\Software\Microsoft\Windows Defender Security Center\Account protection" /v DisableDynamiclockNotifications /t REG_DWORD /d 0 /f
OR
reg add "HKCU\Software\Microsoft\Windows Defender Security Center\Account protection" /v DisableNotifications /t REG_DWORD /d 0 /f
reg add "HKCU\Software\Microsoft\Windows Defender Security Center\Account protection" /v DisableDynamiclockNotifications /t REG_DWORD /d 1 /f
Summary
You now know two ways to control your account protection notifications in Windows Security. The easiest way is through the Settings menu in Windows Security itself. If you prefer using commands, you can use the Registry method, but remember you’ll need administrator access. Choose whichever method works best for you, and you can turn these helpful notifications on or off anytime you want.
Was this guide helpful?

About the Author
Richard
Tech Writer, IT Professional
Richard, a writer for Geek Rewind, is a tech enthusiast who loves breaking down complex IT topics into simple, easy-to-understand ideas. With years of hands-on experience in system administration and enterprise IT operations, he’s developed a knack for offering practical tips and solutions. Richard aims to make technology more accessible and actionable. He's deeply committed to the Geek Rewind community, always ready to answer questions and engage in discussions.


No comments yet — be the first to share your thoughts!