
This article explains how to enable or disable the Caps lock key in Windows 11.
When pressed, the Caps lock key on your keyboard turns all letters into capital letters. Unfortunately, the Caps lock key can also make people incorrectly type their passwords or enter data incorrectly when mistakenly or unknowingly pressed.
If you unknowingly use the Caps lock key and it is causing you too much trouble, the steps below show you how to disable it.
Even when the Caps lock key is disabled, users can still press and hold the Shift key and press a letter to capitalize it.
Enable or disable the Caps lock key via Windows Registry Editor
As mentioned above, Windows lets you enable or disable the Caps lock key via the Registry Editor.
Here’s how to do that.
Yet another way to turn on or off the AutoPlay feature in Windows is to use the Windows Registry Editor.
First, open the Windows Registry, and navigate to the folder key path below.
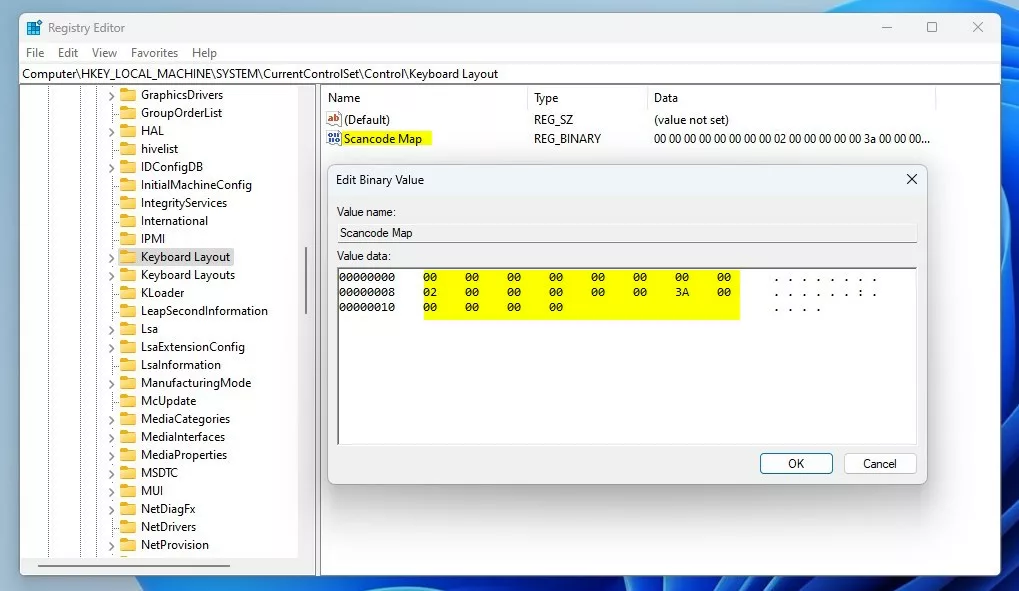
HKEY_LOCAL_MACHINE\SYSTEM\CurrentControlSet\Control\Keyboard Layout
If you don’t see the Keyboard Layout folder key, right-click on the Control key, then create the subkey (Keyboard Layout) folders.

Right-click the Keyboard Layout folder key’s right pane and select New -> Binary Value. Next, type a new item named Scancode Map.
Double-click the new item name (Scancode Map) and type the Value data:
- Default (delete) = Caps lock key is enabled.
- Disable Caps lock: 00,00,00,00,00,00,00,00,02,00,00,00,00,00,3a,00,00,00,00,00
Save your changes and restart your computer.
That should do it!
Conclusion:
- Disabling the Caps lock key can prevent accidental typing errors, especially in sensitive fields like password entry.
- Using the Windows Registry Editor provides a straightforward method for enabling or disabling the Caps lock key.
- After making the changes in the Registry Editor, a computer restart is necessary for the adjustments to take effect.


Leave a Reply Cancel reply