How to Enable or Disable Spatial Sound in Windows 11
This tutorial will show you how to enable or disable Spatial Sound in Windows 11.
Open Settings, navigate to System > Sound, select your output device, and choose Off or Windows Sonic for Headphones from the Spatial audio menu. Alternatively, use the Control Panel’s Sound settings or the Quick Settings Volume Mixer.
What is Spatial Sound?
Spatial sound in Windows 11 makes your audio feel like it’s all around you, even above, creating a 3D virtual space for a more immersive experience than traditional surround sound.
Why use it? Want a more immersive audio experience when listening to music, watching movies, or playing games? Spatial sound creates a more realistic environment around you.
Reference:
Spatial Sound for app developers for Windows, Xbox, and Hololens 2 – Win32 apps – Developer guidance for Microsoft Spatial Sound, Microsoft’s platform-level solution for spatial sound on Xbox, Windows and HoloLens 2, enabling both surround & elevation audio cues.
Spatial Sound Tooltip on Volume Icon
The spatial sound tooltip on the volume icon is available starting with Windows 11 build 22598. Starting with Windows 11 build 25231, when you move your mouse over the sound icon on Quick Settings, the tooltip will now display when spatial audio is in use – not just that it is enabled.
Option 1Enable or Disable Spatial Sound in Settings
- Open Settings (⊞ Win+I).
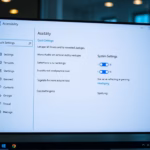
- Click/tap on System on the left side, and click/tap on Sound on the right side. (see screenshot below)
You can turn spatial sound on or off in Windows 11 using the Settings app by going to System, then Sound, and selecting your audio device.
- Under Output devices, click/tap on the sound device (ex: “Digital Audio (S/PDIF)”) you want to enable or disable spatial sound for. (see screenshot below)

- In the Spatial audio drop menu, select Off (disable – default) or Windows Sonic for Headphones (enable) for what you want. (see screenshot below)
If you turned on mono audio, it will gray out and disable the spatial sound setting.

- You can now close Settings if you like.
Option 2Enable or Disable Spatial Sound in Control Panel
To change spatial sound settings using the Control Panel in Windows 11, open Sound, pick your playback device, go to its Properties, and then select the Spatial sound tab.- Open the Control Panel (icons view), and click/tap on the Sound icon.
- In the Playback tab, select the device (ex: “Digital Audio (S/PDIF)”) you want to enable or disable spatial sound for, and click/tap on Properties. (see screenshot below)

- Click/tap on the Spatial sound tab, select Off (disable – default) or Windows Sonic for Headphones (enable) for what you want in the Spatial sound format drop menu, and click/tap on OK. (see screenshot below)
- Click/tap on OK.

- You can now close the Control Panel if you like.
Option 3Enable or Disable Spatial Sound in Quick Settings Volume Mixer
For Windows 11 version 22H2 and later, you can quickly turn spatial sound on or off using the Quick Settings menu by opening the volume mixer and selecting your desired spatial audio option.
Perform one of the following actions:
- Press the ⊞ Win+Ctrl+V keys.
- Open Quick Settings (⊞ Win+A), and click/tap on the Select a sound output button. (see screenshot below)

- Select Off (disable – default) or Windows Sonic for Headphones (enable) for what you want under Spatial Audio.
If you turned on mono audio, it will disable the spatial sound setting.

That’s it!
Summary
Spatial sound in Windows 11 gives you a 3D audio experience, and you can easily turn it on or off using Settings, Control Panel, or Quick Settings by choosing ‘Windows Sonic for Headphones’ or ‘Off’ for your audio device.
Should I activate Windows Spatial sound?
Should I enable Windows Spatial Sound? Yes, you should enable Windows Spatial Sound, especially when listening with headphones. It provides a more immersive audio experience for gaming, movies, and music by creating a virtual 3D soundscape.
Was this guide helpful?

About the Author
Richard
Tech Writer, IT Professional
Richard, a writer for Geek Rewind, is a tech enthusiast who loves breaking down complex IT topics into simple, easy-to-understand ideas. With years of hands-on experience in system administration and enterprise IT operations, he’s developed a knack for offering practical tips and solutions. Richard aims to make technology more accessible and actionable. He's deeply committed to the Geek Rewind community, always ready to answer questions and engage in discussions.


No comments yet — be the first to share your thoughts!