How to Enable or Disable Remote Assistance Connections in Windows 11
This tutorial shows you how to turn Remote Assistance on or off in Windows 10 or Windows 11.
Windows Remote Assistance lets someone you trust take control of your computer and fix problems from anywhere.
Remote Assistance is turned on by default in Windows. You may want to turn it off when you don’t need it. This is because it can be a security risk.
Reference:
Solve PC problems remotely with Remote Assistance – Microsoft Support
Remote Assistance lets someone you trust take control of your Windows PC and fix problems from anywhere.
Important: You must be signed in as an administrator to enable or disable Remote Assistance.
This will not affect the Quick Assist app by Microsoft.
Option One
Enable or Disable Remote Assistance Using System Properties
- Open System Properties (SystemPropertiesRemote.exe). ⚠️ Requires admin privileges
- In the Remote tab, check the box to enable or uncheck it to disable Allow Remote Assistance connections to this computer. Then click OK.

Option Two
Enable or Disable Remote Assistance Using Command Lines
Enable Remote Assistance
This is the default setting.
REG ADD "HKLM\SYSTEM\CurrentControlSet\Control\Remote Assistance" /v fAllowToGetHelp /t REG_DWORD /d 1 /f
REG ADD "HKLM\SYSTEM\CurrentControlSet\Control\Remote Assistance" /v fAllowFullControl /t REG_DWORD /d 1 /f
netsh advfirewall firewall set rule group="Remote Assistance" new enable=yes
⚠️ Requires admin privileges
Disable Remote Assistance
REG ADD "HKLM\SYSTEM\CurrentControlSet\Control\Remote Assistance" /v fAllowToGetHelp /t REG_DWORD /d 0 /f
netsh advfirewall firewall set rule group="Remote Assistance" new enable=no
⚠️ Requires admin privileges
Option Three
Enable or Disable Remote Assistance Using Local Group Policy Editor
Note: The Local Group Policy Editor is only available in Windows 10/11 Pro, Enterprise, and Education editions. Use Option Four for other editions.
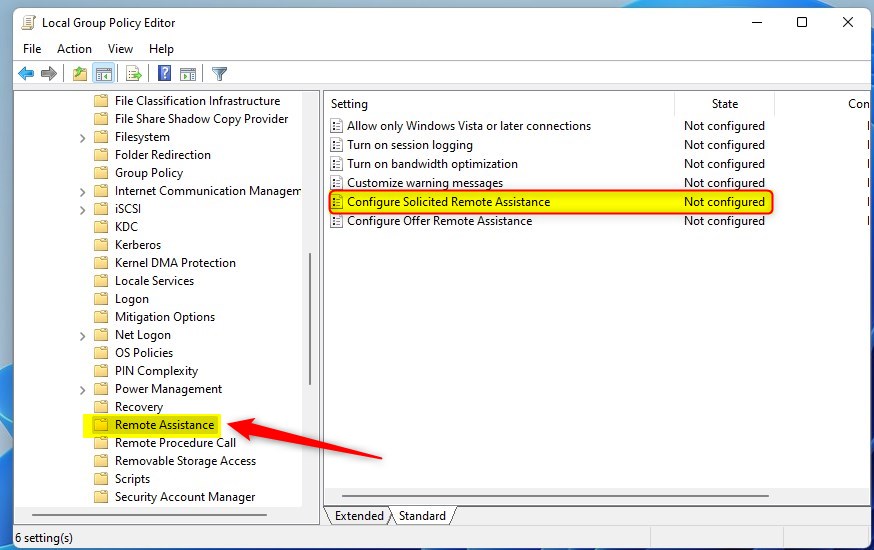
- Open the Local Group Policy Editor (gpedit.msc). ⚠️ Requires admin privileges
- Navigate to this location in the left pane:
Computer Configuration > Administrative Templates > System > Remote Assistance
- In the right pane, double-click Configure Solicited Remote Assistance to edit it.
Enable Remote Assistance
This is the default setting.
A) Select the Not Configured option.
Disable Remote Assistance
This will turn off Remote Assistance.
A) Select the Disabled option.
B) Click OK.
You can now close the Local Group Policy Editor.

Option Four
Enable or Disable Remote Assistance Using Registry
Enable Remote Assistance
This is the default setting.
reg delete "HKEY_LOCAL_MACHINE\SOFTWARE\Policies\Microsoft\Windows NT\Terminal Services" /v fAllowToGetHelp /f
Disable Remote Assistance
This will turn off Remote Assistance.
reg add "HKEY_LOCAL_MACHINE\SOFTWARE\Policies\Microsoft\Windows NT\Terminal Services" /v fAllowToGetHelp /t REG_DWORD /d 0 /f
Summary
Windows Remote Assistance is a feature that lets trusted people help fix your computer problems from anywhere. It’s turned on by default, but you can turn it off if you don’t use it. This tutorial showed you four ways to control Remote Assistance: using System Properties, command lines, Local Group Policy Editor, or the Windows Registry. Choose the method that works best for you. Remember that you need admin privileges to make these changes.
Was this guide helpful?

About the Author
Richard
Tech Writer, IT Professional
Richard, a writer for Geek Rewind, is a tech enthusiast who loves breaking down complex IT topics into simple, easy-to-understand ideas. With years of hands-on experience in system administration and enterprise IT operations, he’s developed a knack for offering practical tips and solutions. Richard aims to make technology more accessible and actionable. He's deeply committed to the Geek Rewind community, always ready to answer questions and engage in discussions.

No comments yet — be the first to share your thoughts!