
This article explains how to turn on or off memory compression in Windows 11.
Windows 11 comes with a feature that compresses a system’s memory to improve performance and reduce physical memory utilization by storing part of the memory pages in RAM in a compressed form.
Compressing the system’s memory helps reduce the number of read/write requests, resulting in fewer pagefile IO operations and reduced reliance on the disk.
Memory compression might help improve user experience overall. However, additional CPU resources may be required to compress and decompress the data in RAM, which may slow CPU processing on some systems.
Windows also uses Memory compression to reduce the amount of memory used per process, freeing up RAM space to maintain more applications in RAM without enacting traditional paging. All of these can help systems with a low memory footprint.
How to enable memory compression in Windows 11
As mentioned above, Memory compression may help low-end systems with little system memory. The Windows Memory compression feature compresses the system’s memory, helps reduce the number of read/write requests, and frees up RAM space to maintain more RAM-intensive applications without enacting traditional paging.
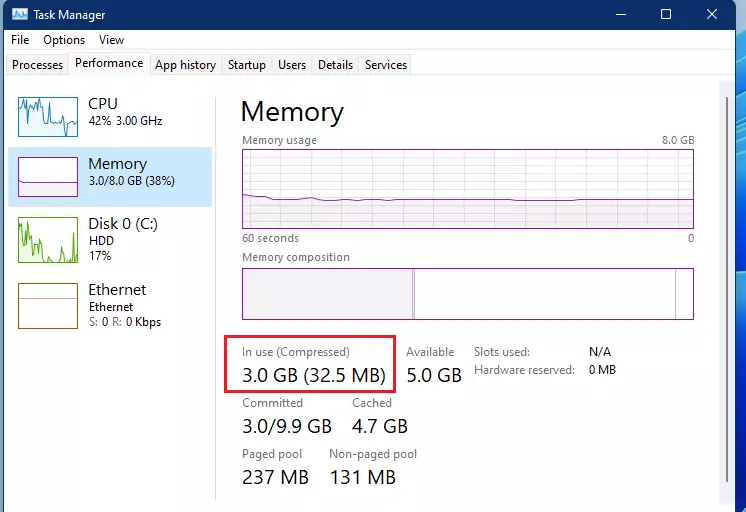
Below is how to see the compressed memory in Windows 11.
Open the Task Manager and look under the Performance tab and Memory section to see how much memory is compressed.
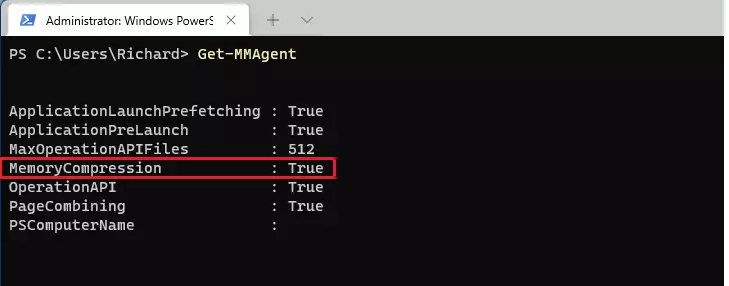
You may also view your system’s Memory compression status using the PowerShell commands below in Windows Terminal as administrator.
Get-MMAgent
You should see results similar to the one below when memory compression is enabled.
If Memory compression is not enabled and the command above returns False, run the commands below in Windows Terminal as administrator and select the PowerShell tab.
Then, run the commands below to enable Memory compression.
Enable-MMAgent -mc
When you’re done, close Windows Terminal and restart your computer to apply the changes.
How to turn off memory compression in Windows 11
If Memory compression is enabled and you want to turn it off, open Windows Terminal as administrator, then select the PowerShell tab. Then, run the commands below.
Disable-MMAgent -mc
When you run the commands above, you will get results similar to those in the screenshot below.

That should do it!
Conclusion:
- Memory compression in Windows 11 optimizes performance and reduces physical memory usage.
- It benefits systems with limited RAM by allowing more applications to run simultaneously.
- Monitoring memory compression can help users understand system performance.
- Enabling or disabling memory compression is straightforward using PowerShell commands.
- Regularly managing memory settings can enhance overall user experience on Windows 11 devices.


Leave a Reply Cancel reply