
Windows 11 lets you search for files and photos stored in the cloud (like OneDrive) right from your computer’s search box. This guide will show you easy ways to turn this cloud search feature on or off.
What is Cloud Search?
Cloud Search lets you find files, photos, and settings saved online through Microsoft services like OneDrive or SharePoint. You can search for them directly from your PC’s search bar. This means you don’t need to remember exact file names or where they are saved.
This feature is available on special Copilot+ PCs and Windows 11 version build 26100.3624 or later.
How to Turn Cloud Search On or Off Using Windows Settings
- Click the Start menu (Windows icon) at the bottom left of your screen.
- Select Settings (gear icon). Or press Windows key + I on your keyboard to open Settings quickly.
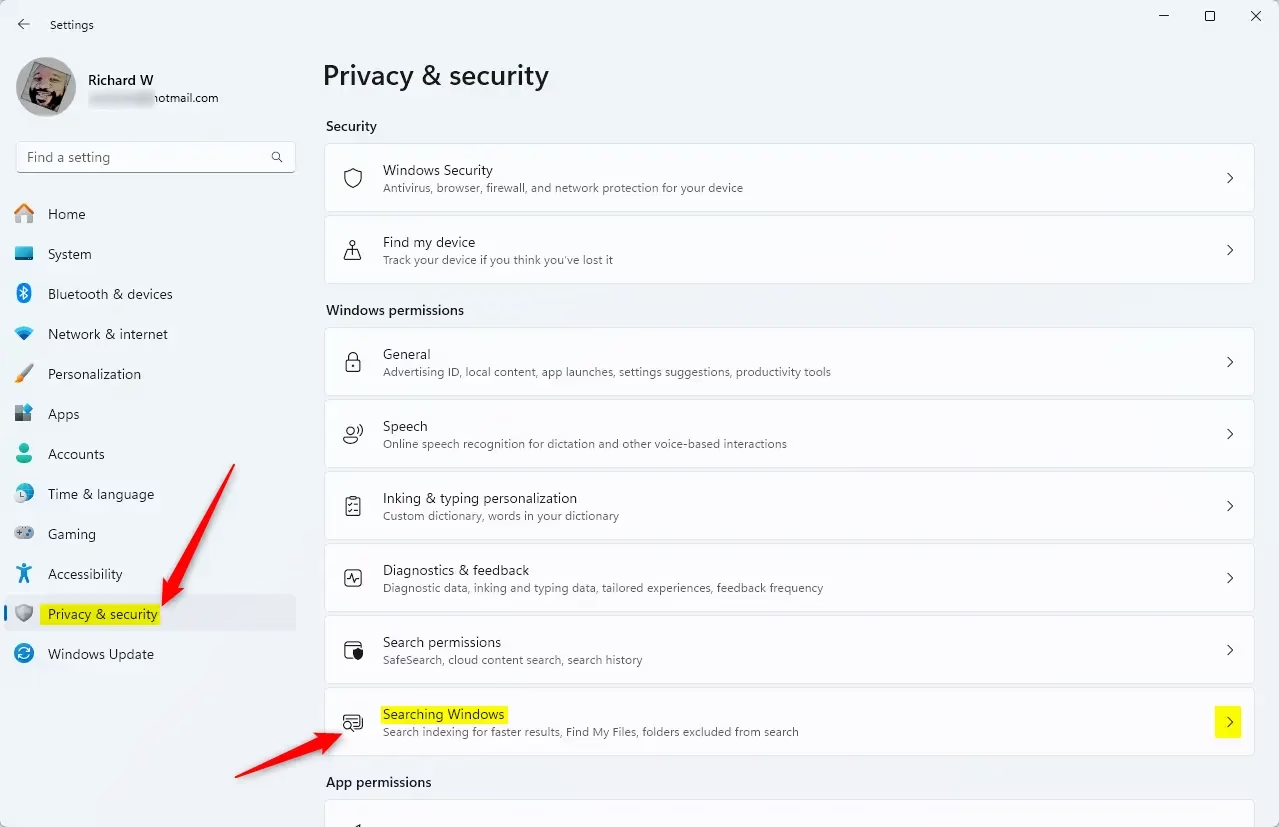
- In Settings, click Privacy & security on the left side panel.
- On the right side, find and click Search Windows.
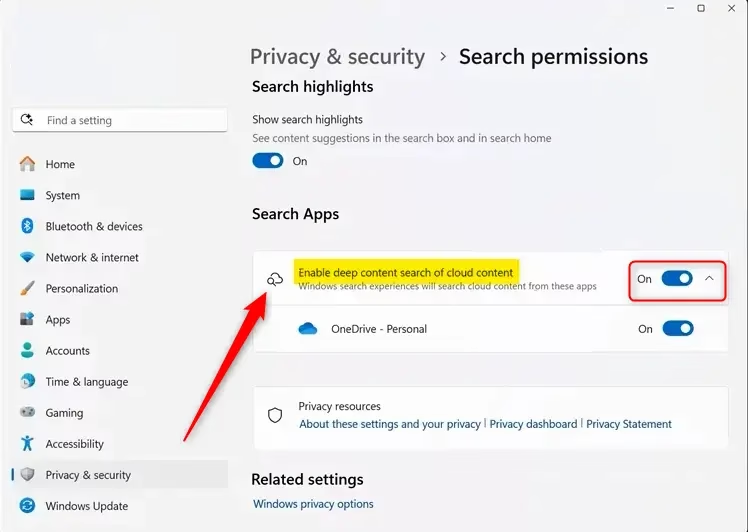
- Look for the option called “Enable deep content search of cloud content” and click the toggle switch to turn it on or off.
When finished, you can close the Settings window.
How to Enable or Disable Cloud Search Using Group Policy Editor
This method is for users comfortable with advanced system settings. Group Policy Editor is available on Windows 11 Pro and higher editions.
- [Admin Required] Press the Start menu button and type
Edit group policy, then press Enter to open the Local Group Policy Editor. - In the left pane, follow this path: Computer Configuration > Administrative Templates > Windows Components > Search
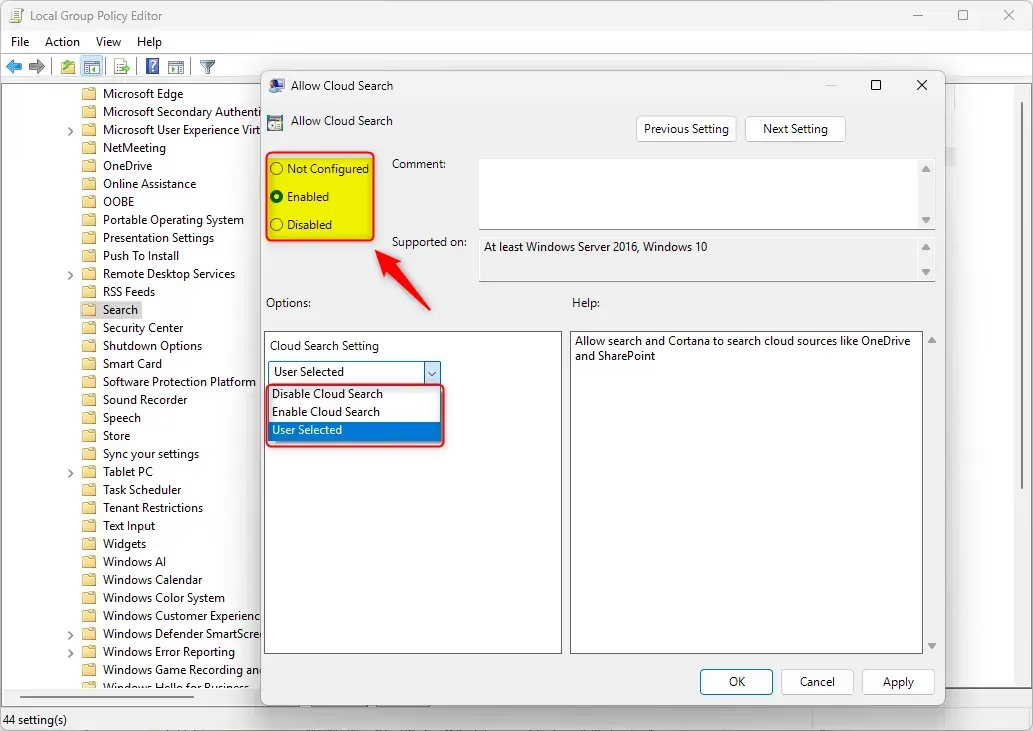
- On the right, find and double-click Allow Cloud Search.
- Choose from these options:
- Not Configured – Default setting (Windows decides).
- Enabled – Turns cloud search on.
- Disabled – Turns cloud search off.
- Click OK to save.

How to Enable or Disable Cloud Search Using Registry Editor
If you don’t have Group Policy Editor or want another method, you can use the Registry Editor. Be careful: Changing the registry can cause problems if done incorrectly. Always make a backup before proceeding.
Before you start:
Backup your registry Create a System Restore point
- [Admin Required] Press the Start menu button, type
regedit, and press Enter to open the Registry Editor. - In Registry Editor, navigate to this folder:
HKEY_LOCAL_MACHINE\SOFTWARE\Policies\Microsoft\Windows\Windows Search - If you don’t see Windows Search folder, right-click Windows, select New > Key, and name it Windows Search.
- Inside Windows Search, right-click the right side, select New > DWORD (32-bit) Value, and name it AllowCloudSearch.
- Double-click AllowCloudSearch and set its value to:
- 1 to enable Cloud Search
- 0 to disable Cloud Search
- Click OK and close Registry Editor.
- Restart your computer to apply changes.

If you want to remove the setting and go back to normal, just delete the AllowCloudSearch DWORD value.
Summary
- Windows 11 can search cloud files and photos easily with the new Cloud Search feature.
- You can turn this feature on or off using Settings, Group Policy Editor, or Registry Editor.
- Always back up your system or registry before making changes, especially in Group Policy or Registry Editor.
- Turning on cloud search helps you quickly find files saved online in services like OneDrive and SharePoint.
- For more information, visit Microsoft’s official Windows Insider blog.


Leave a Reply Cancel reply