How to Connect to a Shared Printer in Windows 11
Do you want to print from your computer but don’t have a printer plugged in? If someone else on your home or work network has a printer shared from their PC, you can connect to it and print without needing to be near the printer.
Go to Settings > Bluetooth & devices > Printers & scanners, then click Add device and Add a device manually. Select “Select a shared printer by name” and enter the printer’s network path, like ComputerNamePrinterName.
What is a Shared Printer?
A shared printer is a printer connected to one computer but set up so other computers on the same network can print to it. This saves money. You don’t need to buy printers for every device. It also makes printing easier for everyone.
Why Use a Shared Printer?
Shared printers help your home or office run smoothly. One printer can serve many computers. This cuts costs and reduces clutter.
What Do You Need?
To connect, you need to know the printer’s network address. It usually looks like this:
\ComputerNamePrinterName
For example:
\MyHomePCCanon TS300 series
Here, MyHomePC is the name of the computer sharing the printer. Canon TS300 series is the printer’s name.
How to Add a Shared Printer Using Windows Settings
Adding a shared printer using Windows 11 Settings is straightforward and works for most people, letting you connect to a printer shared by another computer on your network.
- Open the Settings app. You can do this by:
- Clicking the Start button and then selecting Settings
- Or pressing Windows key + I on your keyboard
- In Settings, click Bluetooth & devices on the left side.
- Click on Printers & scanners.
- Click the Add device button at the top.
- When the new window opens, click Add a device manually at the bottom.
- Select Select a shared printer by name.
- Type the network path of the printer (like
\MyHomePCCanon TS300 series). - If you’re not sure about the path, click the Browse button to find printers on your network.
- Click Next and wait for Windows to connect to the printer.
- You can print a test page to make sure it works.

How to Add a Shared Printer from Devices and Printers Folder
You can add a shared printer in Windows 11 by using the older Devices and Printers folder, which is a handy alternative if you prefer this classic view to find network printers.
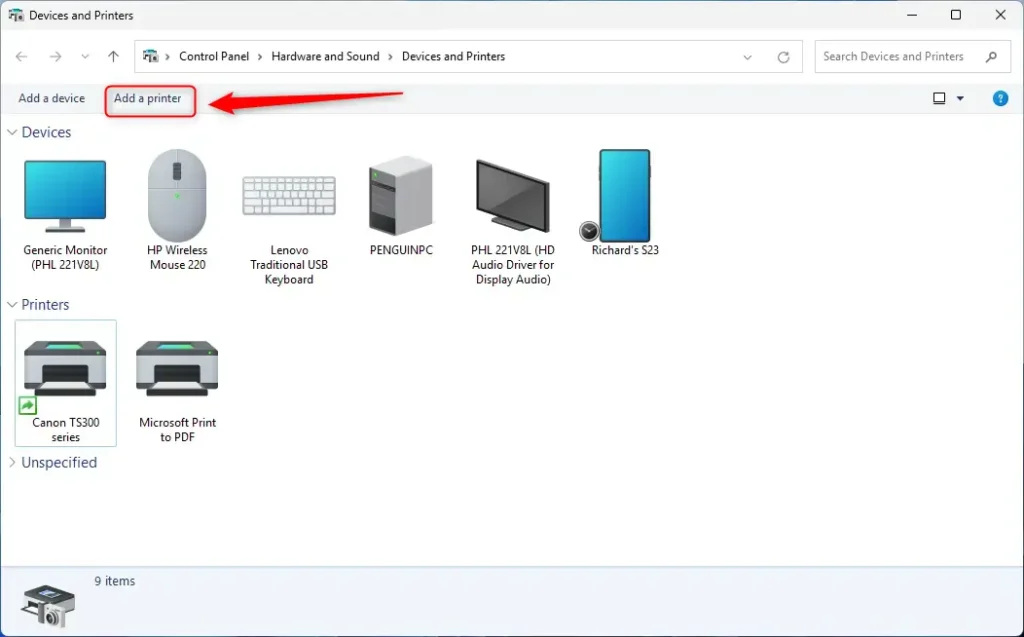
- Open the Devices and Printers folder. You can search for “Devices and Printers” in the Start menu.
- Click the Add a printer button at the top.
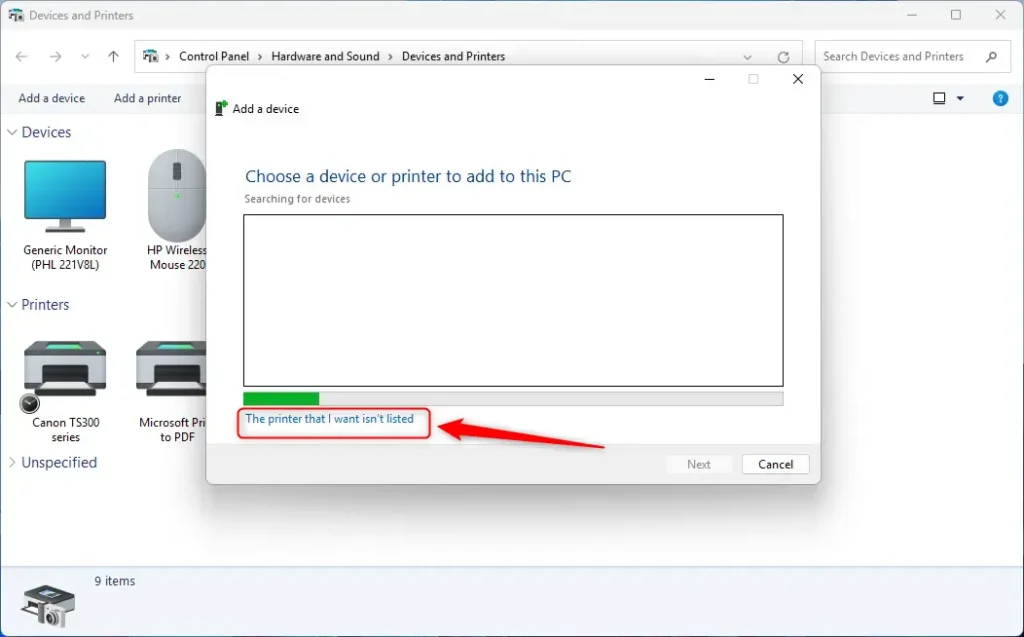
- When it searches for printers, click the The printer that I want isn’t listed link at the bottom.
- Choose Select a shared printer by name.
- Type the printer’s network path (for example,
\MyHomePCCanon TS300 series). - Or click Browse to find it on the network.
- Click Next and then Finish when done.
How to Add a Shared Printer Using PowerShell
Windows 11 users who prefer commands can add a shared printer using PowerShell, a powerful tool that lets you connect to network printers with a simple command if you have admin rights.
- Open Windows Terminal as an administrator:
- Search for “Windows Terminal” in the Start menu
- Right-click it and choose Run as administrator
- Open the PowerShell tab inside Windows Terminal.
- Type this command to add the printer:
Add-Printer -ConnectionName "\ComputerNamePrinterName" - For example:
Add-Printer -ConnectionName "\MyHomePCCanon TS300 series" - Or, if you prefer using the IP address:
Add-Printer -ConnectionName "\192.168.1.2Canon TS300 series" - Press Enter and the printer will be added.
Summary
Connecting to a shared printer in Windows 11 lets you print from any computer on your network without needing a printer nearby, saving money and offering convenience.
Does 🪟 Windows 11 allow printer sharing?
Printers installed on a Windows device can be shared with other Windows devices on the same network, allowing multiple users to print without installing the printer on each PC. To share a printer in Windows, the printer must be: Connected to a primary Windows device.
What is the difference between a network printer and a shared printer?
Typically the printer in this case is shared and you would be connecting to a shared printer “through” another device. A Network printer connection is a little different in that you are connecting to a printer through another device, like a print server.
What is 0x00000709 shared printer 🪟 Windows 11?
Error 0x00000709 in Windows 11 usually comes from a corrupted default printer entry in the registry. Open regedit and go to 🗝️HKEY_CURRENT_USER\Software\Microsoft\Windows NT\CurrentVersion\Windows , then clear or correct the Device value to match the shared printer name.
Was this guide helpful?

About the Author
Richard
Tech Writer, IT Professional
Richard, a writer for Geek Rewind, is a tech enthusiast who loves breaking down complex IT topics into simple, easy-to-understand ideas. With years of hands-on experience in system administration and enterprise IT operations, he’s developed a knack for offering practical tips and solutions. Richard aims to make technology more accessible and actionable. He's deeply committed to the Geek Rewind community, always ready to answer questions and engage in discussions.


No comments yet — be the first to share your thoughts!