

Windows 11 automatically saves “restore points.” Think of them as snapshots of your computer’s settings and system. They help you fix problems by going back to a time when your computer was working well. By default, Windows creates just one restore point every 24 hours.
In this guide, you’ll learn how to change how often Windows makes these restore points. You can have more or fewer, depending on what you want.
What is a Restore Point?
A restore point is like taking a snapshot of your computer’s important files and settings at a certain time. If something goes wrong later — like after installing a new program — you can use a restore point to put your computer back to that earlier, working condition.
How Often Does Windows Create Restore Points?
Windows will create a restore point automatically if it hasn’t made one in the last 24 hours. This happens only when system protection is turned on for your drive (usually the C: drive).
You can change this time to make Windows create restore points more often. Or you can set it so Windows creates one every time something changes on your computer.
How to Change How Often Windows 11 Makes Restore Points
Important: You will be changing the Windows Registry. This is a part of Windows that controls important settings. Please follow these steps carefully. It’s a good idea to back up your registry first, just in case.
Step 1: Open the Registry Editor
- Press
Win + Ron your keyboard. This opens the Run box. - Type
regeditand press Enter. - [ADMIN REQUIRED] If Windows asks for permission, click Yes.
Need help? See this guide: How to Open Registry Editor in Windows 11.
Step 2: Find the SystemRestore Folder
In the Registry Editor window, go to this path:
HKEY_LOCAL_MACHINE\SOFTWARE\Microsoft\Windows NT\CurrentVersion\SystemRestore
If you don’t see the SystemRestore folder, follow these steps:
- Right-click on the CurrentVersion folder.
- Select New > Key.
- Name the new folder:
SystemRestore.

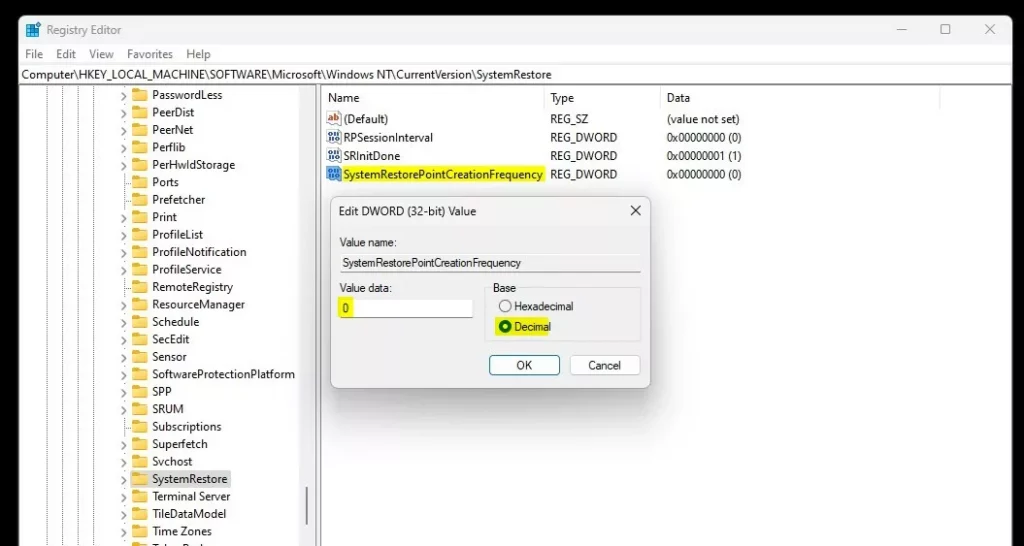
Step 3: Create or Change the Frequency Setting
- Click on the SystemRestore folder.
- On the right side, right-click in the empty space and choose New > DWORD (32-bit) Value.
- Name the new value:
SystemRestorePointCreationFrequency. - Double-click the new value you just made.
- In the box for Value data, enter how many minutes you want between restore points.
For example:
- 0 means Windows will try to create a restore point every time it can (never skip).
- 1440 means Windows will make one restore point every 24 hours (this is the default).
Step 4: Save and Restart Your PC
- Click OK to save your changes.
- Close the Registry Editor.
- Restart your computer to make the new setting take effect.
Summary
You can control how often Windows 11 makes restore points by changing the SystemRestorePointCreationFrequency value in the Registry.
- Setting the value to 0 means Windows will create restore points every time it tries, without skipping.
- You can choose any number of minutes that works best for you.
Want to learn more? Check out the official Microsoft info here: Microsoft Restore Point Info.
Need Help or Want to Share?
If you have questions or want to share your experience, leave a comment below — we’re here to help!


Leave a Reply Cancel reply