How to Add or Remove Default Desktop Icons in Windows 11
Want to tidy up your Windows 11 desktop or make your favorite shortcuts more accessible? You can add or remove default icons by adjusting your desktop icon settings, allowing you to customize your desktop for better efficiency.
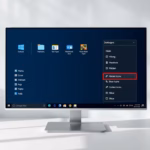
Go to Settings > Personalization > Themes > Desktop icon settings. Check boxes to add icons like This PC and Recycle Bin, or uncheck them to remove them from your desktop. Click OK to apply changes.
Desktop icons are like shortcuts to important system tools and folders, such as ‘This PC,’ ‘Recycle Bin,’ ‘Network,’ and ‘User’s Files.’ Windows 11 offers control over which of these pre-defined icons appear on your desktop. For instance, Windows 11 typically displays the Recycle Bin by default. You can add or remove this and other system icons through the Personalization settings.
Personalizing your desktop helps create a cleaner look or keeps your most-used shortcuts right where you need them.
- This PC: Lets you see your hard drives and other connected devices.
- Recycle Bin: Where deleted files go before you permanently remove them.
- Network: Shows other computers and devices on your network.
- User’s Files: A quick link to your personal folders like Documents or Pictures.
Ready to change them? Here’s how:
Open Desktop Icon Settings
To change your Windows 11 desktop icons, you’ll first need to open the correct settings menu.
In the Settings window, find and click on Personalization. After that, select Themes.
Tip: You can also open Settings quickly by pressing the Windows key + I. Then, type “Themes” in the search box at the top and select “Themes & related settings.”
Choose Your Icons
Inside the Themes settings, find and click on ‘Desktop icon settings’ to open a window where you can choose which icons appear on your Windows 11 desktop.
A new window will open. It shows a list of common desktop icons like This PC, User’s Files, Network, and Recycle Bin. You will see checkboxes next to each one.
To add an icon to your desktop, check the box next to it. To remove an icon, uncheck the box.
Confirm Your Choices
After you have picked the icons you want, click the OK button at the bottom of the Desktop icon settings window.
Your desktop will update immediately to show only the icons you selected.
A Note About Themes
You might see a setting that lets themes change your desktop icons; if you uncheck this, your chosen icons won’t change when you switch themes in Windows 11.
If you switch your desktop theme later, Windows might automatically revert your main desktop icons to match the new theme’s defaults.
If you prefer your selected icons to remain unchanged, consider unchecking this box. This way, your icon setup won’t change when you switch themes.
Summary
Making your Windows 11 desktop personal with the icons you use most can make your computer feel more efficient and enjoyable.
How do I add or remove desktop icons in 🪟 Windows 11?
To add or remove default desktop icons in Windows 11, go to Settings > Personalization > Themes > Desktop icon settings. From there, you can check or uncheck boxes next to icons like This PC, Recycle Bin, Network, and User's Files to show or hide them on your desktop.
How do I remove icons from my desktop without deleting them?
You can remove icons from your Windows 11 desktop without deleting the associated files or programs by adjusting desktop icon settings. Navigate to Settings > Personalization > Themes > Desktop icon settings and uncheck the icons you wish to hide. They will be removed from view but remain accessible.
How to get rid of all icons on desktop?
To remove all icons from your Windows 11 desktop, go to Settings > Personalization > Themes > Desktop icon settings. Uncheck all the available default icons (This PC, Recycle Bin, Network, User's Files). This will clear your desktop of all system icons, providing a clean view.
How to reset desktop icons to default in 🪟 Windows 11?
To reset desktop icons to their default in Windows 11, open Settings > Personalization > Themes > Desktop icon settings. Ensure that the default icons like This PC, Recycle Bin, Network, and User's Files are checked. Click Apply and OK to restore them to their original state.
Was this guide helpful?

About the Author
Richard
Tech Writer, IT Professional
Richard, a writer for Geek Rewind, is a tech enthusiast who loves breaking down complex IT topics into simple, easy-to-understand ideas. With years of hands-on experience in system administration and enterprise IT operations, he’s developed a knack for offering practical tips and solutions. Richard aims to make technology more accessible and actionable. He's deeply committed to the Geek Rewind community, always ready to answer questions and engage in discussions.


No comments yet — be the first to share your thoughts!