How to Add or Remove Bluetooth Notification Icon on Taskbar in Windows 11
Here’s how to add or remove the Bluetooth notification icon from your taskbar in Windows 11.
You can add or remove the Bluetooth icon by right-clicking it on the taskbar and selecting “Remove Icon,” or by going to Settings > Bluetooth & devices > Devices > More Bluetooth settings and toggling the “Show the Bluetooth icon” option.
What is Bluetooth?
Bluetooth is a wireless tech that lets your computer connect to other devices without needing any cables.
- Mobile phones
- Wireless headsets
- Speakers
- Fitness trackers
- Mouse and keyboard
The Bluetooth icon shows up in your taskbar corner when it’s on, and disappears when you turn it off.
Option 1Remove the Icon Quickly
- Look for the Bluetooth icon in the taskbar corner (bottom right of your screen).
- Click on the Bluetooth icon.
- Click on Remove Icon.
Option 2Add or Remove the Icon Using Settings
Adding or removing the Bluetooth icon from your Windows 11 taskbar is easy using the Settings app. You just need to find the right option within the Bluetooth settings to show or hide the icon.- Open Settings by pressing ⊞ Win+I on your keyboard.
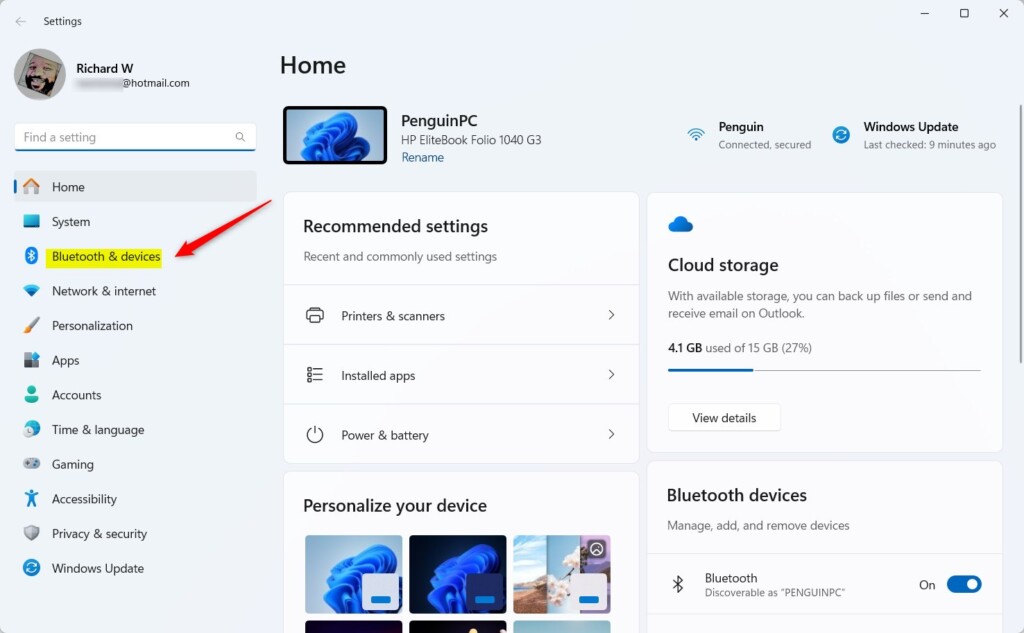
- Click on Bluetooth & devices on the left side.
- Click on Devices on the right side.
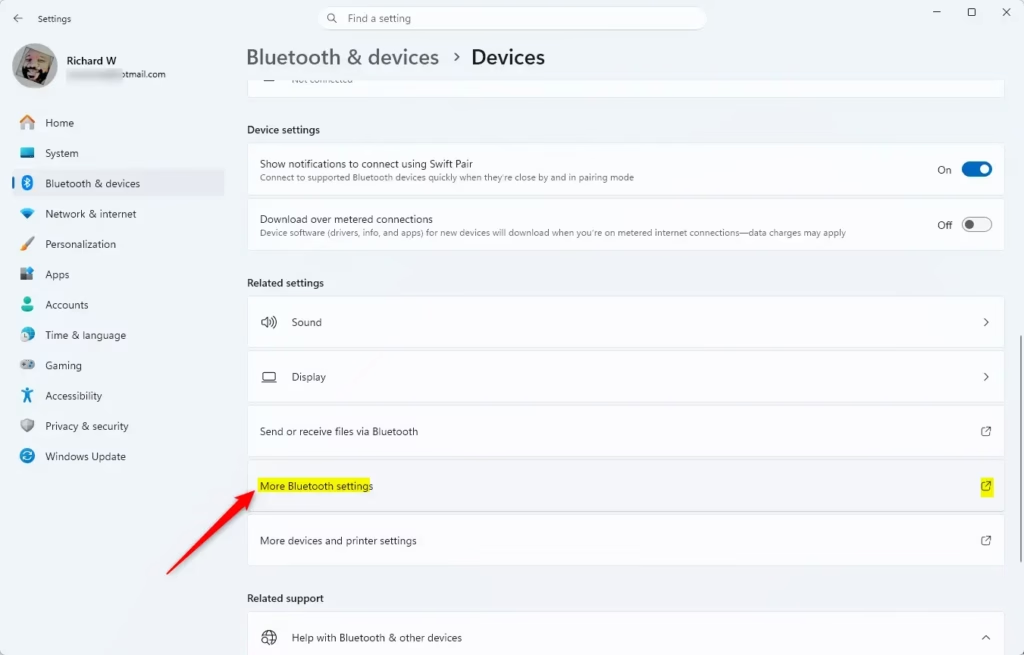
- Click on More Bluetooth settings under Related settings.
- In the Options tab, check the box next to Show the Bluetooth icon in the notification area to add the icon. Uncheck it to remove the icon.
- Click OK.
- You can now close Settings.
Option 3Add or Remove the Icon Using Registry Editor
⚠️ Admin privileges required
To add the Bluetooth icon:
reg add "HKEY_CURRENT_USER\Control Panel\Bluetooth" /v "Notification Area Icon" /t REG_DWORD /d 1 /fTo remove the Bluetooth icon:
reg add "HKEY_CURRENT_USER\Control Panel\Bluetooth" /v "Notification Area Icon" /t REG_DWORD /d 0 /fSummary
You’ve learned how to manage the Bluetooth icon on your Windows 11 taskbar using different methods.
How do I show the Bluetooth icon on my taskbar?
You’ll get this popup. Then, you can click ‘Show the Bluetooth icon in the notification area,’ press Apply, and then OK. You’ll see the icon is now being shown.
Why has Bluetooth disappeared from my taskbar?
This issue can occur for several reasons, including incorrect Bluetooth settings, outdated or incompatible drivers, stopped system services, hardware malfunctions, or problems from recent Windows updates.
Was this guide helpful?

About the Author
Richard
Tech Writer, IT Professional
Richard, a writer for Geek Rewind, is a tech enthusiast who loves breaking down complex IT topics into simple, easy-to-understand ideas. With years of hands-on experience in system administration and enterprise IT operations, he’s developed a knack for offering practical tips and solutions. Richard aims to make technology more accessible and actionable. He's deeply committed to the Geek Rewind community, always ready to answer questions and engage in discussions.


No comments yet — be the first to share your thoughts!