This brief tutorial shows students and new users how to install a scanner in Windows 10.
Adding a scanner in Windows 10 is a great way to scan physical documents, such as receipts, contracts, or photos, and make them available in a digital format. Doing so lets you store important information on your computer or in the cloud, making it easier to access, search, and share.
Additionally, having a scanner connected to your computer allows you to digitize documents quickly and easily, reducing the amount of paper clutter in your workspace.
When you connect a scanner to your device or add a new scanner to your home network, you can usually start scanning pictures and documents immediately.
If you add a scanner and it doesn’t work automatically, simply follow the steps
To get started, use the steps below:
Install | Add a local scanner
Today, adding a scanner to a Windows computer is very easy. In most cases, all you have to do to set up a scanner is to connect it to your computer.
Plug the USB cable from your scanner into an available USB port on your computer, and turn the scanner on. Windows should automatically install the scanner drivers and configure them to work.
If that doesn’t work, here’s a way to do it manually.
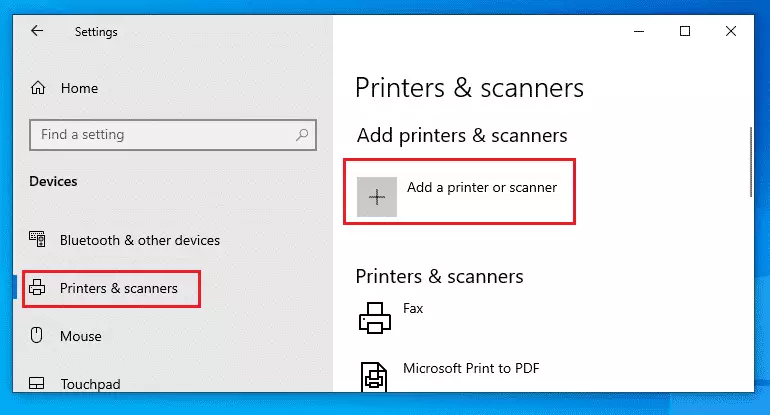
- Select Start > Settings > Devices > Printers & scanners, or use the following button.
- Select Add a printer or scanner. Please wait for it to find nearby scanners, choose the one you want to use from the list, and select Add device.

Add a Network | Wireless scanner
Some scanners are wireless-enabled and work over wireless connections.
If your scanner is connected to the network via wired or Wi-Fi and is turned on, Windows should also find it automatically.
Windows can find all available scanners on a network, such as Bluetooth and wireless scanners or scanners plugged into another device and shared on the network.
Here’s a way to do it manually.
- Select Start > Settings > Devices > Printers & scanners, or use the following button.
- Select Add a printer or scanner. Please wait for it to find nearby scanners, choose the one you want to use, and select Add device.
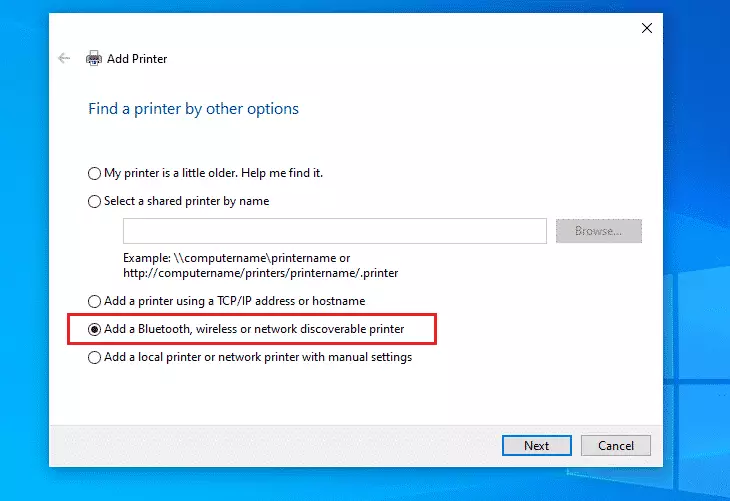
If your scanner isn’t on the list, select The printer I want isn’t listed, and then follow the instructions to add it manually.

You should be able to find a wireless or network printer when you follow the wizard above.
If the wireless scanner hasn’t been added to your home network, try reading the manual that came with the scanner to find help installing it in Windows.
It should also come with a driver CD or link to download the drivers from the manufacturer’s website.
Conclusion:
- Installing a scanner in Windows 10 is a straightforward process, allowing for efficient digitization of documents.
- A connected scanner simplifies document management by reducing paper clutter and enabling easy storage in digital formats.
- Both local and wireless scanners can be added with minimal effort, either automatically or manually, based on the user’s needs.
- Accessing and utilizing advanced features may require consulting the scanner’s manual or manufacturer’s website for additional support and driver installation.
- Regularly updating your scanner software can ensure optimal performance and compatibility with Windows 10 features.


Leave a Reply