This article explains enabling or disabling the “Automatic Maintenance” feature in Windows 11.
Automatic Maintenance is a feature in Windows that allows the operating system to perform routine maintenance tasks such as software updates, disk optimization, and security scanning.
This Maintenance will run daily at 2 AM if you aren’t using your computer. This feature is designed to run in the background, so it doesn’t interfere with your work or other activities.
You can change the default run time or manually trigger it to start. The Automatic Maintenance feature is enabled by default in Windows, but you can disable it if you prefer not to have it enabled.
Enabling or disabling the Automatic Maintenance feature in Windows 11 can be useful to avoid interruptions while working on your computer; you may choose to disable the Automatic Maintenance feature.
On the other hand, if you want to ensure that your computer stays up-to-date with the latest security patches and performance improvements, you may choose to enable the Automatic Maintenance feature.
Disable or enable the Automatic Maintenance feature in Windows
As mentioned, users can enable or disable Windows’s “Automatic Maintenance” feature.
Here’s how to do it.
First, open Windows Registry Editor.
Then, navigate to the registry key below.
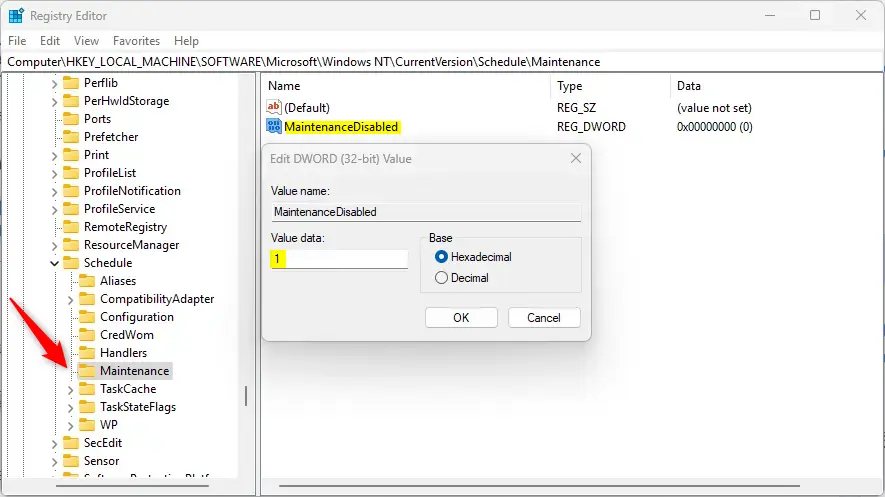
Computer\HKEY_LOCAL_MACHINE\SOFTWARE\Microsoft\Windows NT\CurrentVersion\Schedule\Maintenance
Next, double-click the MaintenanceDisabled (REG_DWORD) name on the Explorer key’s right pane to open it.
Then, enter a value 1 to disable using the “Automatic Maintenance” feature in Windows. When disabled, the daily scheduled Maintenance will not run, and users cannot manually trigger the Maintenance.
If you do not see the “MaintenanceDisabled” item, right-click a blank area and create a new DWORD (32-bit) registry item.
Then, enter the name “MaintenanceDisabled” and enter 1 to disable it.

To restore the default behavior and allow automatic maintenance, delete the “MaintenanceDisabled” item that was created.
You may have to reboot your computer to apply the changes.
That should do it!
Conclusion:
- Enabling or disabling the Automatic Maintenance feature in Windows can help you manage interruptions while using your computer
- You can customize the default run time or manually trigger the Maintenance to suit your preferences
- Following the provided steps in the Windows Registry Editor will allow you to enable or disable the feature
- Remember to consider the impact of enabling or disabling Automatic Maintenance on your computer’s security and performance
- Feel free to share any feedback or additional tips in the comments section below to enhance the information provided


Leave a Reply Cancel reply