

This post shows students and new users how to create a bootable Ubuntu Linux USB drive to install Ubuntu Linux.
These days, you hardly see Ubuntu OS on installation CDs/DVDs. So, if you want to install your favorite operating system, you most likely will have to download its ISO image and boot your computer from it.
For new users and students, this process can be challenging. So, to make it easy, we’re writing this post to show you how to easily create Ubuntu bootable flash sticks using balenaEtcher bootable flash disk creator.
Etcher is a free and open-source program for flashing images to SD cards & USB drives and supports Windows, macOS, and Linux.
To get started with creating a bootable flash USB stick for Ubuntu, follow the steps below:
How to download balenaEtcher on Windows
This post uses a Windows computer to install balenaEtcher and create a bootable Ubuntu Linux USB drive.
Use the link below to download balenaEtcher for Windows.
https://www.balena.io/etcher/#download
Once the installation file is downloaded, double-click it and begin the installation wizard. Installing it should be pretty straightforward. Just accept the default settings and complete the wizard.
Once you’re done installing Etcher, head over and download the Ubuntu ISO image (Desktop / Server) you want to install. Then, please make your choice and download it.
https://www.ubuntu.com/download/desktop
Once you’ve installed balenaEtcher, continue below to create a bootable USB drive with the Ubuntu image.
How to flash Ubuntu ISO to a USB drive
Now that you have Etcher installed and an Ubuntu ISO image downloaded, open Etcher and flash the image file to your USB stick. Ubuntu desktop ISO images are enormous so you may want a USB stick of 8GB or larger.
Creating a bootable Ubuntu USB stick with Etcher is a pretty straightforward process. Follow the steps below to create one.
Insert the USB flash drive into the USB port on your computer and launch Etcher.
Then click on the Select Image button and locate your Ubuntu ISO file. By default, downloaded files using your web browsers are automatically saved in your Downloads folder.
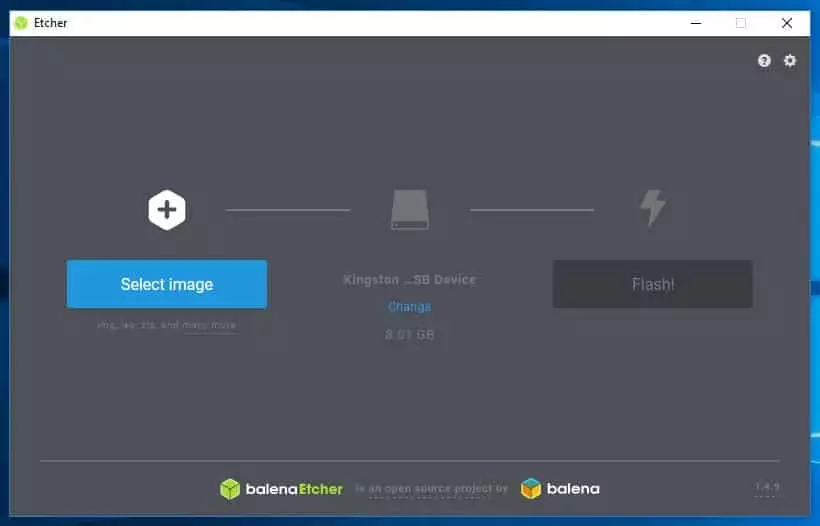
Etcher will autoselect the USB drive if only one drive is present. If you have more than one USB drive inserted, you may have to choose the correct one with Etcher.
After selecting the ISO image and choosing the USB drive, you must start the flashing process by clicking the Flash Image button.
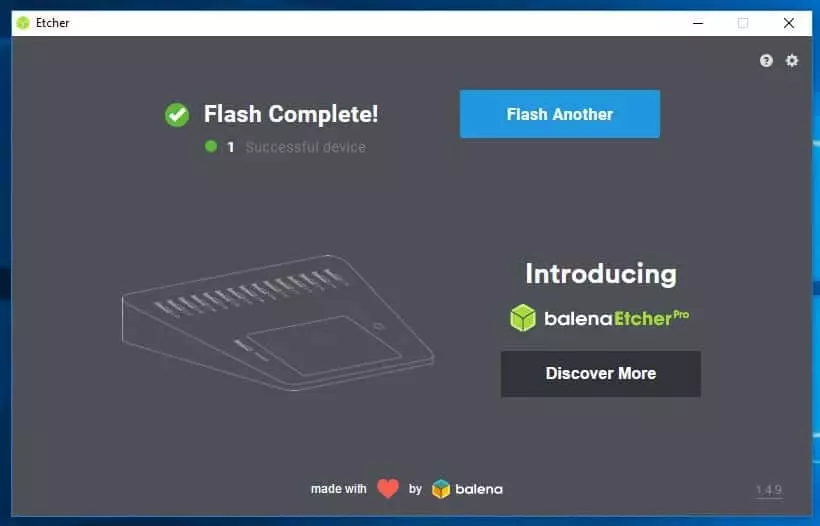
This process may take several minutes to complete, depending on the size of the ISO image and the speed of your computer. When the process is complete, click the X to close Etcher and remove the USB stick.
Use the USB stick to boot up the computer you want to install Ubuntu.
That’s it!
Conclusion:
This post showed you how to create a bootable Ubuntu Linux USB drive with balenaEtcher. Please use the comment form below if you find any errors above or have something to add.

Leave a Reply