
This post shows students and new users steps to locate and use the Documents folder in Windows 11.
The Documents folder is one of the default folders created for each user in Windows 11, and it is used as a default storage location for saved documents and personal data.
The Documents folder is essential, although not critical. It simply provides a unified storage location for saved documents and personal data, so you don’t look everywhere to find the content you saved on your computer.
When you create a new document with any application and click the save button, the document will automatically be saved in your Documents folder. This is the default behavior in Windows.
If you are an administrator, you can use folder redirection to modify or change the location of Documents to reside on a network share or another partition.
The Documents folder was previously known as My Documents in previous versions of Windows. In Windows 10 and 11, it is now known simply as Documents.
To find the Documents folder in Windows 11, follow the steps below.
How to locate the Documents folder in Windows 11
In Windows, the default location for the Documents folder in each user’s profile is C:\Users\<username>\Documents.
Replace <username> with your Windows account name. Windows also allows users to change documents or personal folders to a different location anytime.
Users can browse the Documents folder via File Explorer. The File Explorer icon is the button with the folder icon on the taskbar.
In File Explorer, the Documents folder has a shortcut in the navigation pane on the left under Quick access.
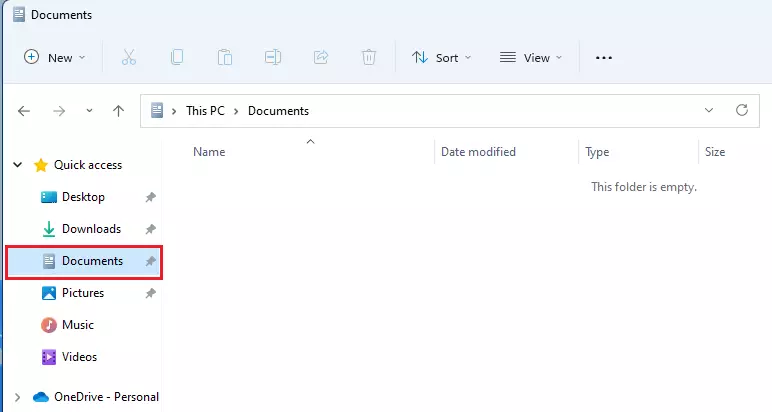
This is the quickest way to get to the Documents folder in Windows. One can also click the This PC ==> Local Disk (C:) ==> Users ==> <username> ==> Documents to get to the Documents folder.
Replacing <username> with your Windows account name.
Another way to quickly get to your Documents folder is via your user profile folder. Use the User Profile variable in your profile folder and find all folders in your home directory.
How to add the Documents folder on the Start menu in Windows 11
Windows also allows users to add Documents or other personal folders to the Start menu button for easy access.
To add the Documents folder to the Start menu, use the steps below:
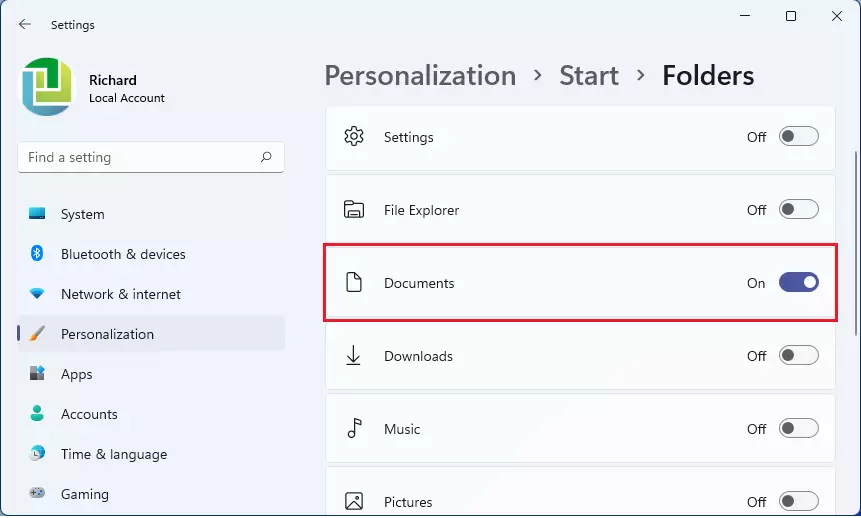
- Press the Windows key + I to bring up the Windows Settings app.
- Navigate to Personalization ==> Start tile, then under Folders, choose which folders appear on Start next to the Power button.
The Documents folder will appear on the Start menu next to the Power button.
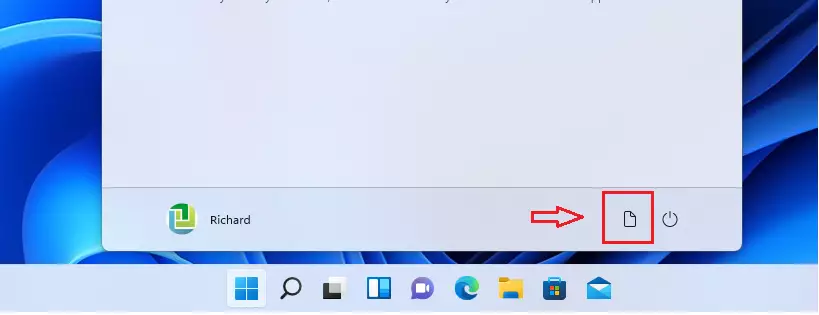
This is another quick way to access the Documents folder in Windows 11.
As mentioned above, one can move the Documents folder to other locations or change application settings to choose a different folder to save files and new content.
That should do it!
Conclusion:
- The Documents folder is a centralized location for saving and accessing personal data and documents in Windows 11.
- It is easily accessible through File Explorer and can be quickly located in the navigation pane.
- Users can add the Documents folder to the Start menu for enhanced accessibility.
- Administrative users can redirect the folder to a different location if necessary.
- Understanding how to navigate and utilize the Documents folder can streamline the storage and retrieval of important files in Windows 11.
Leave a Reply