
This article explains how to turn on or off reduced protections for agent connectors in Windows 11. Think of agent connectors as programs that help AI tools connect to your computer’s features and services.
Windows 11 build 26220.7344 added built-in support for the Model Context Protocol (MCP). Windows Settings Anthropic created this open standard in late 2024. It lets AI agents link up with outside tools, data, and services.
Why Should You Care?
By default, all agent connectors on your Windows computer run in a safe, protected mode. Each one has its own identity and keeps track of what it does. When you enable reduced protections, these connectors get more access and power to do their jobs.
Method 1: Using the Settings App
Step 1: Open Settings
Click the Start menu and select Settings. Or press Windows key + I on your keyboard. This launches the Settings app app.
Step 2: Go to System Settings
When Settings opens, click System on the left side. On the right, find and click the Advanced tile to expand it.
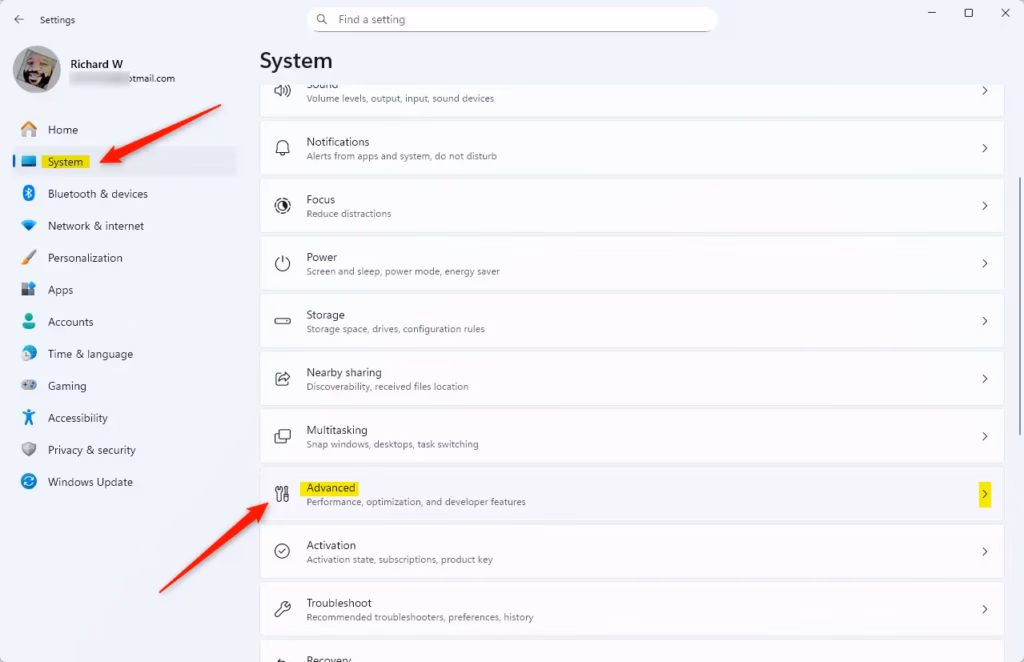
Step 3: Find AI Components
Look for the AI components section. You’ll see an option that says “Enable more agent connectors by reducing protections.”
Step 4: Toggle the Switch
Toggle this switch on to enable reduced protections. Toggle it off to disable them. That’s all you need to do!
Method 2: Using the Windows Registry
Another way to control this feature is through the Windows Registry. Windows Registry Editor This method is more technical.
Important: Back Up First
Before making any changes to the registry, back up your registry your system. You can also create a System Restore point as extra protection.
Step 1: Open Registry Editor
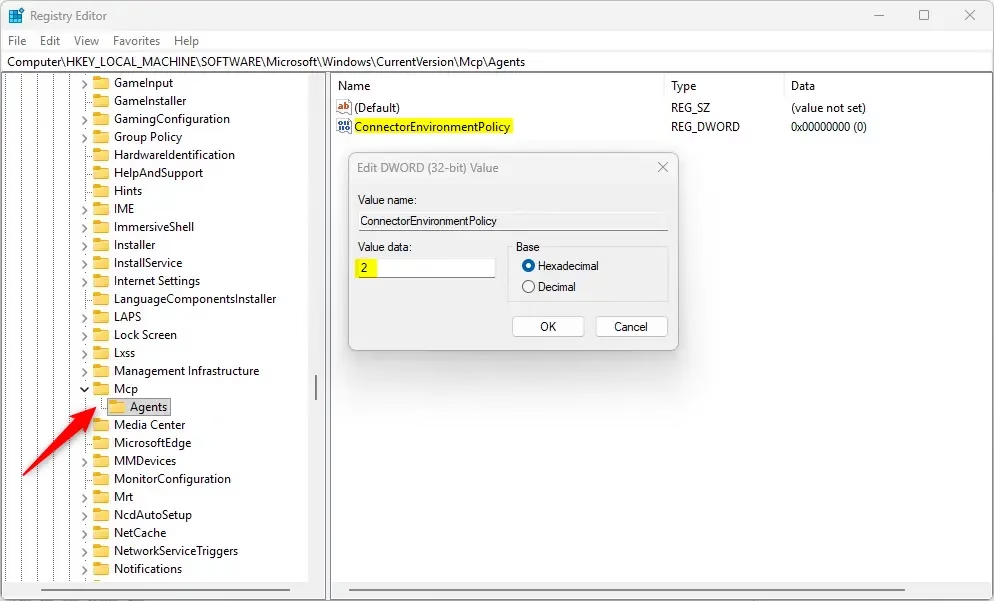
Open the Windows Registry and go to this location:
Computer\HKEY_LOCAL_MACHINE\SOFTWARE\Microsoft\Windows\CurrentVersion\Mcp\AgentsStep 2: Create a New Value
Right-click on Agents. Select New, then click DWORD (32-bit) Value. Name this new value ConnectorEnvironmentPolicy.
Step 3: Set the Value
Double-click the new ConnectorEnvironmentPolicy entry. Set the value to:
2to enable reduced protections for all users1to disable reduced protections for all users
⚠️ Admin Privileges Required: This method requires administrator access to your computer.
Step 4: Restart Your Computer
You may need to restart your computer for the changes to take effect.
What Happens When You Change This Setting?
When you enable reduced protections, agent connectors get more power and access. This means they can do more tasks and connect to more of your system. However, this also means less security control over what they can do.
When you disable reduced protections (the default), connectors run safely. Each one stays separate and keeps its own audit trail. This is the safest option.
Summary
You can control agent connector protections in Windows 11 using two methods. The easiest way is through the Settings app. The more technical way uses the Windows Registry. By default, protections are on for safety. Turning off protections gives connectors more power but less security. Always understand what you’re changing before you make registry edits. For the latest information, check Microsoft on Microsoft’s official website.


Leave a Reply Cancel reply