This brief tutorial shows students and new users how to install the Koel streaming server on Ubuntu 16.04 and 18.04 LTS servers and desktops easily.
Koel is an open-source, personal web media streamer based on Vue on the client side and powered by Laravel. It allows you to stream your music and provide ubiquitous access to your music files anywhere there’s an internet connection.
Koel is designed to handle extensive music collections and is optimized for MP3 streaming. It works with any media format streamed over HTTP / HTTPS, including AAC, OGG, WMA, FLAC, APE, etc.
For more about Koel, please check out its homepage.
When you’re ready, follow the steps below:
Install MariaDB Database Server
MariaDB database server is a great place to start when looking at open-source database servers to use with Koel. To install MariaDB, run the commands below.
sudo apt update
sudo apt-get install mariadb-server mariadb-client
After installing MariaDB, the commands below can stop, start, and enable the service to start when the server boots.
Run these on Ubuntu 16.04 LTS
sudo systemctl stop mysql.service
sudo systemctl start mysql.service
sudo systemctl enable mysql.service
Run these on Ubuntu 18.04 and 18.10 LTS
sudo systemctl stop mariadb.service
sudo systemctl start mariadb.service
sudo systemctl enable mariadb.service
After that, run the commands below to secure the MariaDB server by creating a root password and disallowing remote root access.
sudo mysql_secure_installation
When prompted, answer the questions below by following the guide.
- Enter current password for root (enter for none): Press the Enter
- Set root password? [Y/n]: Y
- New password: Enter password
- Re-enter new password: Repeat password
- Remove anonymous users? [Y/n]: Y
- Disallow root login remotely? [Y/n]: Y
- Remove test database and access to it? [Y/n]: Y
- Reload privilege tables now? [Y/n]: Y
Restart MariaDB server
Type the commands below to log on to the MariaDB server to test if MariaDB is installed.
sudo mysql -u root -p
Then, type the password you created above to sign on. If successful, you should see a MariaDB welcome message.

Create Koel Database
Once you’ve installed all the MariaDB required for Koel to function, continue below to create the Koel database and user. First, run the commands below to create a blank Koel database.
To log on to the MariaDB database server, run the commands below.
sudo mysql -u root -p
Then, create a database called koeldb
CREATE DATABASE koeldb;
Create a database user called koeluser with a new password
CREATE USER 'koeluser'@'localhost' IDENTIFIED BY 'new_password_here';
Then, grant the user full access to the database.
GRANT ALL ON koeldb.* TO 'koeluser'@'localhost' IDENTIFIED BY 'user_password_here' WITH GRANT OPTION;
Finally, save your changes and exit.
FLUSH PRIVILEGES;
EXIT;
Install PHP 7.2 / Node.js / Yarn
To quickly install Koel media streamer, you should use PHP Composer. The commands below show you how to install PHP Composer on Ubuntu.
First, run the commands below to install PHP 7.2 and related modules.
sudo apt update
sudo apt install php7.2 php7.2-cli php7.2-common php7.2-mbstring php7.2-xml php7.2-mysql php7.2-curl php7.2-zip
After installing PHP 7.2, run the commands below to install the composer.
sudo apt install curl git
curl -sS https://getcomposer.org/installer | sudo php -- --install-dir=/usr/local/bin --filename=composer
Install Node.js and Yarn
You’ll also need Node.js and Yarn to get Koel working. To install both, run the commands below:
curl -sL https://deb.nodesource.com/setup_8.x | sudo -E bash -
sudo apt install -y nodejs
First, run the commands below to add Yarn’s repository key.
curl -sS https://dl.yarnpkg.com/debian/pubkey.gpg | sudo apt-key add -
After that, run the commands below to add Yarn’s repository to Ubuntu.
echo "deb https://dl.yarnpkg.com/debian/ stable main" | sudo tee /etc/apt/sources.list.d/yarn.list
When you’re done, run the commands below to install Yarn
sudo apt update
sudo apt install yarn
Download and Configure Koel
Now that the required packages are installed, follow the steps below to install Koel. First, you’ll need to get the latest from GitHub. To do that, run the commands below.
Then, run the commands below to download Koel’s latest version and install Koel in your home directory.
cd ~/
git clone https://github.com/phanan/koel
cd koel
git checkout -b v3.7.2
composer install
php artisan koel:init
When you run the last command above, you’ll be prompted to create and specify the database name and user account.
Koel cannot connect to the database. Let's set it up.

 Your DB driver of choice [MySQL/MariaDB]:
  [mysql     ] MySQL/MariaDB
  [pgsql     ] PostgreSQL
  [sqlsrv    ] SQL Server
  [sqlite-e2e] SQLite
 > mysql
 DB host: localhost
 DB port (leave empty for default) []:
 DB name: koeldb
 DB user: koeluser
 DB password: database_user_password
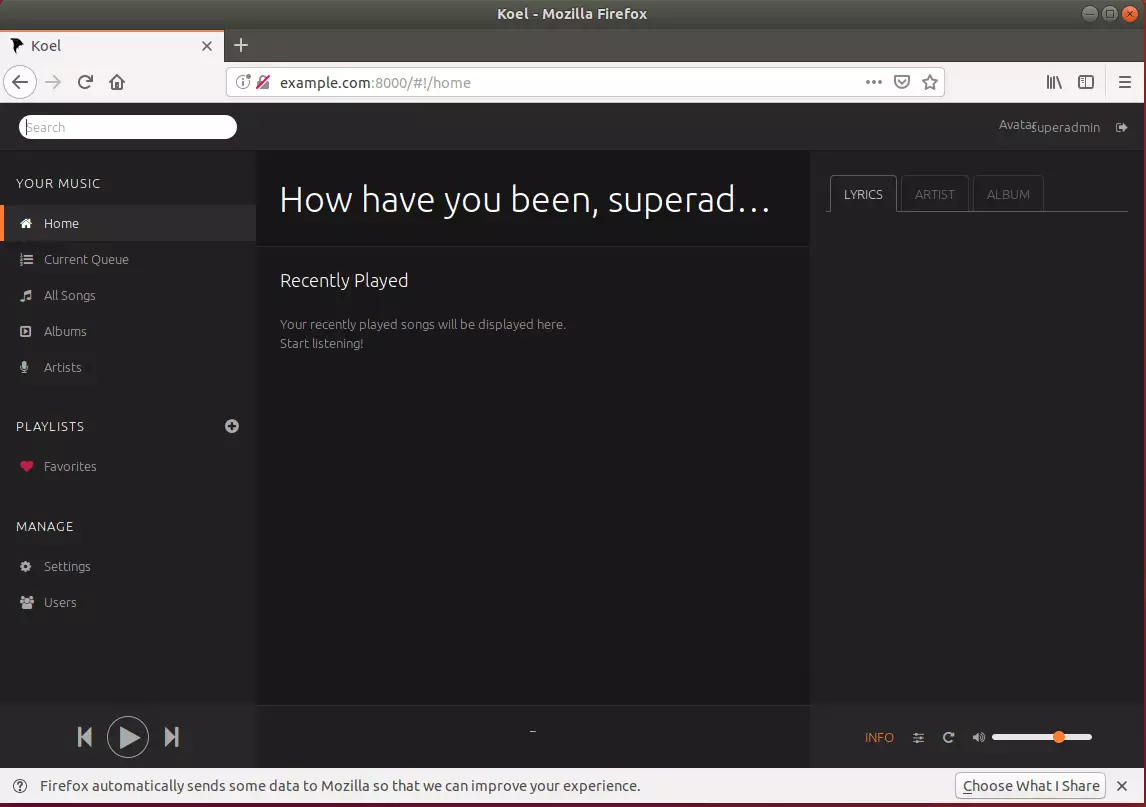
After that, you will again be prompted to create a Koel admin account.
Let's create the admin account.
 Your name [Koel Admin]: superadmin
 Your email address [admin@koel.com]: admin@example.com
 Your desired password:
 Again, just to make sure:
Seeding initial data
The absolute path to your media directory. If this is skipped (left blank) now, you can set it later via the web interface.
 Media path []:
Compiling front-end stuff
Finally, run the commands below to start the server:
php artisan serve
Open your browser and browse to the server name or IP address followed by port 8080
The server started on http://localhost:8000/
You should see the Koel login page.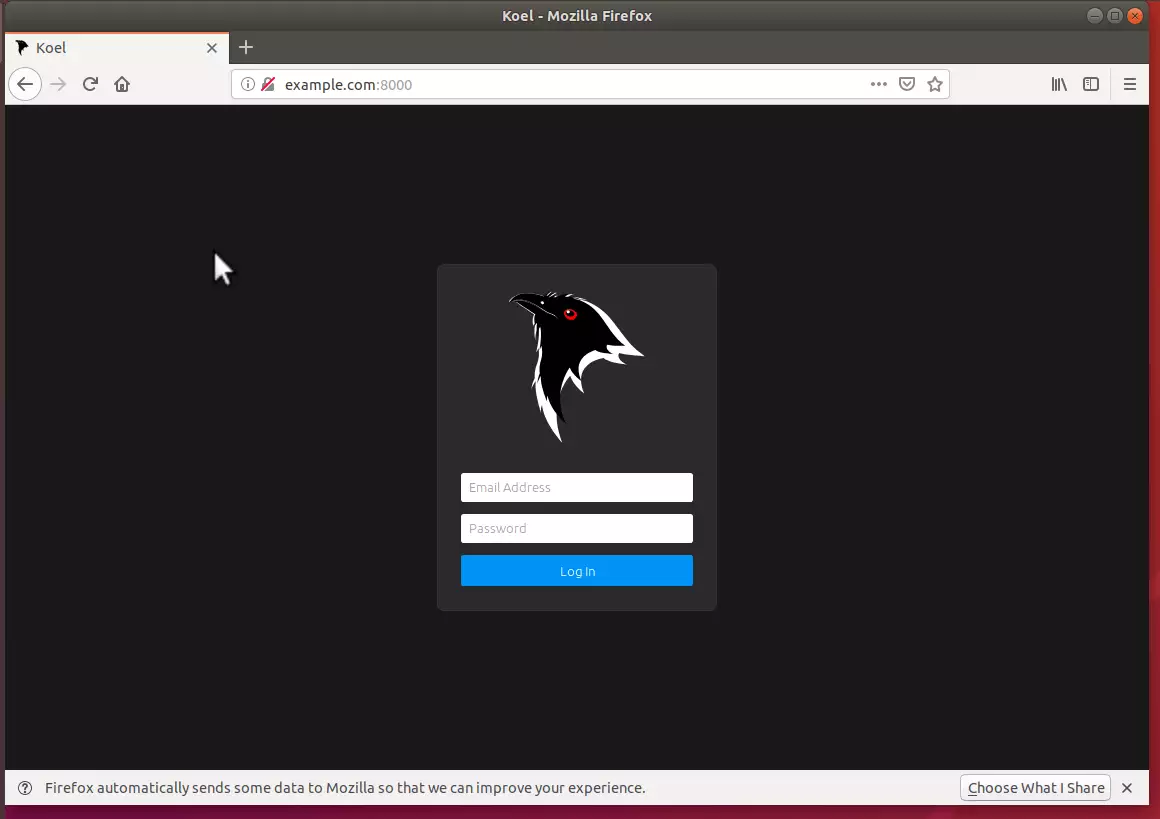
Enjoy!
You may also like the post below:

Leave a Reply Cancel reply