
Do you use Windows 11? You might want to control who can sign in with a Microsoft account on your computer. This guide shows you easy ways to turn Microsoft accounts on or off on your PC.
What is a Microsoft Account?
A Microsoft account is an online account you use to sign in to Windows. You can also use it to access Microsoft apps like Outlook, OneDrive, Skype, and Xbox Live. It syncs your settings and files across your devices.
Why would you want to block Microsoft accounts? On shared computers or work computers, you might want to stop people from adding new Microsoft accounts. Windows 11 gives you tools to do this.
You have two main ways to control Microsoft accounts:
- Local Security Policy Editor (easier method for managing your PC)
- Windows Registry Editor (advanced method for power users)
How to Enable or Disable Microsoft Accounts Using Local Security Policy
This is the simpler way to allow or block Microsoft accounts on your PC.
Steps:
- Press
Windows + Ron your keyboard. The Run box opens. - Type
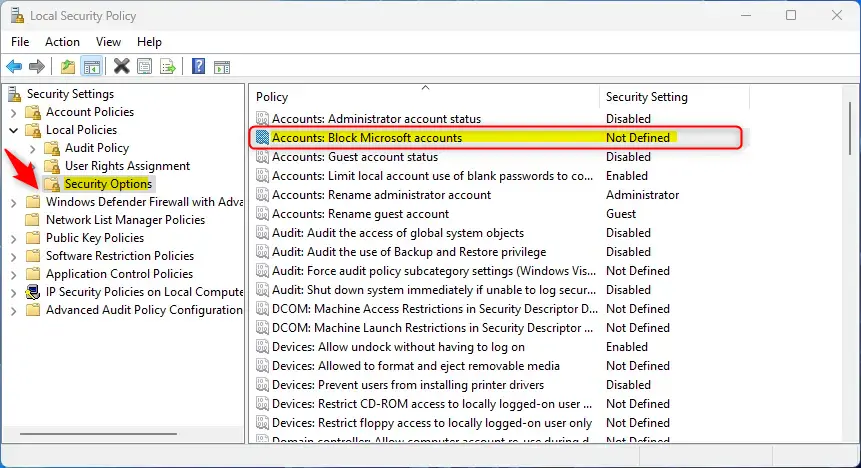
secpol.mscand press Enter. The Local Security Policy editor opens. - In the left panel, click Local Policies > Security Options.
- Find and double-click “Accounts: Block Microsoft accounts”.
- Choose one of these options:
- Disabled: Microsoft accounts work normally.
- Users can’t add Microsoft accounts: People cannot add new Microsoft accounts.
- Users can’t add or log on with Microsoft accounts: No one can use Microsoft accounts on this PC.
- Click OK to save your choice.
How to Allow or Block Microsoft Accounts Using the Registry Editor
This is a more advanced method. The Registry Editor lets you control Microsoft account access with direct settings. What happens when you edit the registry? Your PC will follow the new rules you set.
Steps:
- Press
Windows + R, typeregedit, and press Enter. The Registry Editor opens. - [ADMIN REQUIRED] Navigate to this location:
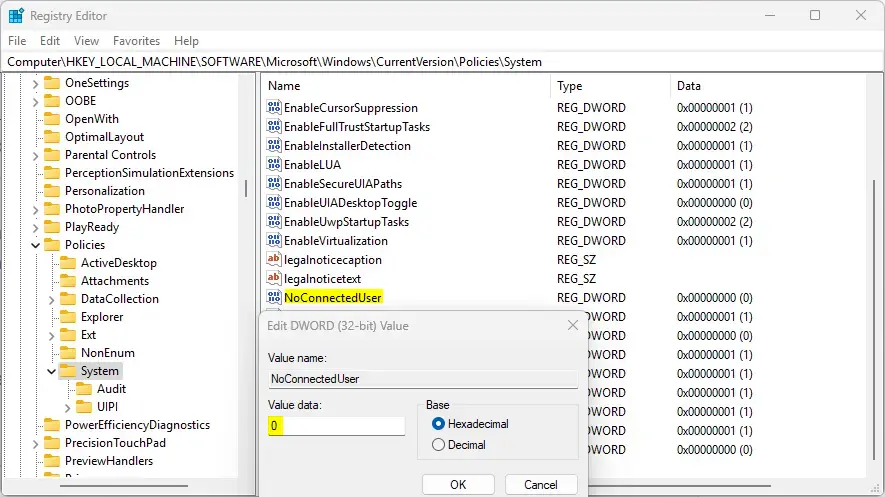
HKEY_LOCAL_MACHINE\SOFTWARE\Microsoft\Windows\CurrentVersion\Policies\System - Look for a value named NoConnectedUser in the right pane.
- If it is not there, right-click on a blank area. Choose New > DWORD (32-bit) Value. Name it NoConnectedUser.
- Double-click NoConnectedUser and set the value data to:
- 1 – Block adding new Microsoft accounts.
- 3 – Block adding and signing in with Microsoft accounts.
- To allow Microsoft accounts again, delete the NoConnectedUser entry.
- Click OK and close the Registry Editor.
Important: Editing the Registry can cause problems if done wrong. Please back up your PC before making any changes. Follow this guide if you want to learn how to safely back up your registry: How to Open the Registry in Windows 11.
Summary
- Microsoft accounts let you sign in and use many Microsoft services on Windows 11.
- You can block or allow Microsoft accounts using the Local Security Policy Editor or Registry Editor.
- The Local Security Policy Editor is easier. Use it to manage settings on a single PC or in your organization.
- The Registry Editor method is more advanced. Use it only if you are comfortable with system settings.
- Always back up your computer before changing system settings.
- By following these steps, you can control how Microsoft accounts are used on your Windows 11 PC.

Leave a Reply Cancel reply