How to Stop Installing Apps on Drives Other Than Your Main Windows Drive in Windows 11
In this guide, you’ll learn how to stop apps from being installed or moved to drives other than your main Windows drive (usually the C: drive) on Windows 11. This can help keep things organized and prevent apps from using space on other drives.
What Types of Apps Are There?
There are two common types of apps on Windows:
- Microsoft Store apps: These come from the Microsoft Store.
- Standalone apps: These are installed using a setup file from other websites or companies.
By default, Microsoft Store apps install on the C: drive (your main Windows drive). You can move these apps to other drives or choose where new apps install if you want.
If you’d like to learn more about moving apps or choosing where they install, check these guides:
How to Prevent Installing Apps on Other Drives
If you want to stop apps from being installed or moved to drives other than the main Windows drive, you can do this in two ways: using the Group Policy Editor or by changing the Registry.
Method 1Use Group Policy Editor (Easy Way)
Follow these steps to stop app installs on other drives using Group Policy:
- Click the Start button, type
Edit group policy, and open the Local Group Policy Editor. - In the left panel, go to:
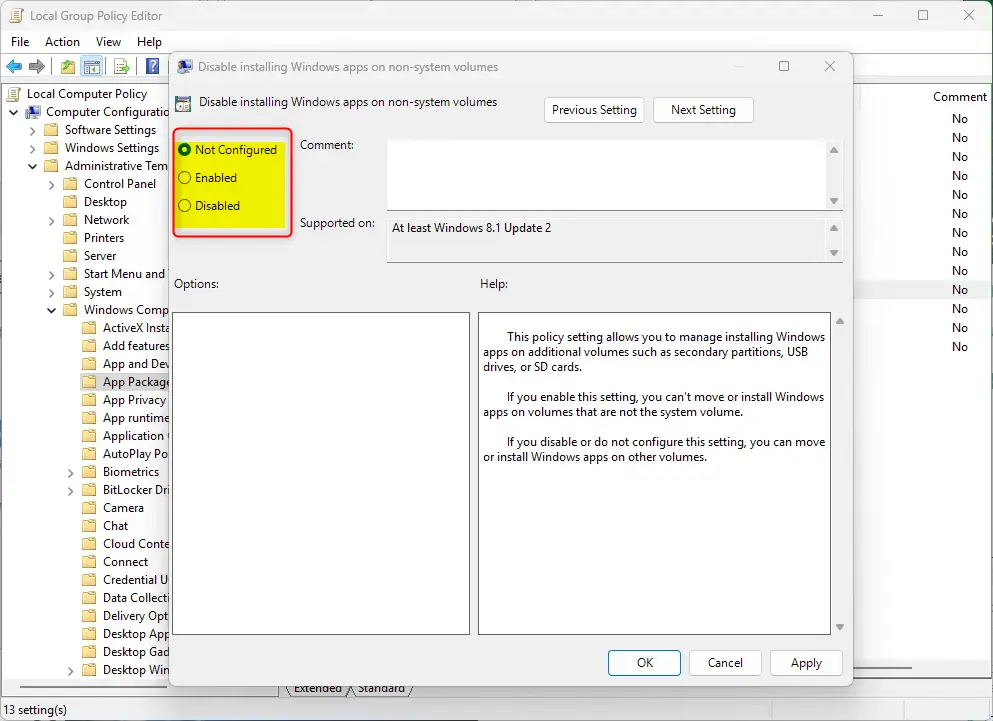
Computer Configuration > Administrative Templates > Windows Components > App Package Deployment - In the right panel, find “Disable installing Windows apps on non-system volumes” and double-click it.
- Choose Enabled to stop installing or moving apps to other drives.
- Click OK to save.
Here’s what the setting looks like:
What the options mean:
- Not Configured: Default. Allows apps to be installed on other drives.
- Enabled: Blocks installing or moving apps to drives other than the main Windows drive.
- Disabled: Allows installing or moving apps to other drives.
Method 2Use Registry Editor (More Advanced)
If you don’t have Group Policy Editor (common in Windows 11 Home), you can use the Registry Editor to do the same thing. Please be careful and follow these steps exactly.
Important: Before editing the registry, back up your registry or create a System Restore point. This keeps your system safe if something goes wrong.
- [ADMIN] Press
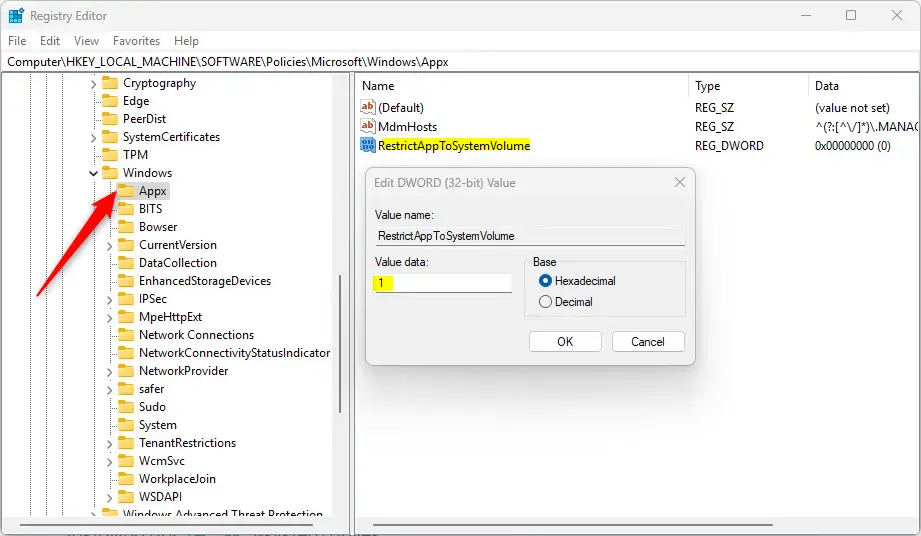
Windows + R, typeregedit, and press Enter to open Registry Editor. - Navigate to this key:
HKEY_LOCAL_MACHINE\SOFTWARE\Policies\Microsoft\Windows\Appx - If the Appx folder doesn’t exist, you can create it by right-clicking the Windows folder, choosing New > Key, and naming it Appx.
- Right-click the Appx folder, select New > DWORD (32-bit) Value, and name it RestrictAppToSystemVolume.
- Double-click RestrictAppToSystemVolume and set its value to 1 to block app installs on other drives.
- Click OK and close the Registry Editor.
- Restart your computer to apply the changes.
If you want to undo this setting later, just delete the RestrictAppToSystemVolume DWORD or set its value to 0.
Summary
- Windows apps can be from the Microsoft Store or installed with setup files.
- By default, apps install to your main Windows drive (C:), but you can move them or install to other drives.
- To stop apps from installing on other drives, you can use Group Policy Editor or Registry Editor.
- Group Policy is easier but may not be available on all Windows versions.
- Editing the registry works on all versions but requires care and backing up first.
- Restart your PC after making changes for them to work.
By following these simple steps, you can control where apps are installed on your Windows 11 computer and keep your drives organized!
Was this guide helpful?

About the Author
Richard
Tech Writer, IT Professional
Richard, a writer for Geek Rewind, is a tech enthusiast who loves breaking down complex IT topics into simple, easy-to-understand ideas. With years of hands-on experience in system administration and enterprise IT operations, he’s developed a knack for offering practical tips and solutions. Richard aims to make technology more accessible and actionable. He's deeply committed to the Geek Rewind community, always ready to answer questions and engage in discussions.

No comments yet — be the first to share your thoughts!