How To Optimize Windows 11 Performance: Speed Up Your PC
You can optimize Windows 11 performance to speed up your PC by disabling startup programs, managing background apps, and freeing up disk space.
Windows 11 performance optimization involves several straightforward steps that can significantly reduce lag and improve responsiveness. A common culprit for slow performance is unnecessary applications launching automatically when you start your computer.
Reducing the number of apps that run in the background also plays a crucial role. Many programs continue to consume resources even when you’re not actively using them. In fact, disabling just a few autostarting applications can often provide an immediate speed boost for your PC.
Furthermore, ensuring your hard drive has sufficient free space is vital. When your disk is nearly full, Windows struggles to manage temporary files and operations, leading to noticeable slowdowns.
To speed up your Windows 11 PC, first run Disk Cleanup by searching for it and selecting files to delete. Then, uninstall unused programs via Settings > Apps > Apps & Features. Finally, empty your Recycle Bin to permanently remove deleted files and free up space.
Why is My 🪟 Windows 11 PC Slow?
Several things can slow down your Windows 11 computer. Over time, temporary files pile up. Too many programs might launch automatically when you turn on your PC. Your hard drive could be getting full. Even outdated software or hardware can slow things down. Knowing these common problems is the first step to fixing them. We’ll look at each of these and more, giving you the tools to fix performance issues.
What Happens When You Optimize 🪟 Windows 11?
When you optimize Windows 11, you’re essentially cleaning and improving your system. This means removing files you don’t need, stopping programs you don’t use from running, and making sure your hardware and software are working well. The result? Your PC will start up faster. Apps will open and run more smoothly. Games will perform better. Overall, your computer will feel much quicker, making your daily tasks easier and more enjoyable.
Section 1: Cleaning Up Your System
1Disk Cleanup: Remove Temporary Files
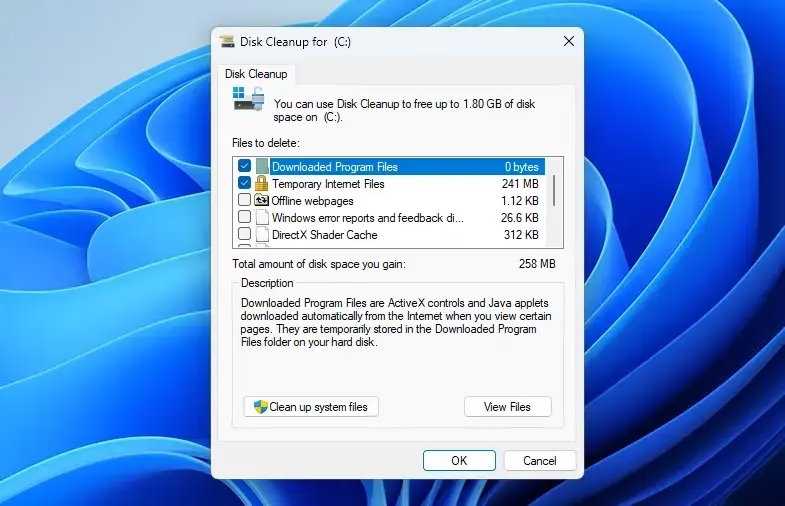
Over time, Windows creates temporary files. Programs and the system use these files. Many of these files aren’t needed after their job is done. They can take up a lot of space on your hard drive, which slows down your PC. Disk Cleanup is a tool built into Windows that finds and removes these unneeded files.
Why do this? To free up disk space and remove clutter that can slow down your system.
What happens when done? Your hard drive will have more free space, and your PC may run a bit faster because it has less data to sort through.
- In the Windows search bar, type “Disk Cleanup” and select the app from the results.
- Windows will ask you to choose a drive to clean. Usually, this is your C: drive. Click “OK”.
- Disk Cleanup will scan your drive and show you a list of files you can delete.
- Check the boxes next to the types of files you want to remove. Common ones include “Temporary Internet Files,” “Downloaded Program Files,” “ Recycle Bin,” and “Temporary files.”
- For a more complete cleanup, click the “Clean up system files” button. This will scan your drive again and show more options, like old Windows update files.
- After selecting the files, click “OK” and then “Delete Files” to confirm.
2Uninstall Unused Programs
Every program you install takes up space on your hard drive. Some programs also run in the background, using system resources, even when you’re not actively using them. If you have programs you no longer use, uninstalling them can free up space and reduce background activity.
Why do this? To get back disk space and reduce the number of programs that might be running in the background.
What happens when done? Your storage space will increase, and your PC might feel quicker because fewer apps are competing for resources.
- Right-click the Start button and select “Install apps or Apps and Features.”
- Scroll through the list of installed applications.
- Click on a program you no longer need.
- Select “Uninstall” and follow the instructions on the screen.
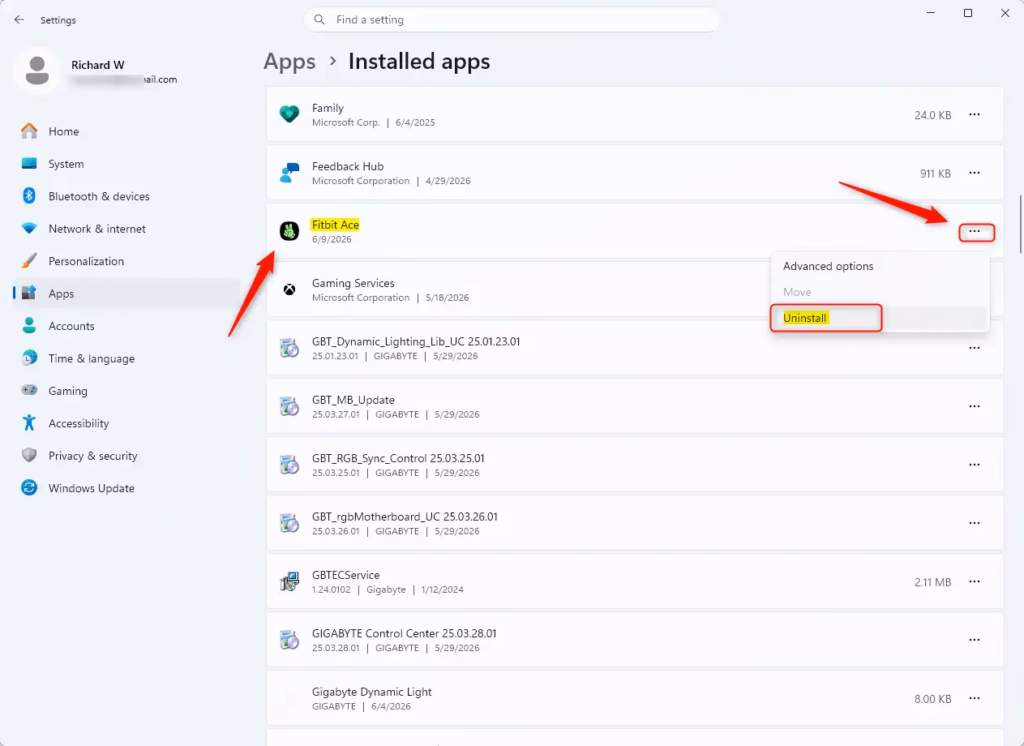
Tip: Be careful not to uninstall programs that are needed for Windows to run, like system components. If you’re not sure, it’s best to leave it installed.
3Empty the Recycle Bin
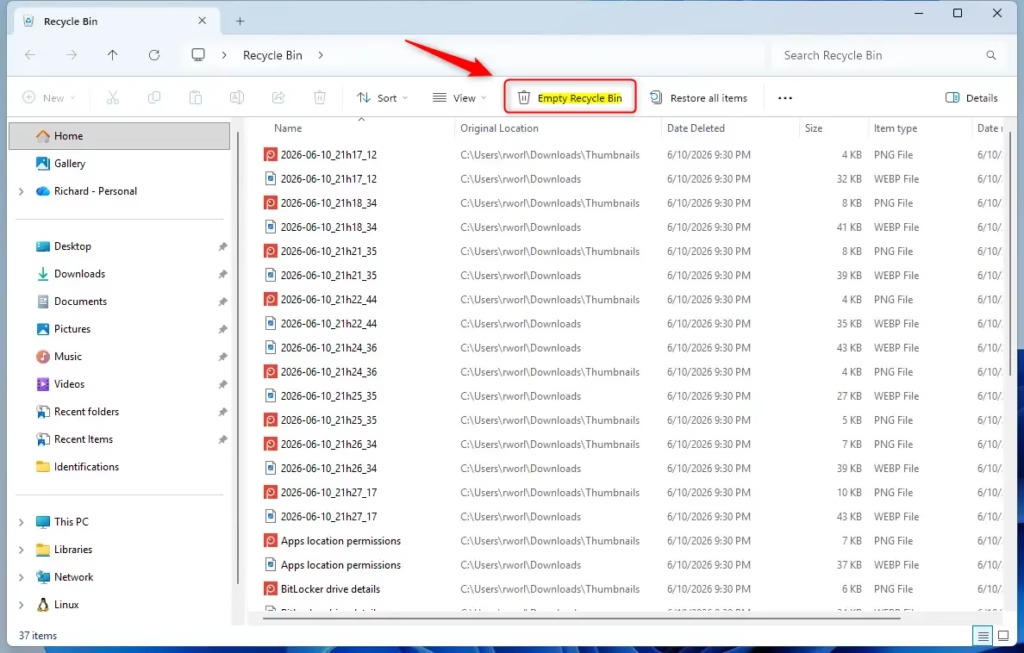
When you delete files, they don’t disappear right away. They go to the Recycle Bin. Files in the Recycle Bin still take up space on your hard drive. You need to empty it to remove them completely and free up that space.
Why do this? To permanently delete files you no longer need and get back the disk space they use.
What happens when done? The space used by deleted files is freed up on your hard drive.
- Find the “ Recycle Bin” icon on your desktop.
- Right-click on the Recycle Bin icon.
- Select “Empty Recycle Bin” from the menu that appears.
- Confirm by clicking “Yes” if asked.
Section 2: Managing Startup Programs
4Control Startup Apps
When you turn on your computer, many programs are set to start automatically. These are called startup applications. While some are needed (like antivirus software), many others are not. Too many startup apps can make your computer start up much slower and use system resources from the moment you log in.
Why do this? To make your computer start up faster and free up system resources.
What happens when done? Your PC will boot up much faster, and more RAM and CPU power will be available for the programs you actually want to use.
- Right-click the Start button and select “ Task Manager.”
- Click on the “Startup apps” tab on the left side.
- You will see a list of applications that start with Windows.
- For each application you want to stop from starting automatically, click on it and then click the “Disable” button at the top right.
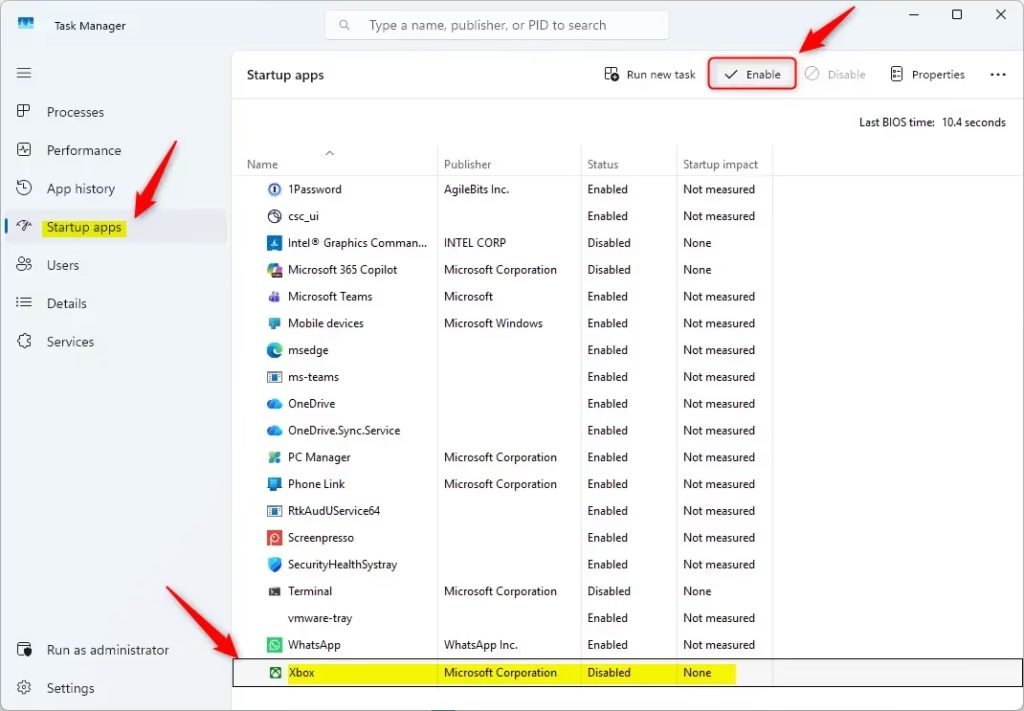
Important: Be careful about disabling important system services or your antivirus program. If you’re unsure, it’s best to leave it enabled.
Section 3: Optimizing Storage
5Free Up Space with Storage Sense
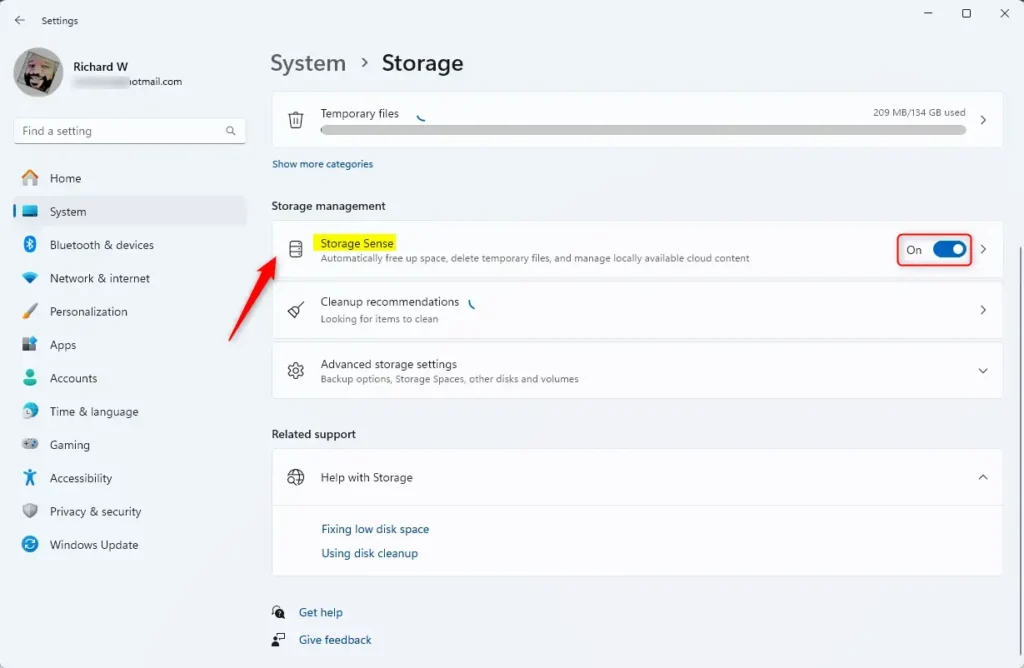
Storage Sense is a Windows 11 feature that automatically frees up space. It can delete temporary files, empty the Recycle Bin, and remove files from your Downloads folder if they haven’t been opened for a certain number of days. You can choose how often it runs and what it cleans.
Why do this? To automatically keep your hard drive clean and prevent it from filling up.
What happens when done? Your PC will keep more free disk space with little effort from you, helping to maintain consistent performance.
- Go to Settings (Windows key + I).
- Click on “System.”
- Click on “Storage.”
- Turn “Storage Sense” to “On.”
- Click on “Storage Sense” to change its settings. You can choose how often it runs (e.g., daily, weekly), when to delete files from your Recycle Bin, and when to delete files from your Downloads folder.
6Move Large Files to Another Drive or Cloud Storage
When your main drive, usually C:, gets nearly full, your PC can really slow down. Windows needs breathing room to function smoothly. Big files like videos, photos, or game installations eat up a lot of space. Consider moving them to a second internal drive, an external hard drive, or a cloud service like OneDrive, Google Drive, or Dropbox.
Why do this? To make sure your main drive has enough free space for Windows to run smoothly.
What happens when done? Your main drive will have more free space, improving how well the system works overall.
- Open File Explorer (Windows key + E).
- Go to the large files you want to move.
- Right-click on the file(s) or folder(s) and select “Cut” (or press Ctrl+X).
- Go to where you want to move them (another drive, external drive, or cloud sync folder).
- Right-click in the destination folder and select “Paste” (or press Ctrl+V).
Section 4: Visual Effects and Performance Settings
7Adjust Visual Effects for Performance
Windows 11 has many visual effects, like animations and shadows. These make the interface look nice, but they use system resources. You can turn off some of these effects to improve performance, especially on older or less powerful computers.
Why do this? To reduce the load on your CPU and graphics card by turning off fancy visual elements.
What happens when done? Your Windows interface might look less fancy, but it will feel much faster and more responsive.
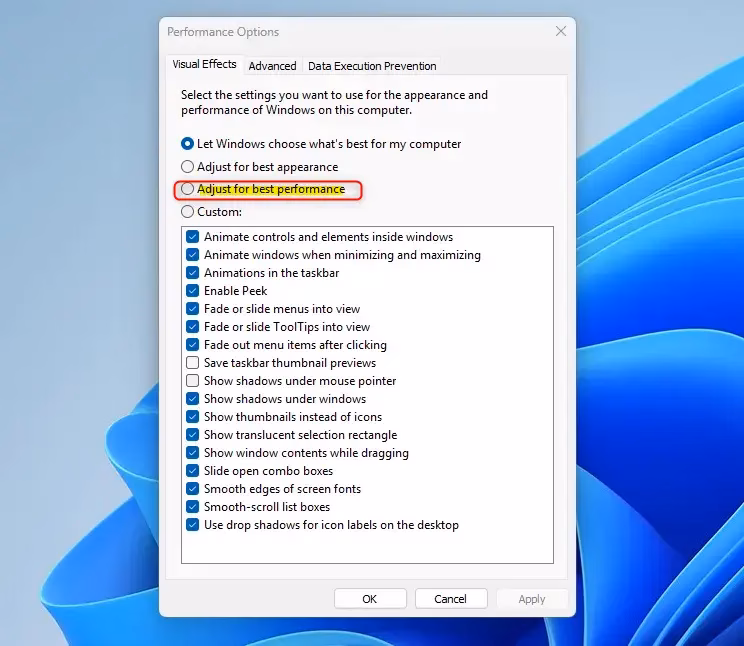
- In the Windows search bar, type “View advanced system settings” and select it.
- Under the “Performance” section, click the “Settings…” button.
- In the “Performance Options” window, select the “Adjust for best performance” option. This will turn off most visual effects.
- You can also select “Custom” and manually uncheck the effects you want to turn off .
- Click “Apply” and then “OK.”
8Enable Game Mode
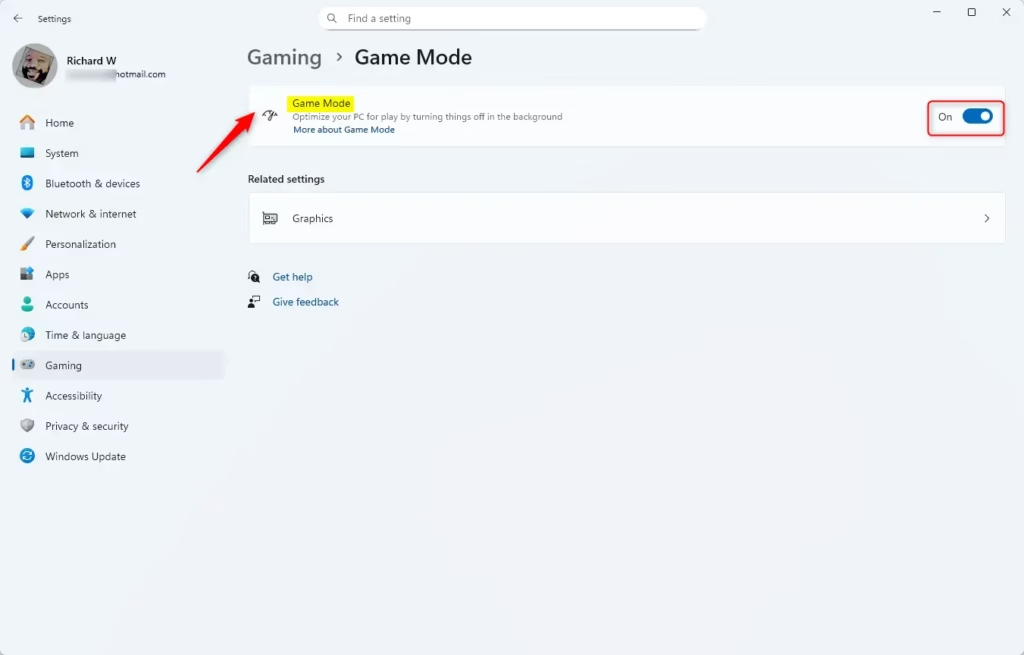
If you play games on your PC, Windows 11 has a feature called Game Mode. When turned on, it makes your game the priority by stopping background tasks and preventing Windows updates from installing while you’re playing. This can lead to smoother gameplay and better frame rates.
Why do this? To give your games the best possible performance by reducing interference from other system processes.
What happens when done? Games will run more smoothly with fewer interruptions, and your PC will give more resources to your gaming experience.
- Go to Settings (Windows key + I).
- Click on “Gaming.”
- Click on “Game Mode.”
- Turn “Game Mode” to “On.”
Section 5: Updates and Drivers
9Keep Windows Updated
Microsoft regularly releases updates for Windows. These updates often include improvements to performance, fixes for bugs, and better security. Keeping your system up-to-date is important for the best performance and stability.
Why do this? To make sure your system has the latest performance improvements, security patches, and bug fixes.
What happens when done? Your PC will be more stable, secure, and possibly faster due to the improvements included.
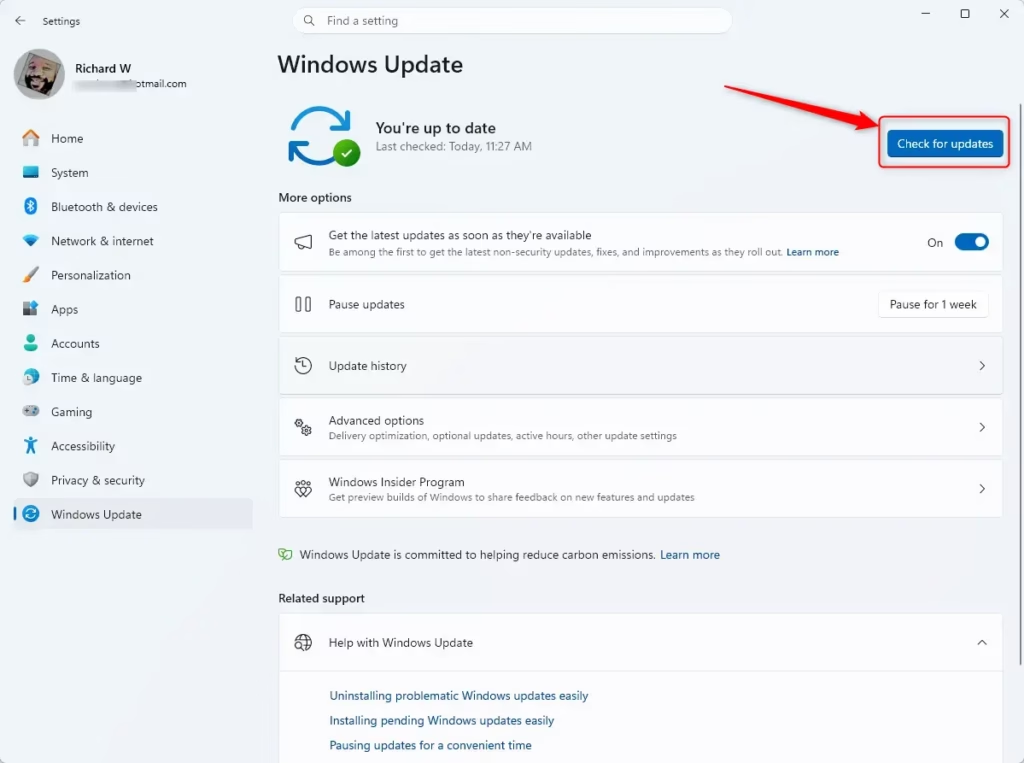
- Go to Settings (Windows key + I).
- Click on “ Windows Update.”
- Click “ Check for updates.”
- If updates are available, Windows will download and install them. You may need to restart your PC to finish the installation.
10Update Your Drivers
Drivers are software that allow your hardware (like your graphics card, network adapter, and sound card) to communicate with Windows. Old or broken drivers can cause performance problems, instability, and even stop hardware from working correctly. Updating your drivers, especially for your graphics card, can greatly improve performance, particularly in games and apps that use a lot of graphics.
Why do this? To make sure your hardware parts are working well with Windows, leading to better performance and stability.
What happens when done? Your hardware will work more reliably, and you may see noticeable improvements in speed and responsiveness, especially for tasks that use a lot of graphics.
For Graphics Drivers (NVIDIA, AMD, Intel):
- Go to the manufacturer’s website (NVIDIA, AMD, or Intel).
- Go to their support or driver download section.
- Find your graphics card model and operating system (Windows 11).
- Download the latest driver.
- Run the downloaded installer and follow the instructions on the screen. A clean installation is often recommended.
For Other Drivers (Device Manager):
- Right-click the Start button and select “Device Manager.”
- Expand the categories (e.g., “Display adapters,” “Network adapters”).
- Right-click on a specific device and select “Update driver.”
- Choose “Search automatically for drivers.” Windows will try to find and install the best available driver.
If Windows cannot find a newer driver, you might need to visit the hardware maker’s website for your motherboard or specific part for the latest drivers.
Section 6: Advanced Optimization Techniques
11Defragment and Optimize Drives
Over time, files on your hard drive can become scattered. This means parts of a file are in different places on the disk. When Windows needs to read a scattered file, it has to look for all the pieces, which takes longer. Defragmenting rearranges these pieces so they are stored together, speeding up access times. This is especially important for regular Hard Disk Drives (HDDs). Solid State Drives (SSDs) don’t need defragmentation and have a different optimization process.
Why do this? To organize scattered files on your hard drive, making it faster for Windows to access data.
What happens when done? Your hard drive will work better, leading to faster file access and possibly quicker app loading times.
- In the Windows search bar, type “Defragment and Optimize Drives” and select it.
- Select the drive you want to optimize (usually your C: drive).
- If it’s an HDD, click the “Optimize” button. Windows will analyze and defragment the drive.
- If it’s an SSD, Windows performs a different optimization called TRIM. Click “Optimize” for SSDs as well.
- You can also set up a schedule for automatic optimization.
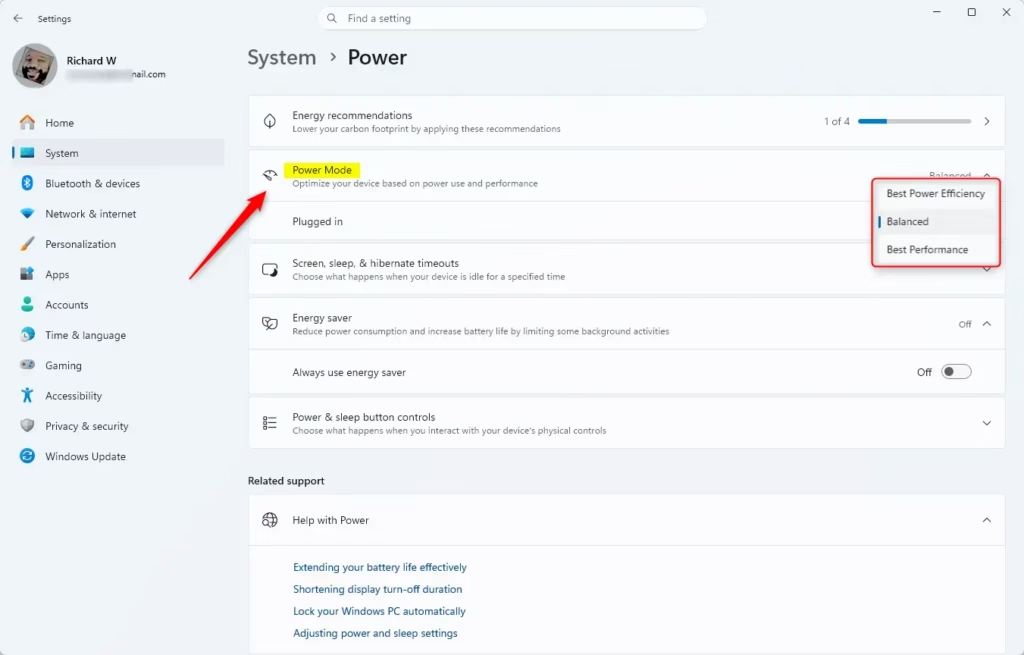
12Adjust Power Settings for Performance
Windows power plans manage how your computer uses energy. While “Balanced” or “Power saver” modes are good for saving battery on laptops or reducing electricity use, they can sometimes limit your PC’s performance. Choosing the “High performance” plan tells Windows to prioritize speed over saving energy.
Why do this? To make sure your CPU and other parts aren’t slowed down to save power, allowing them to run at their best.
What happens when done? Your PC may feel quicker and perform better, especially during demanding tasks. Note: This can increase power use and heat.
- In the Windows search bar, type “Edit power plan” and select it.
- Click on “Power Options” on the left.
- Under “Preferred plans,” select “High performance.”
- If “High performance” is not visible, click “Show additional plans.”
For laptops, this setting will mainly affect performance when plugged in.
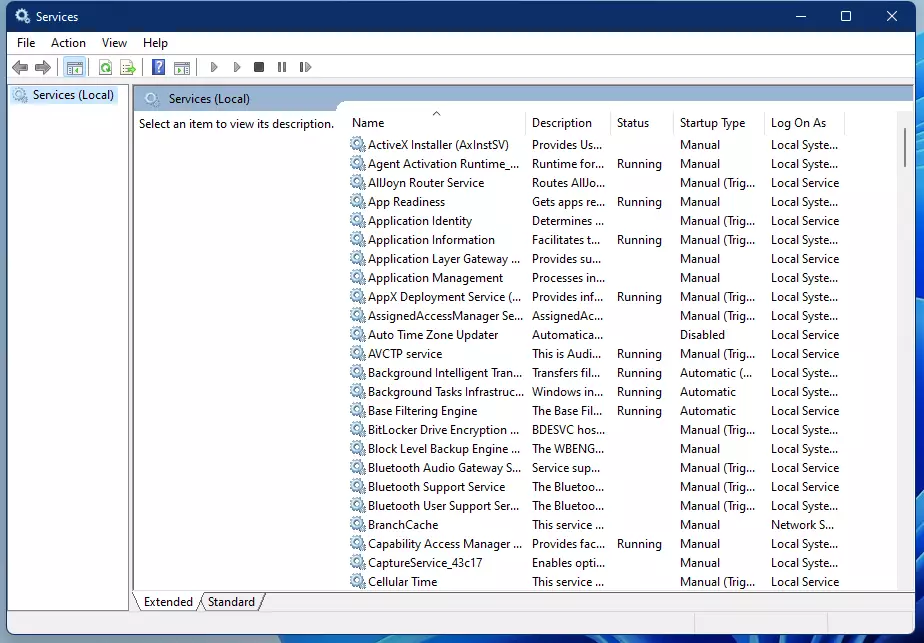
13Disable Unnecessary Services (Advanced)
Windows runs many background services to provide different functions. Some of these services might not be needed by the average user. Turning off unneeded services can free up system resources. However, this is an advanced step and requires caution, as turning off the wrong service can cause your system to become unstable.
Why do this? To reduce background resource use by stopping services you don’t use.
What happens when done? System resources like RAM and CPU cycles are freed up. However, if you turn off a critical service, certain features or even Windows itself might stop working correctly.
You’ll need administrator privileges for this.
- Right-click the Start button and select “Run.”
- Type
services.mscand press Enter or click “OK.” - The Services window will open. You will see a list of services and their status.
- Carefully look through the list. If you are sure a service is not needed and you understand what it does, you can turn it off. For example, if you never use Bluetooth, you might consider turning off the “Bluetooth Support Service.”
- To turn off a service:
- Double-click on the service.
- Click the “Stop” button to stop it if it is running.
- Change the “Startup type” to “Disabled.”
- Click “Apply” and then “OK.”
Warning: Only turn off services if you are absolutely sure what they do. Research each service before turning it off. Turning a disabled service back on might require a system restore or advanced troubleshooting if you make a mistake.
14Optimize Network Performance
Slow internet speeds or network delays can make your PC feel slow, especially when browsing, streaming, or gaming online. Optimizing network settings can help.
Why do this? To improve internet connection speed and reduce slowdowns related to the network.
What happens when done? Faster downloads, smoother streaming, and a more responsive online experience.
- Update Network Drivers: Make sure your network adapter drivers are up-to-date (see Step 10).
- Check Background Network Usage: Use Task Manager (Ctrl+Shift+Esc), go to the “Performance” tab
Conclusion
In conclusion, optimizing your Windows 11 PC can significantly enhance performance, making everyday tasks smoother and more enjoyable. By cleaning up your system, managing startup programs, optimizing storage, adjusting visual effects, and keeping your system updated, you can breathe new life into your computer. Implementing techniques like defragmentation, adjusting power settings, and managing background services can also contribute to a more responsive experience.
Taking the time to follow these steps will not only improve your computer’s speed but can also prolong its lifespan, reducing the need for costly hardware upgrades. Whether you use your PC for work, gaming, or leisure, these optimizations help to ensure that your system runs at its best. Regular maintenance is key, so make a habit of revisiting these suggestions to keep your Windows 11 PC performing optimally. Happy computing!
Was this guide helpful?

About the Author
Richard
Tech Writer, IT Professional
Richard, a writer for Geek Rewind, is a tech enthusiast who loves breaking down complex IT topics into simple, easy-to-understand ideas. With years of hands-on experience in system administration and enterprise IT operations, he’s developed a knack for offering practical tips and solutions. Richard aims to make technology more accessible and actionable. He's deeply committed to the Geek Rewind community, always ready to answer questions and engage in discussions.


No comments yet — be the first to share your thoughts!