This article describes the steps to install and use PowerDNS on Ubuntu Linux.
PowerDNS is an accessible, open-source, cross-platform authoritative nameserver in C++. It has features to create authoritative DNS, Recursive DNS, DNS loading balancer, and many more.
PowerDNS should be considered if you are looking for a fast, scalable, and efficient DNS platform to manage your DNS zones. It supports MySQL, MariaDB, PostgreSQL, and Oracle to store zone files and records.
Below, we will show you how to install and use PowerDNS in Ubuntu Linux.
Install PowerDNS and PowerDNS Admin tool on Ubuntu Linux
As described above, PowerDNS is an accessible, open-source, cross-platform authoritative nameserver in C++. It has features to create authoritative DNS, Recursive DNS, DNS loading balancer, and more.
PowerDNS Admin is a web-based application that manages PowerDNS from one’s browser.
To get started, follow the steps below:
Install the MariaDB database server
This article will use the MariaDB database server to store PowerDNS zone records.
To learn how to install MariaDB, read the post below:
How to install MariaDB database server on Ubuntu Linux
Once you have installed MariaDB, run the commands below to create a database and user to use with PowerDNS.
Connect to MariaDB SQL console:
sudo mysql
Then create a database pdns and a user named pdnsadmin with a new password.
CREATE DATABASE pdns; GRANT ALL ON pdns.* TO pdnsadmin@localhost IDENTIFIED by 'type_password_here';
Save your changes and exit.
FLUSH PRIVILEGES; exit;
Install PowerDNS
Once you have installed MariaDB and created a new database and user, continue below to download and install PowerDNS.
First, disable the systemd-resolved service that comes with Ubuntu Linux. Since PowerDNS will be our premier DNS resolver, remove the default resolver by running the commands below.
sudo systemctl disable --now systemd-resolved
Next, remove the current resolv.conf file, and create a new one with your preferred external DNS nameserver.
Google nameserver is a good choice.
sudo rm -rf /etc/resolv.conf sudo bash -c "echo 'nameserver 8.8.8.8' > /etc/resolv.conf"
Finally, install PowerDNS using the commands below.
sudo apt update sudo apt install pdns-server pdns-backend-mysql
Once PowerDNS is installed above, run the commands below to import the PowerDNS database schema to the MariaDB database created above.
sudo mysql -u pdnsadmin -p pdns < /usr/share/pdns-backend-mysql/schema/schema.mysql.sql
When prompted for a password, use the one created above.
Configure PowerDNS
After the database stuff above, create a PowerDNS configuration file and define the PowerDNS database connection details.
sudo nano /etc/powerdns/pdns.d/pdns.local.gmysql.conf
Then copy the details below into the file and save.
# MySQL Configuration # Launch gmysql backend launch+=gmysql #gmysql parameters gmysql-host=127.0.0.1 gmysql-port=3306 gmysql-dbname=pdns gmysql-user=pdnsadmin gmysql-password=type_password_here gmysql-dnssec=yes # gmysql-socket=
Save the file and exit.
Run the commands below to protect the config file above.
sudo chmod 640 /etc/powerdns/pdns.d/pdns.local.gmysql.conf sudo chown pdns:pdns /etc/powerdns/pdns.d/pdns.local.gmysql.conf
Next, test the PowerDNS service to make sure all is configured correctly.
sudo systemctl stop pdns sudo pdns_server --daemon=no --guardian=no --loglevel=9
You should see connected and prosperous messages as output if all is well.
Start PowerDNS again by running the commands below.
sudo systemctl start pdns
PowerDNS is now installed and working.
Install the PowerDNS Admin web application
You can install the PowerDNS admin tool to manage PowerDNS intuitively via your browser.
First, install the prerequisite for PowerDNS admin.
sudo apt-get install nginx curl python3-dev libsasl2-dev libldap2-dev libssl-dev libxml2-dev libxslt1-dev libxmlsec1-dev libffi-dev pkg-config apt-transport-https virtualenv build-essential libmariadb-dev git python3-flask
Next, install Node.js and Yarn. Then, run the commands line by line as listed below.
curl -sL https://deb.nodesource.com/setup_16.x | sudo bash - sudo apt-get install nodejs curl -sS https://dl.yarnpkg.com/debian/pubkey.gpg | sudo apt-key add - echo "deb https://dl.yarnpkg.com/debian/ stable main" | sudo tee /etc/apt/sources.list.d/yarn.list sudo apt update sudo apt install yarn
You should now have all the dependencies to run the PowerDNS Admin tool.
Next, download the PowerDNS package via git.
sudo git clone https://github.com/ngoduykhanh/PowerDNS-Admin.git /var/www/html/pdns
They change the pdns directory and create and activate a Python virtual environment.
cd /var/www/html/pdns/ sudo virtualenv -p python3 flask source ./flask/bin/activate sudo pip install -r requirements.txt deactivate
Next, create PowerDNS database connection details to the default_config.py file for PowerDNS Admin configuration.
sudo nano /var/www/html/pdns/powerdnsadmin/default_config.py
Next, ensure the highlighted lines match your database name, username, and password.
import os import urllib.parse basedir = os.path.abspath(os.path.dirname(__file__)) ### BASIC APP CONFIG SALT = '$2b$12$yLUMTIfl21FKJQpTkRQXCu' SECRET_KEY = 'e951e5a1f4b94151b360f47edf596dd2' BIND_ADDRESS = '0.0.0.0' PORT = 9191 HSTS_ENABLED = False OFFLINE_MODE = False FILESYSTEM_SESSIONS_ENABLED = False SESSION_COOKIE_SAMESITE = 'Lax' CSRF_COOKIE_HTTPONLY = True ### DATABASE CONFIG SQLA_DB_USER = 'pdnsadmin' SQLA_DB_PASSWORD = 'type_password_here' SQLA_DB_HOST = '127.0.0.1' SQLA_DB_NAME = 'pdns' SQLALCHEMY_TRACK_MODIFICATIONS = True
Save the file and exit.
Next, activate the virtual environment, download and configure all settings, and then deactivate by running the commands below.
Again, run the commands line by line as listed below.
cd /var/www/html/pdns/ source ./flask/bin/activate export FLASK_APP=powerdnsadmin/__init__.py flask db upgrade sudo yarn install --pure-lockfile deactivate sudo bash source ./flask/bin/activate export FLASK_APP=powerdnsadmin/__init__.py flask assets build deactivate exit
The web server and the HTTP API must enable the API. Run the commands below to open the pdns.conf file.
sudo nano /etc/powerdns/pdns.conf
Then add these lines to the pdns.conf file and save.
################################ # api Enable/disable the REST API (including HTTP listener) # api=yes ################################# # api-key Static pre-shared authentication key for access to the REST API api-key=e951e5a1f4b94151b360f47edf596dd2
Restart PowerDNS
sudo systemctl restart pdns
Create Nginx reverse proxy
You will want to create a Nginx proxy to access PowerDNS via a web browser. First, run the commands below to create a proxy configuration file.
sudo nano /etc/nginx/conf.d/pdns-admin.conf
Then copy and paste the code below into the file and save.
server { listen *:80; server_name pdnsadmin.example.com; index index.html index.htm index.php; root /var/www/html/pdns; access_log /var/log/nginx/pdnsadmin_access.log combined; error_log /var/log/nginx/pdnsadmin_error.log; client_max_body_size 10m; client_body_buffer_size 128k; proxy_redirect off; proxy_connect_timeout 90; proxy_send_timeout 90; proxy_read_timeout 90; proxy_buffers 32 4k; proxy_buffer_size 8k; proxy_set_header Host $host; proxy_set_header X-Real-IP $remote_addr; proxy_set_header X-Forwarded-For $proxy_add_x_forwarded_for; proxy_headers_hash_bucket_size 64; location ~ ^/static/ { include /etc/nginx/mime.types; root /var/www/html/pdns/powerdnsadmin; location ~* \.(jpg|jpeg|png|gif)$ { expires 365d; } location ~* ^.+.(css|js)$ { expires 7d; } } location / { proxy_pass http://unix:/run/pdnsadmin/socket; proxy_read_timeout 300s; proxy_connect_timeout 300s; proxy_redirect off; } }
Next, change the ownership for pdns directory to pdns and www-data.
sudo chown -R pdns:www-data /var/www/html/pdns
Restart Nginx
sudo systemctl restart nginx
Create PowerDNS Admin systemd service
To easily start and stop PowerDNS Admin, you will want to create a systemd service for PowerDNS Admin.
Run the commands below to create a systemd file.
sudo nano /etc/systemd/system/pdnsadmin.service
Then, copy and paste the lines below into the file.
[Unit] Description=PowerDNS-Admin Requires=pdnsadmin.socket After=network.target [Service] PIDFile=/run/pdnsadmin/pid User=pdns Group=pdns WorkingDirectory=/var/www/html/pdns ExecStart=/usr/local/bin/gunicorn --pid /run/pdnsadmin/pid --bind unix:/run/pdnsadmin/socket 'powerdnsadmin:create_app()' ExecReload=/bin/kill -s HUP $MAINPID ExecStop=/bin/kill -s TERM $MAINPID PrivateTmp=true [Install] WantedBy=multi-user.target
Save and exit.
Create a pdnsadmin socket file by running the commands below.
sudo nano /etc/systemd/system/pdnsadmin.socket
Then copy and paste the lines below into the file and save.
[Unit] Description=PowerDNS-Admin socket [Socket] ListenStream=/run/pdnsadmin/socket [Install] WantedBy=sockets.target
Save the exit.
Then, create the required files and directories for the configurations above.
sudo bash -c "echo 'd /run/pdnsadmin 0755 pdns pdns -' >> /etc/tmpfiles.d/pdnsadmin.conf" sudo mkdir /run/pdnsadmin/ sudo chown -R pdns:www-data /run/pdnsadmin/ sudo chown -R pdns: /var/www/html/pdns/powerdnsadmin/
Reload systemd-daemon to apply the configurations above.
sudo systemctl daemon-reload
Start and enable the PowerDNS Admin service
sudo systemctl enable --now pdnsadmin
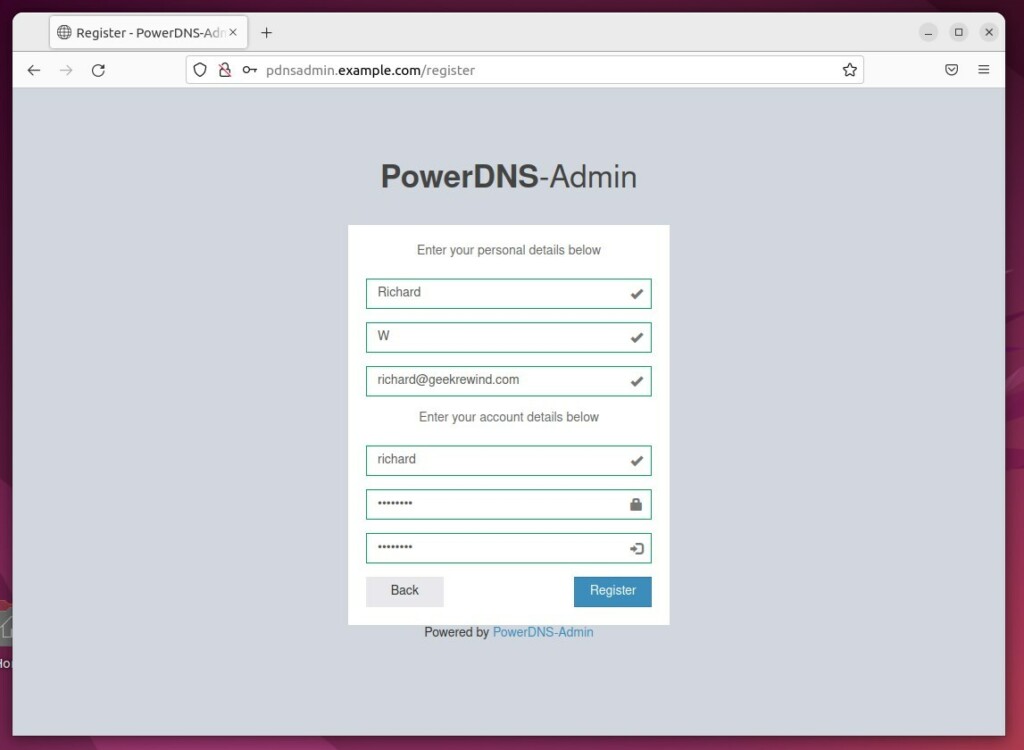
.service pdnsadmin.socket
Then, check its status.
sudo systemctl status pdnsadmin.service pdnsadmin.socket
If everything is set up correctly, you should see similar results below.
● pdnsadmin.service - PowerDNS-Admin Loaded: loaded (/etc/systemd/system/pdnsadmin.service; enabled; vendor preset: enabled) Active: active (running) since Fri 2022-10-07 12:55:24 CDT; 6s ago TriggeredBy: ● pdnsadmin.socket Main PID: 10066 (gunicorn) Tasks: 2 (limit: 4626) Memory: 63.5M CPU: 915ms CGroup: /system.slice/pdnsadmin.service ├─10066 /usr/bin/python3 /usr/local/bin/gunicorn --pid /run/pdnsadmin/pid --bind unix:/run/pdnsadmin/socket "powerdnsadmin:create_app()" └─10067 /usr/bin/python3 /usr/local/bin/gunicorn --pid /run/pdnsadmin/pid --bind unix:/run/pdnsadmin/socket "powerdnsadmin:create_app()" Oct 07 12:55:24 Ubuntu2204 systemd[1]: Started PowerDNS-Admin. Oct 07 12:55:24 Ubuntu2204 gunicorn[10066]: [2022-10-07 12:55:24 -0500] [10066] [INFO] Starting gunicorn 20.0.4 Oct 07 12:55:24 Ubuntu2204 gunicorn[10066]: [2022-10-07 12:55:24 -0500] [10066] [INFO] Listening at: unix:/run/pdnsadmin/socket (10066) Oct 07 12:55:24 Ubuntu2204 gunicorn[10066]: [2022-10-07 12:55:24 -0500] [10066] [INFO] Using worker: sync Oct 07 12:55:24 Ubuntu2204 gunicorn[10067]: [2022-10-07 12:55:24 -0500] [10067] [INFO] Booting worker with pid: 10067 ● pdnsadmin.socket - PowerDNS-Admin socket Loaded: loaded (/etc/systemd/system/pdnsadmin.socket; enabled; vendor preset: enabled) Active: active (running) since Fri 2022-10-07 12:45:01 CDT; 10min ago Triggers: ● pdnsadmin.service Listen: /run/pdnsadmin/socket (Stream) CGroup: /system.slice/pdnsadmin.socket Oct 07 12:45:01 Ubuntu2204 systemd[1]: Listening on PowerDNS-Admin socket.
Access PowerDNS portal
Finally, open your browser and browse to the server hostname defined above.
http://pdnsadmin.example.com

Create an account

Login and register the API key used above when you see an API warning.

That’s it!
Conclusion:
- PowerDNS and PowerDNS Admin have been successfully installed and configured on an Ubuntu Linux server.
- The installation process covered several steps, including setting up MariaDB for storing zone records, installing PowerDNS, and configuring the PowerDNS Admin web application.
- Users can now manage PowerDNS intuitively via a web browser and access its features efficiently.
- If there are any queries, errors to report, or additional insights to share, please utilize the comment section below for further interaction.
Leave a Reply Cancel reply