How to Install OTRS Ticketing Systems on Ubuntu Linux
You install OTRS (Open-source Ticket Request System) on Ubuntu Linux to create a robust, free ticketing and customer support platform.
OTRS is an open-source software that centralizes and manages incoming support requests, acting as a powerful alternative to paid customer service solutions.
This tutorial specifically guides you through the installation process on Ubuntu 18.04 LTS, enabling you to efficiently organize both internal and external communications for your support needs.
Install Apache2 using `sudo apt install apache2`, then install Perl and necessary modules with `sudo apt install libapache2-mod-perl2` and other packages. Finally, install MariaDB server via `sudo apt install mariadb-server`.
Install Apache2
Apache2 is a popular web server that OTRS needs to run, so let’s get it installed on your Ubuntu system.
To install the Apache2 HTTP server, run the commands below.
sudo apt update
sudo apt install apache2
After installing Apache2, the commands below can stop, start, and enable the Apache2 service to always start up with the server boots.
sudo systemctl stop apache2.service
sudo systemctl start apache2.service
sudo systemctl enable apache2.service
To determine if the Apache2 HTTP server is installed, open your web browser and type in the server’s Iserver’stname.
http://localhost
When you see a page similar to the one above, Apache2 is installed and working.
Install Perl and Related Modules
OTRS relies on Perl, so we need to install it along with some essential modules to make sure everything works smoothly.
sudo apt install libapache2-mod-perl2 libdatetime-perl libcrypt-eksblowfish-perl libcrypt-ssleay-perl libgd-graph-perl libapache-dbi-perl libsoap-lite-perl libarchive-zip-perl libgd-text-perl libnet-dns-perl libpdf-api2-perl libauthen-ntlm-perl libdbd-odbc-perl libjson-xs-perl libyaml-libyaml-perl libxml-libxml-perl libencode-hanextra-perl libxml-libxslt-perl libpdf-api2-simple-perl libmail-imapclient-perl libtemplate-perl libtext-csv-xs-perl libdbd-pg-perl libapache2-mod-perl2 libtemplate-perl libnet-dns-perl libnet-ldap-perl libio-socket-ssl-perl
That should get Perl installed and ready to use.
Install MariaDB Database Server
OTRS needs a database to store its information, and MariaDB is a great open-source choice to install on your Ubuntu server.
To install MariaDB, run the commands below:
sudo apt update
sudo apt install mariadb-server mariadb-client
After installing MariaDB, the commands below can stop, start, and enable the service to start when the server boots.
sudo systemctl stop mariadb.service
sudo systemctl start mariadb.service
sudo systemctl enable mariadb.service
The commands below secure the MariaDB server by creating a root password and disallowing remote root access.
sudo mysql_secure_installation
When prompted, answer the questions below by following the guide.
- Enter current password for root (enter for none): Just press the Enter
- Set root password? [Y/n]: Y
- New password: Enter password
- Re-enter new password: Repeat password
- Remove anonymous users? [Y/n]: Y
- Disallow root login remotely? [Y/n]: Y
- Remove test database and access to it? [Y/n]: Y
- Reload privilege tables now? [Y/n]: Y
Restart MariaDB server
To test if MariaDB is installed and working, run the commands below:
sudo systemctl status mariadb
That should display MariaDB’s status.
● mariadb.service - MariaDB 10.1.44 database server
Loaded: loaded (/lib/systemd/system/mariadb.service; enabled; vendor preset: enabled)
Active: active (running) since Wed 2020-04-08 17:08:17 CDT; 1min 54s ago
Docs: man:mysqld(8)
https://mariadb.com/kb/en/library/systemd/
Main PID: 22363 (mysqld)
Status: "Taking your SQL requests now…"
Tasks: 27 (limit: 4666)
CGroup: /system.slice/mariadb.service
└─22363 /usr/sbin/mysqld
Apr 08 17:08:17 ubuntu1804 /etc/mysql/debian-start[22396]: mysql
After installing the server, run the commands below to open its configuration file.
sudo nano /etc/mysql/mariadb.conf.d/50-server.cnf
Then, add the highlighted lines to the file and save.
# this is only for the mysqld standalone daemon
[mysqld]

#
# * Basic Settings
#
user            = mysql
pid-file        = /var/run/mysqld/mysqld.pid
socket          = /var/run/mysqld/mysqld.sock
port            = 3306
basedir         = /usr
datadir         = /var/lib/mysql
tmpdir          = /tmp
lc-messages-dir = /usr/share/mysql
skip-external-locking

max_allowed_packet=64M
query_cache_size=36M
innodb_log_file_size=256M
character_set_server=utf8
.
Save the file and exit, then restart MariaDB:
sudo systemctl restart mariadb.service
Create OTRS Database
With the necessary software installed, the next step is to create a dedicated database for OTRS within MariaDB.
To do that, run the commands below to log on to MariaDB. When prompted for a password, type the root password you created above.
sudo mysql -u root -p
Then create a database called otrs
CREATE DATABASE otrs CHARACTER SET utf8 COLLATE utf8_general_ci;Create a database user called otrsuser with a new password
CREATE USER 'otrsuser'@'localhost' IDENTIFIED BY 'new_password_here';
Next, grant the user full access to the otrsuser database.
GRANT ALL ON otrs.* TO 'otrsuser'@'localhost' WITH GRANT OPTION;
Finally, save your changes and exit.
FLUSH PRIVILEGES;
EXIT;
Now that the MariaDB server is installed and a database created, go and install OTRS.
Create OTRS User
For better security, it’s best to create a separate user account for OTRS instead of running it as the main administrator (root).
sudo useradd -d /opt/otrs -c 'OTRS user' otrs
sudo usermod -aG www-data otrs
When you don’t, continue below to download OTRS
Download and Configure OTRS
Now that your system is ready, let’s download the latest OTRS package and move it to the correct place on your Ubuntu server.
Then, move the download files to the OTRS home directory.
cd /tmp
wget http://ftp.otrs.org/pub/otrs/otrs-latest.tar.gz
tar xvf otrs-latest.tar.gz
mv otrs-6.0.27/ otrs
sudo mv otrs /opt
sudo /opt/otrs/bin/otrs.CheckModules.pl
When you’re done, the commands below create an OTRS configuration file.
sudo cp /opt/otrs/Kernel/Config.pm.dist /opt/otrs/Kernel/Config.pm
sudo nano /opt/otrs/Kernel/Config.pm
The second command should open the configuration file where you’ll add the name, username, and password created above.
sub Load {
    my $Self = shift;

    # ---------------------------------------------------- #
    # database settings                                    #
    # ---------------------------------------------------- #

    # The database host
    $Self->{DatabaseHost} = '127.0.0.1';

    # The database name
    $Self->{Database} = 'otrs';

    # The database user
    $Self->{DatabaseUser} = 'otrsuser';

    # The password of database user. You also can use bin/otrs.Console.pl Maint::Database::PasswordCrypt
    # for crypted passwords
    $Self->{DatabasePw} = 'type_database_user_password';

    # The database DSN for MySQL ==> more: "perldoc DBD::mysql"
    $Self->{DatabaseDSN} = "DBI:mysql:database=$Self->{Database};host=$Self->{DatabaseHost};";

    # The database DSN for PostgreSQL ==> more: "perldoc DBD::Pg"
    # if you want to use a local socket connection
#    $Self->{DatabaseDSN} = "DBI:Pg:dbname=$Self->{Database};";
    # if you want to use a TCP/IP connection
Next, run the commands below to open and enable the Apache Perl configuration.
sudo nano /opt/otrs/scripts/apache2-perl-startup.pl
Edit the file, update the highlighted line, and then save.
# Preload frequently used modules to speed up client spawning.
use CGI ();
CGI->compile(':cgi');
use CGI::Carp ();

use Apache::DBI ();

# enable this if you use mysql
use DBD::mysql ();
use Kernel::System::DB::mysql;

# enable this if you use postgresql
#use DBD::Pg ();
#use Kernel::System::DB::postgresql;
When you don’t, you use the commands below to configure Apache2 permissions for the directory and create a VirtualHost file.
sudo /opt/otrs/bin/otrs.SetPermissions.pl --web-group=www-data
sudo ln -s /opt/otrs/scripts/apache2-httpd.include.conf /etc/apache2/sites-enabled/otrs.conf
When you don’t, do the above, run the commands below to install other Perl packages, and validate that all packages are installed.
perl -MCPAN -e shell

install Crypt::Random::Source::Weak::devurandom
install Exporter::Tiny
install Math::Random::ISAAC
install Math::Random::Secure
install Module::Find
install Moo
install Type::Tiny
install namespace::clean
Then, exit from the terminal and validate that all packages are installed.
perl -cw /opt/otrs/bin/cgi-bin/index.pl
perl -cw /opt/otrs/bin/cgi-bin/customer.pl
perl -cw /opt/otrs/bin/otrs.Console.pl
After that, restart Apache2 and Perl by running the commands below:
sudo systemctl restart apache2
sudo a2enmod perl
Finally, open your web browser and browse to the server’s IP address.
http://localhost/otrs/installer.pl
That should open the installation wizard. Follow the setup wizard until you’re done.

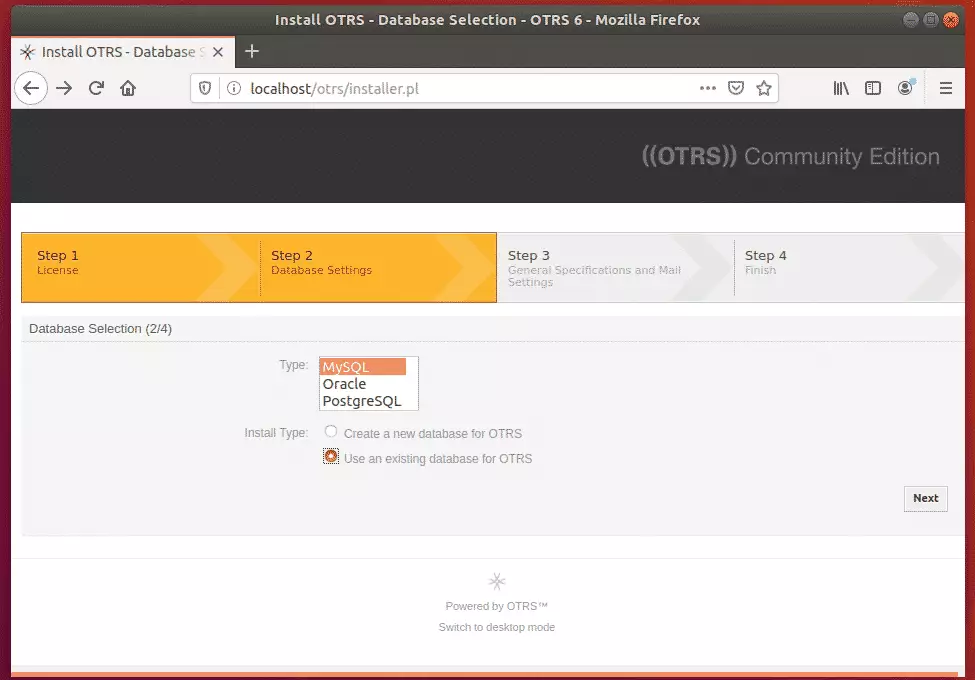
On the screen below, choose MySQL and select the option to use an existing database for OTRS.
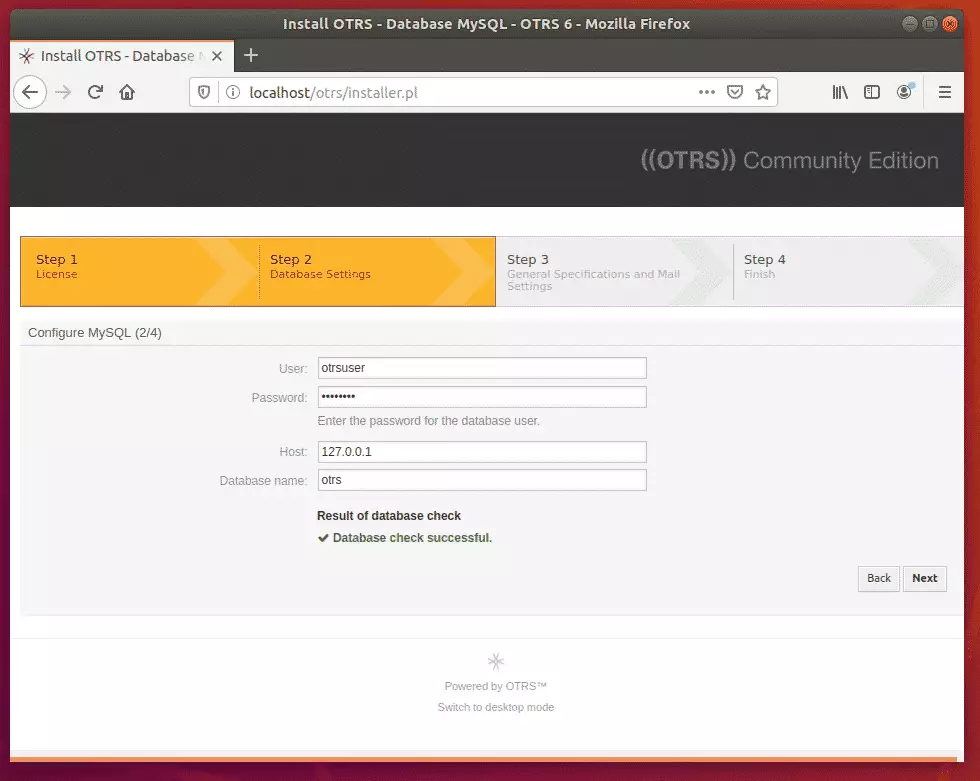
Then, type in the database information you created above and continue.
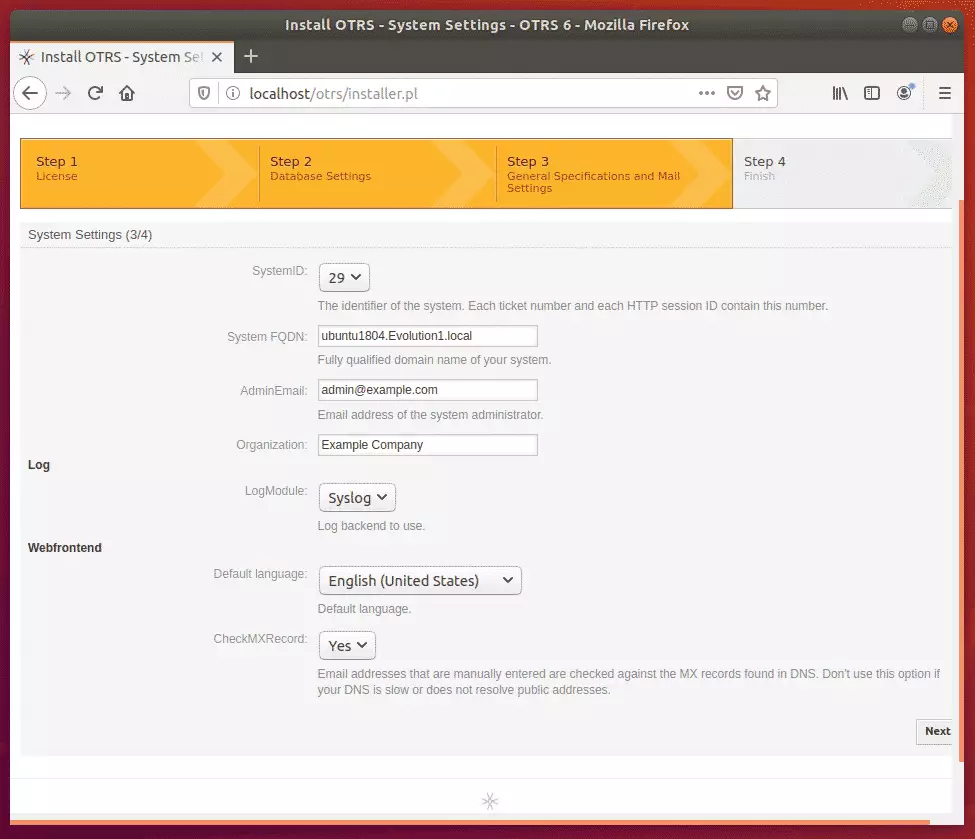
After that, enter information for your environment and continue
When you don’t do the setup, log in with the credentials provided.
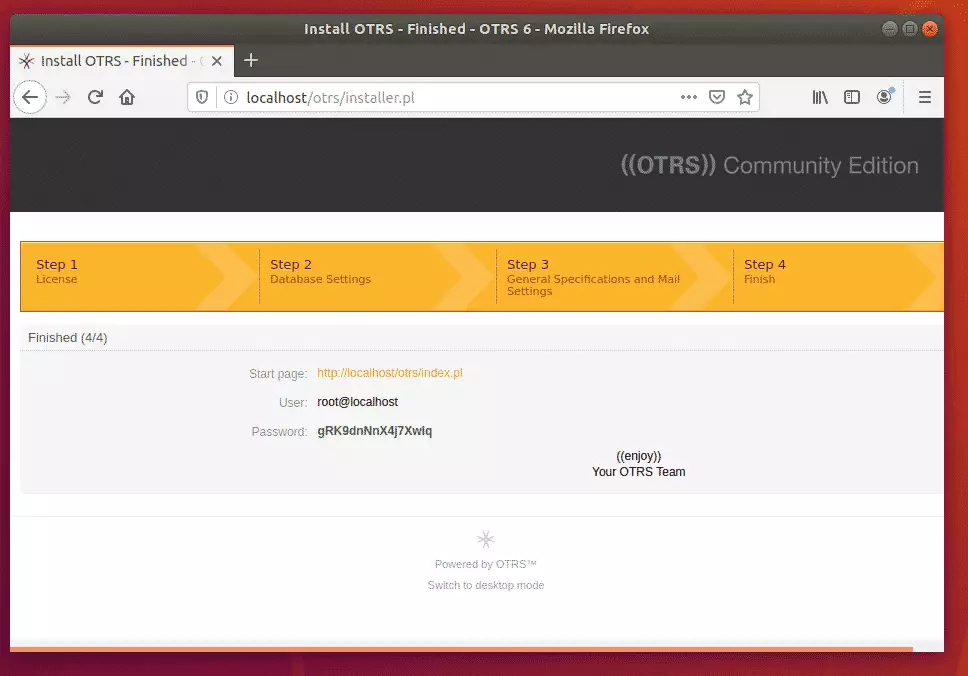
Enjoy!

OTRS daemon can be started and activated using the commands below:
sudo su - otrs -c "/opt/otrs/bin/otrs.Daemon.pl start"
sudo su - otrs -c "/opt/otrs/bin/Cron.sh start"
That’s it! Begin configuring your environment.
Conclusion:
This post showed you how to install and configure OTRS ticket systems on Ubuntu 18.04 | 16.04. If you find any error above, please use the comment form below to report.
Thanks,
You may also like the post below:
Was this guide helpful?

About the Author
Richard
Tech Writer, IT Professional
Richard, a writer for Geek Rewind, is a tech enthusiast who loves breaking down complex IT topics into simple, easy-to-understand ideas. With years of hands-on experience in system administration and enterprise IT operations, he’s developed a knack for offering practical tips and solutions. Richard aims to make technology more accessible and actionable. He's deeply committed to the Geek Rewind community, always ready to answer questions and engage in discussions.


Thank you very much for these posts. Will you write as you usually do about how to config nginx to work with OTRS?
It would be very helpful also if you write how to update software once it has been installed. I followed your instructions to install snipe-it but I had to find my way to keep it updated by trial and error.
Thanks for this wonderful guide. I have followed till the end but on configuring MySQL when i enter the password i get an error that access denied
thanks,
just to help some new users,
in mariadb config you have to comment the max_allowed_packet size if you have one, or add all the lines ad the bottom.
second,
before going in “perl -MCPAN -e shell”
you have to check if make is installed on the system, otherwise you’ll get a lot of errors 😉
Host ‘10.0.0.108’ is not allowed to connect to this MariaDB server
Hi,
Thanks for your documentation, I have followed your tutorial.
But now i want to enable https but i cannot. Would you please help me & share the details procedure.
When inputting – wget http://ftp.otrs.org/pub/otrs/otrs-latest.tar.gz – the following error is being displayed.
Resolving http://ftp.otrs.org (ftp.otrs.org)… failed: Name or service not known.
wget: unable to resolve host address ‘ftp.otrs.org’
Can you please help?
wget http://ftp.otrs.org.cn/pub/otrs/otrs-latest.tar.gz
wget https://ftp.otobo.org/pub/otrs/otrs-latest.tar.gz