How to Install Lychee with Nginx on Ubuntu 24.04
You can install Lychee, an open-source photo management system, on Ubuntu 24.04 with the nginx-on-ubuntu-linux/" class="sal-link" rel="noopener" target="_blank" data-sal-id="17686">Nginx web server.
Lychee empowers you to host your personal photo gallery, offering an intuitive web-based interface for organizing, managing, and sharing your images.
Nginx excels at handling numerous simultaneous connections with minimal memory usage, making it an excellent choice for serving your Lychee photo gallery efficiently.
This combination provides robust performance and security features, allowing you to securely manage your cherished memories online.
Install Nginx HTTP server on Ubuntu
Lychee requires a web server. This post will install and use the Nginx web server to run Lychee.
To do that, open the Ubuntu terminal and run the commands below to install the Nginx web server.
sudo apt update
sudo apt install nginx
Once Nginx is installed, the commands below can start, stop, and enable the Nginx web server to start automatically when your server boots up.
sudo systemctl stop nginx
sudo systemctl start nginx
sudo systemctl enable nginx
You can test the Nginx web server by opening your web browser and browsing to the server’s localhost or IP address.
http://localhost
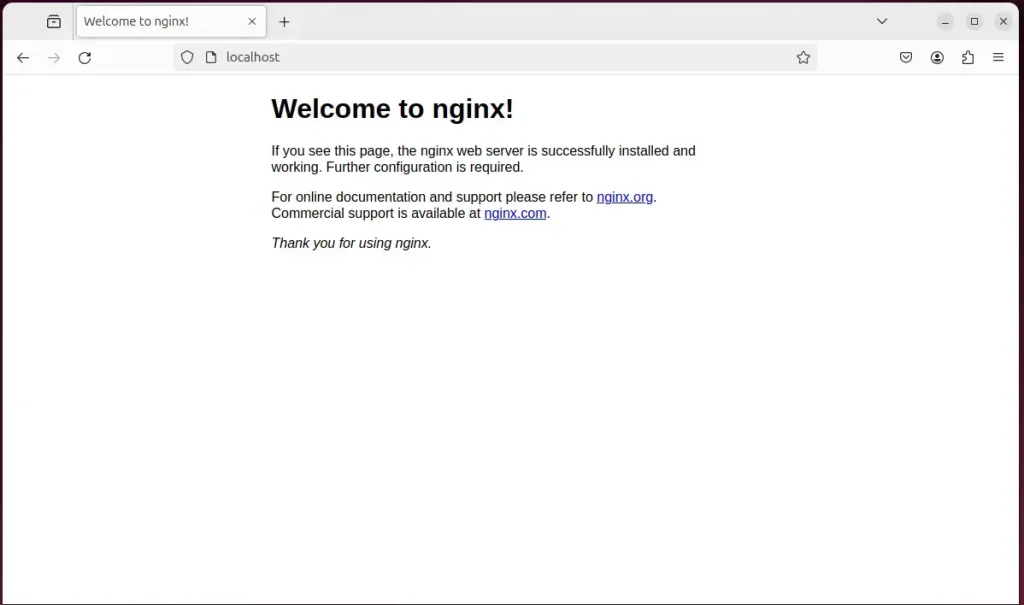
When you see the Welcome to nginx!, it means the Nginx HTTP server is successfully installed.
Additional help on installing Nginx on Ubuntu is in the link below.
Install the MariaDB database server on Ubuntu
The next component required to run Lychee is a database server. This post will install and use the MariaDB database server.
To install and use the MariaDB database server, use the instructions below.
Open the Ubuntu terminal and run the commands below to install the MariaDB database server.
sudo apt update
sudo apt install mariadb-server
Once the MariaDB database server is installed, use the commands below to stop, start, and enable the MariaDB server to start automatically when the server boots.
sudo systemctl stop mariadb
sudo systemctl start mariadb
sudo systemctl enable mariadb
Run the following commands to validate and test if the MariaDB database server is installed successfully.
sudo mariadb
Once you run the commands above, it will log you onto the MariaDB console and display a message similar to the one below.
Welcome to the MariaDB monitor.  Commands end with ; or g.
Your MariaDB connection id is 32
Server version: 10.11.2-MariaDB-1 Ubuntu 23.04

Copyright (c) 2000, 2018, Oracle, MariaDB Corporation Ab and others.

Type 'help;' or 'h' for help. Type 'c' to clear the current input statement.

MariaDB [(none)]>
The message tells you that the server is installed successfully.
Additional help on installing MariaDB.
- How to install MariaDB on Ubuntu Linux
- MariaDB without password prompt
Create a Lychee database
Upon successfully installing the MariaDB database server, create a blank database on the server specifically for the Lychee application.
As part of the setup, we will create a lycheedb database and a user account called lycheedbuser.
Finally, we’ll grant the lycheedbuser full access to the lycheedb database.
All the database steps above can be done using the commands below:
But first, log on to the MariaDB database server:
sudo mariadb
Then run the commands below to complete the steps:
CREATE DATABASE lycheedb CHARACTER SET utf8mb4 COLLATE utf8mb4_general_ci;
CREATE USER lycheedbuser@localhost IDENTIFIED BY 'type_your_password_here';
GRANT ALL ON lycheedb.* TO lycheedbuser@localhost WITH GRANT OPTION;
FLUSH PRIVILEGES;
exit
Ensure to replace ‘type_your_password_here ‘with your password.
Install PHP on Ubuntu Linux
The last component you will need to run Lychee is PHP. The Lychee application is PHP-based and supports the latest versions of PHP.
Then, run the commands below to install the latest PHP version.
sudo apt install php-fpm php-intl php-mysql php-curl php-cli php-zip php-xml php-gd php-common php-mbstring php-xmlrpc php-bcmath php-json php-sqlite3 php-soap php-zip
Additional help on installing PHP
Download Lychee files
Let’s begin downloading and configuring the Lychee files on Ubuntu Linux.
To always install the latest version, check the download page for Lychee. Get the download link and download the archived package to your computer. Then, extract it.
First, navigate to the /tmp/ directory and download the Lychee files. Next, extract the content into the Lychee folder in the Nginx root directory.
The final step is to change the permissions. This will allow the Nginx web server to interact safely with the files, ensuring a secure environment for your Lychee installation.
cd /tmp/
wget https://github.com/LycheeOrg/Lychee/releases/download/v6.2.0/Lychee.zip
sudo unzip Lychee.zip -d /var/www
sudo chown -R www-data:www-data /var/www/Lychee
Next, run the command below to copy the ‘.env‘ file for Lychee and modify it using the ‘nano‘ editor.
sudo -u www-data cp /var/www/Lychee/.env.example /var/www/Lychee/.env
sudo -u www-data nano /var/www/Lychee/.env
Change the default APP_URL to match your domain name and the database info created above.
# Lychee domain URL
APP_URL=https://lychee.example.com

# DB_CONNECTION can be sqlite, mysql or pgsql. For sqlite the other entries are
# *not* be left blank.
DB_CONNECTION=mysql
DB_HOST=localhost
DB_PORT=3306
DB_DATABASE=lycheedb
DB_USERNAME=lycheedbuser
DB_PASSWORD=type_password_here
DB_LOG_SQL=false
DB_LOG_SQL_EXPLAIN=false #only for MySQL
Save the file and exit the editor.
Once you have completed all the above steps, continue configuring the Nginx web server below to serve the Lychee content.
Run the commands below to create a Nginx virtual host file for Lychee.
sudo nano /etc/nginx/sites-available/lychee.conf
Then, copy and paste the content block below into the Nginx server block.
server {
    listen 80;
    listen [::]:80;
    root /var/www/Lychee/public;
    index  index.php;
    server_name  lychee.example.com;

    access_log /var/log/nginx/example.com.access.log;
    error_log /var/log/nginx/example.com.error.log;

    if (!-e $request_filename)
    {
        rewrite ^/(.*)$ /index.php?/$1 last;
        break;
    }

    location ~ .php$ {
         include snippets/fastcgi-php.conf;
         fastcgi_pass unix:/var/run/php/php8.3-fpm.sock;
         fastcgi_param SCRIPT_FILENAME $document_root$fastcgi_script_name;
         include fastcgi_params;
    }

    location ~ [^/].php(/|$) {
        return 403;
    }

    rewrite ^/(.+)/$ /$1 permanent;

}
Save the file.
Then, run the commands below to enable the virtual host and restart the Nginx server.
sudo ln -s /etc/nginx/sites-available/lychee.conf /etc/nginx/sites-enabled/
sudo systemctl restart nginx
Setup Let’s Encrypt SSL/TLS for Lychee
You may want to install an SSL/TLS certificate to secure your Lychee site. Secure your Lychee installation with HTTPS from Let’s Encrypt.
Please read the post below for additional resources on installing and creating Let’s Encrypt SSL certificates for Nginx.
How to set up Let’s Encrypt SSL certificate for Nginx on Ubuntu Linux
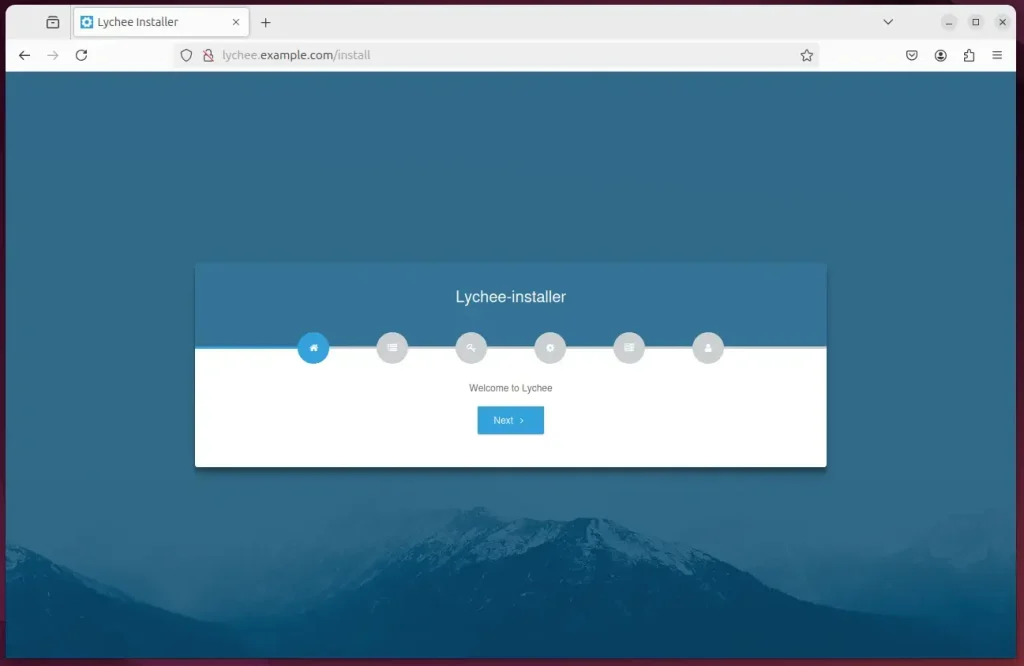
Once you have restarted the Nginx web server, open your browser and browse to the server hostname or IP address defined in the Nginx server block.
http://lychee.example.com
A Lychee installation wizard page should appear. Click next to continue.
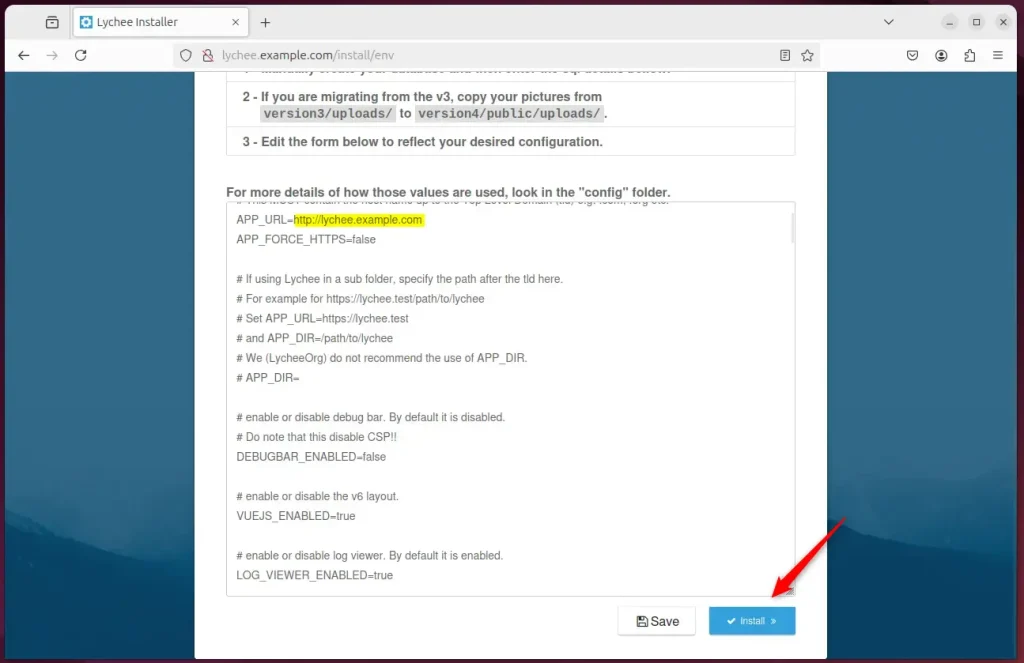
Ensure the information in the .env file is correct. Then, click Install.
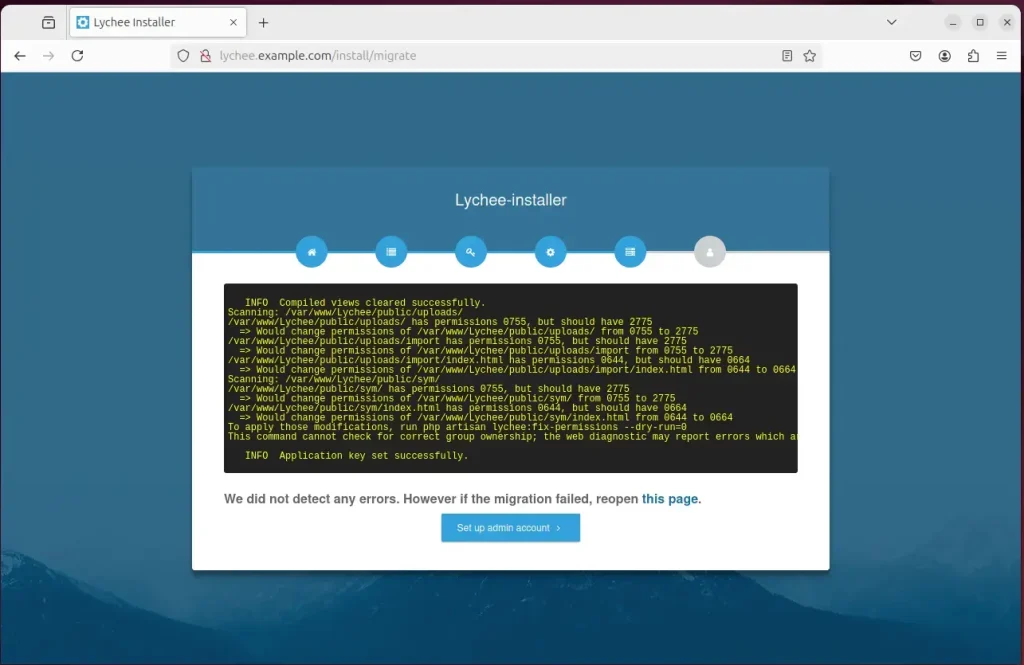
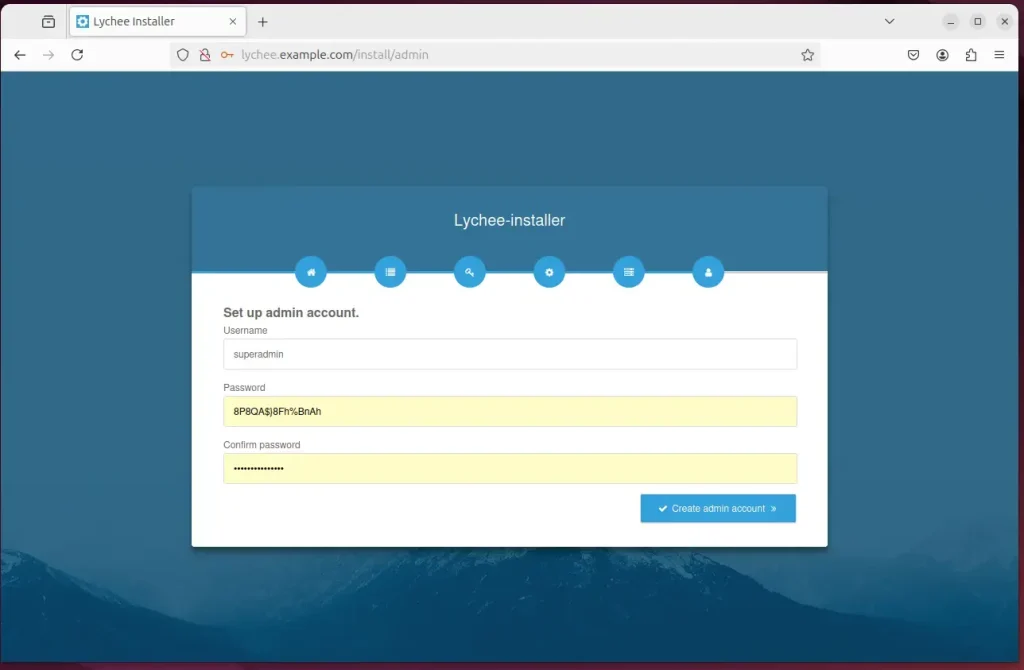
Fix any errors and set up an account.
Create an admin account.
Lychee should be installed and ready to use.
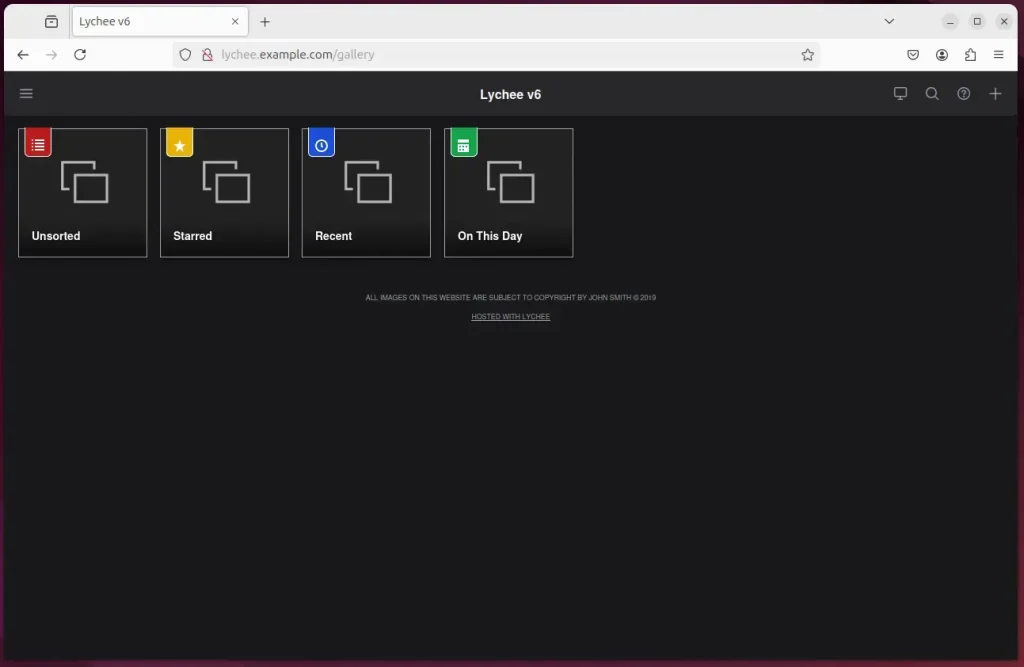
That should do it!
Conclusion:
In conclusion, installing the Lychee Photo Management system with Nginx on Ubuntu 24.04 is a straightforward process that can significantly enhance your photo management capabilities. Here are the key takeaways:
- User-Friendly Interface: Lychee provides an intuitive interface for managing and sharing photos.
- Efficient Performance: Nginx is lightweight and can handle multiple connections, making it ideal for hosting photo galleries.
- Database Support: Using MariaDB ensures reliable data storage for your images.
- Secure Setup: Implementing SSL/TLS with Let’s Encrypt adds an essential layer of security to your installation.
- Configurability: The ability to customize settings via the
.envfile allows for tailored configurations based on your requirements.
With these components working together, you can enjoy a robust and secure environment for your photo gallery.
Frequently Asked Questions
What is Lychee and why should I use it?
How do I install Nginx on Ubuntu 24.04?
What database server is required for Lychee?
How can I test if Nginx is installed correctly?
Is it necessary to configure SSL/TLS for Nginx when using Lychee?
Was this guide helpful?

About the Author
Richard
Tech Writer, IT Professional
Richard, a writer for Geek Rewind, is a tech enthusiast who loves breaking down complex IT topics into simple, easy-to-understand ideas. With years of hands-on experience in system administration and enterprise IT operations, he’s developed a knack for offering practical tips and solutions. Richard aims to make technology more accessible and actionable. He's deeply committed to the Geek Rewind community, always ready to answer questions and engage in discussions.

No comments yet — be the first to share your thoughts!