
This article describes installing Jitsi Meet video conferencing software on Ubuntu Linux.
Jitsi Meet is a free, secure, open-source video conferencing platform that can be installed and used in their environment.
For businesses and individuals looking for a free video-conferencing service, Jitsi Meet might be a great alternative. It’s encrypted and open source; you don’t need an account.
Using the SIP or XMPP protocol, you can access Jitsi Meet directly via a web browser and make free calls, chat, send files, or share your screen.
Below is how to install Jitsi Meet on Ubuntu Linux.
How to install Jitsi Meet video conferencing software on Ubuntu Linux
As described above, Jitsi Meet is an entirely free, secure, open-source video conferencing platform that one can install and use in their environment.
Below is how to install and use it in Ubuntu Linux.
Install prerequisite
Before installing Jitsi Meet, make sure to install these packages. They should help you install and run Jitsi Meet.
sudo apt update
sudo apt install wget curl gnupg2 apt-transport-https
Now that the packages are installed above, continue to install Jitsi Meet below.
Add Jitsi Meet repository and install
Out of the box, Jitsi Meet packages are not available in Ubuntu default repositories. So you can’t simply run the apt-get command to install.
To install Jitsi Meet, you must add its official repository. The steps below show you how to do it.
Add the Jitsi Meet repository GPG key by running the commands below:
wget -qO - https://download.jitsi.org/jitsi-key.gpg.key | sudo apt-key add -
Next, add the Jitsi Meet repository by running the commands below:
sudo bash -c "echo 'deb https://download.jitsi.org stable/' >> /etc/apt/sources.list.d/jitsi-stable.list"
After that, run the commands below to update the Ubuntu package index and install Jitsi Meet.
sudo apt update
sudo apt install jitsi-meet
During the installation, you’ll be prompted to specify the system domain name or hostname.
┌─────────────────────┤ Configuring jitsi-videobridge2 ├─────────────────────┐

│ The value for the hostname that is set in Jitsi Videobridge installation.  │
│                                                                            │
│ The hostname of the current installation:                                  │
│ jitsi.example.com
│                                   <Ok>                                     │
└────────────────────────────────────────────────────────────┘
You can also generate a self-signed certificate if you are testing it. However, you may want to install a publicly trusted certificate in a production environment.
──────────────────────────────┤ Configuring jitsi-meet-prosody ├─────────────────────────────┐
│ Jitsi Meet requires an SSL certificate. This installer can generate one automatically for  │
│ your using "Let’s Encrypt". This is the recommended and simplest option for most           │
│ installations.                                                                             │
│ In the event you need to use a certificate of your own, you can configure its location     │
│ which defaults to /etc/ssl/--domain.name--.key for the key and /etc/ssl/--domain.name--.crt│
│ for the certificate.                                                                       │
│ If you are a developer and are only looking for a quick way to test basic Jitsi Meet       │
│ functionality then this installer can also generate a self-signed certificate.             │
│                                            <Ok>                                            │
└────────────────────────────────────────────────────────────────────────────────────────────┘
For the dev environment, choose a self-signed certificate. In the production environment, select Let’s Encrypt. However, if you choose Let’s Encrypt, ensure the domain is accessible.
───────┤ Configuring jitsi-meet-prosody ├────────┐
│ SSL certificate                                │
│                                                │
│     Let's Encrypt certificates                 │
│     I want to use my own certificate           │
│     Generate a new self-signed certificate     │
│                     <Ok>                       │
└────────────────────────────────────────────────┘
You can run the commands below to generate a free Let’s Encrypt certificate in a production environment.
sudo /usr/share/jitsi-meet/scripts/install-letsencrypt-cert.sh
Configure Jitsi Meet
Now that you have installed Jitsi Meet, the default configuration for your site will be located at the path below with the name of the domain or hostname selected above:
sudo nano /etc/prosody/conf.avail/jitsi.example.com.cfg.lua
You can configure additional settings in the file to make all meetings private or change the authentication line to allow anonymous users.
-- internal muc component

Component "internal.auth.jitsi.example.com" "muc"
    storage = "memory"
    modules_enabled = {
        "ping";
    }
    admins = { "[email protected]", "[email protected]" }
    muc_room_locking = false
    muc_room_default_public_jids = true
VirtualHost "auth.jitsi.example.com"
    ssl = {
        key = "/etc/prosody/certs/auth.jitsi.example.com.key";
        certificate = "/etc/prosody/certs/auth.jitsi.example.com.crt";
        "limits_exception";
    authentication = "internal_hashed"
Another configuration file that you might edit is the one below:
sudo nano /etc/jitsi/meet/jitsi.example.com-config.js
If you have an Ubuntu Linux firewall enabled, you will want to run the commands below to allow Jitsi Meet to communicate with external clients.
sudo ufw allow 80/tcp
sudo ufw allow 443/tcp
sudo ufw allow 4443/tcp
sudo ufw allow 10000/udp
sudo ufw allow 22/tcp
sudo ufw enable
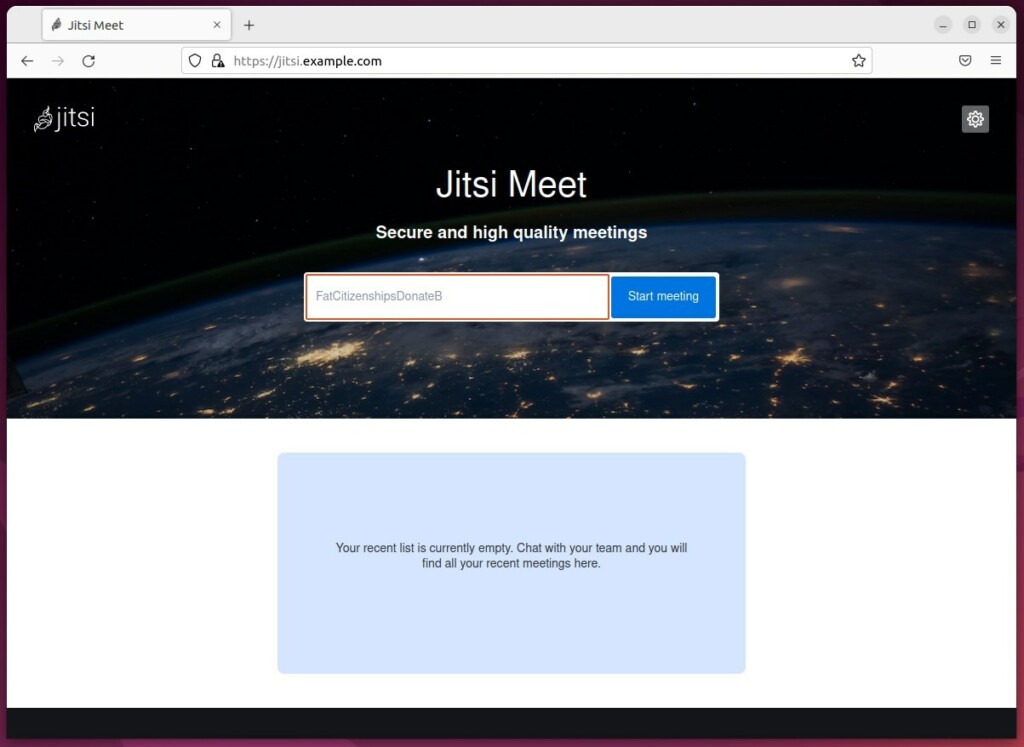
Finally, type the domain created above to access the Jitsi Meet portal.
https://jitsi.example.com
By default, anyone with the URL can create and schedule meetings. You can change that in the configuration files above.
Also, if your system is behind a NAT or firewall, you must allow traffic to traverse the firewall. Run the commands below to open the configuration file.
sudo nano /etc/jitsi/videobridge/sip-communicator.properties
Add the lines into the file and save.
org.ice4j.ice.harvest.NAT_HARVESTER_LOCAL_ADDRESS=<Local.IP.Address>
org.ice4j.ice.harvest.NAT_HARVESTER_PUBLIC_ADDRESS=<Public.IP.Address>
That should do it!
For more about setting up Jitsi Meet, visit its community page at the link below:
Conclusion:
- Easy Installation: The installation of Jitsi Meet on Ubuntu Linux is straightforward, requiring the addition of its official repository and a few package installations.
- Flexible Configuration: Users can easily configure settings related to SSL certificates, firewall permissions, and domain accessibility according to their specific environment and requirements.
- Community Support: The Jitsi Meet platform offers a vibrant community page for further assistance and information, ensuring users have access to resources for potential troubleshooting and additional setup tips.
- Secure and Open Source: With its emphasis on security and open-source nature, Jitsi Meet provides users with a trustworthy and cost-effective solution for video conferencing on Ubuntu Linux.


Leave a Reply