How to Enable Passkey Managers on Windows 11
You enable passkey managers on Windows 11 by integrating them with your Microsoft account, allowing passwordless logins for compatible apps and websites.
Passkeys are a modern authentication method that replaces passwords with cryptographic keys, offering enhanced security and user convenience through biometric verification (like fingerprint or facial scan) or a PIN.
Windows 11 introduced native support for passkeys, streamlining the process for users to adopt this advanced login technology. This feature is essential for a secure and efficient digital experience.
Go to Settings > Accounts > Passkey settings. Click Advanced options and use the switch to turn saving passkeys on or off. This allows you to manage whether Windows saves your passkeys or if a third-party manager handles them.
What are Passkeys?
Passkeys are a modern way to log into websites and apps without needing to type a password. Think of them like a digital key that uses your face, fingerprint, or a PIN on your device to prove it’s really you, making sign-ins quicker and much safer than traditional passwords.
When you use Windows Hello, your passkeys are usually saved on your device. This lets you sign in quickly with your face, fingerprint, or PIN.
If you prefer, Windows 11 also lets you use popular tools like 1Password or Bitwarden to manage your passkeys.
By default, you can’t disable saving passkeys to Windows. However, adding a third-party manager gives you control to turn saving on or off.
How to Turn On or Off Passkey Managers on 🪟 Windows 11
You can easily turn passkey managers on or off in Windows 11 through the Settings app. To start, open Settings by clicking the Start menu and selecting it, or by pressing the Windows key and ‘I’ together. Then, go to the Accounts section and look for the Passkey settings to make your changes.
- Open Windows Settings: Click the Start menu (the Windows icon in the lower-left corner) and select Settings. Or press Windows key + I on your keyboard to open Settings quickly.
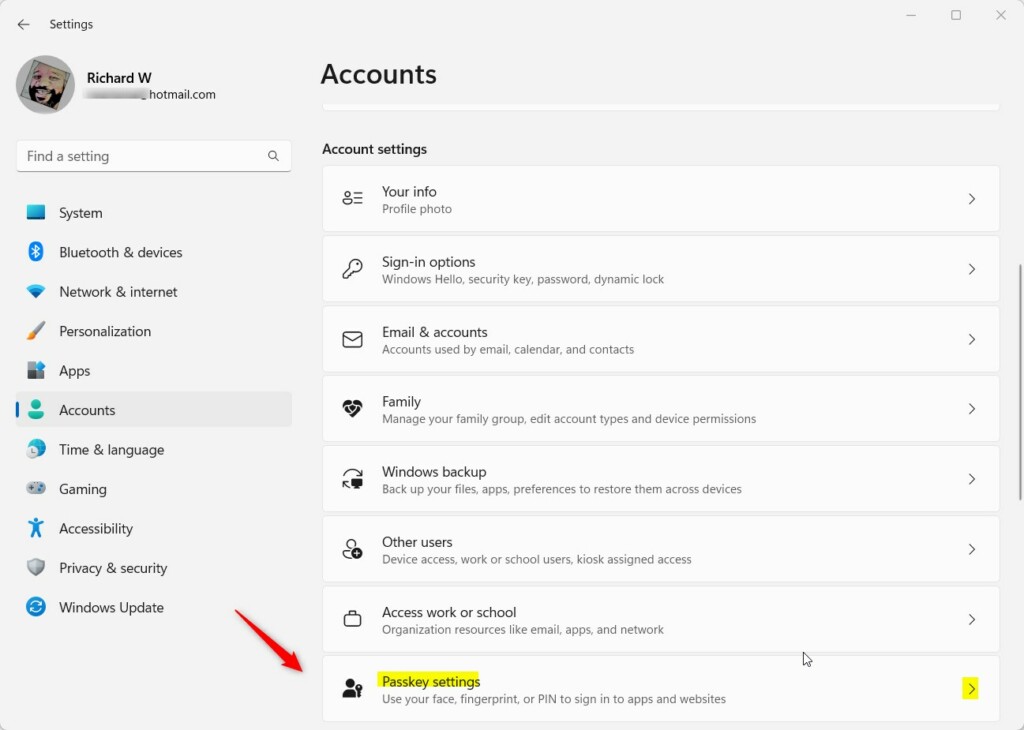
- Go to Accounts: In the Settings window, click on the Accounts option on the left side.
- Find Passkey Settings: On the right side, look for the Passkey settings box and click it to open.
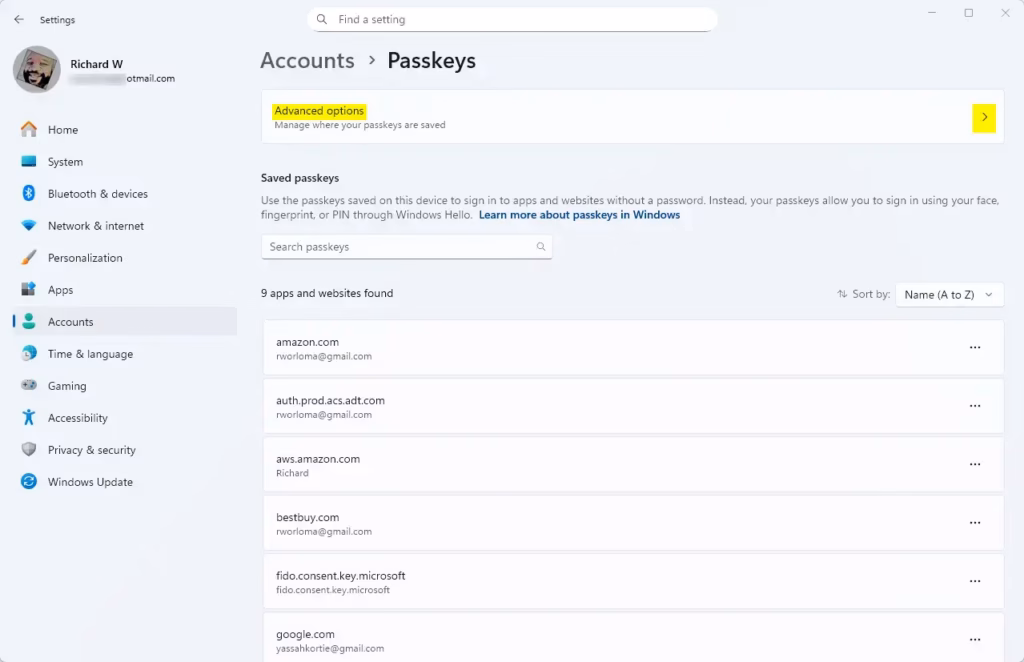
- Open Advanced Options: Inside Passkey settings, click the Advanced options to see more settings.
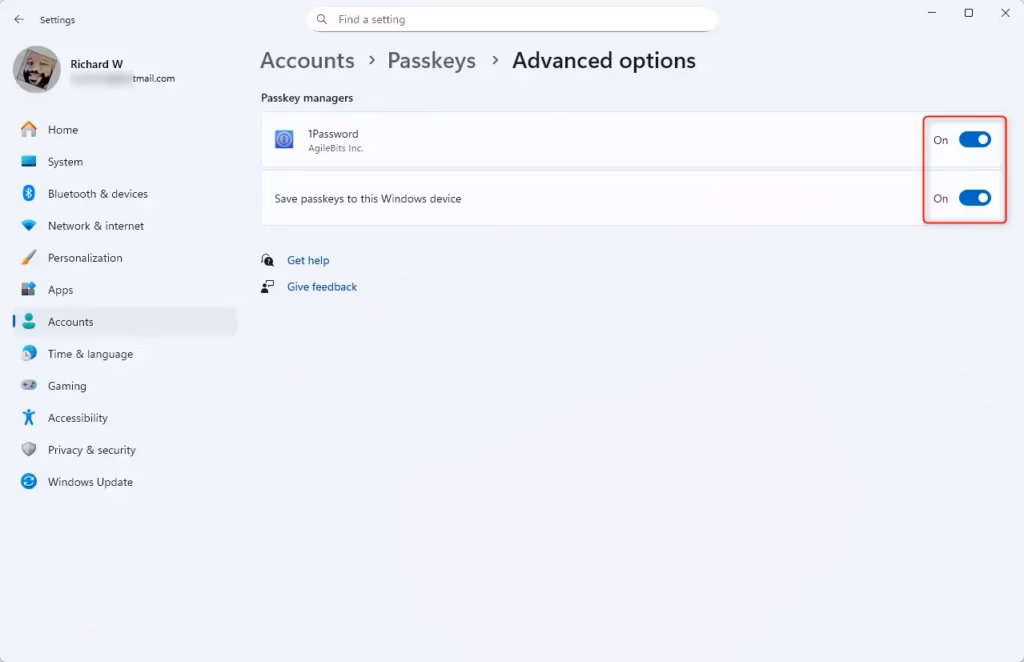
- Turn Saving Passkeys On or Off: You will see a switch to save passkeys to your device. Click it to turn saving passkeys on or off.
Here are some pictures to help you:
That’s it! You’ve successfully adjusted your passkey settings.
Why Use Passkeys?
- Safer than passwords: Passkeys use your face, fingerprint, or PIN instead of typing passwords that can be stolen.
- Works with popular apps: You can use tools like 1Password or Bitwarden to keep your passkeys safe and organized.
- Easy to turn on /off: You decide if Windows should save your passkeys or not. This is especially helpful if you use third-party apps.
- Better sign-in experience: Passkeys make signing in faster and smoother.
- Keep your software updated: For the best security, always keep Windows and your apps up to date.
Using passkeys on Windows 11 is a great idea because they’re much safer than passwords, as they use your unique biometrics or PIN instead of something that can be easily stolen. They also work with popular apps like 1Password and Bitwarden, and you have full control over whether Windows saves them, making sign-ins smoother and more secure.
How to sign in with your face on Windows 11
Summary
This guide showed you how to manage passkey managers in Windows 11, explaining that passkeys offer a safer and faster way to sign in using your face, fingerprint, or PIN. You can control these settings directly within the Windows Settings app, and keeping your system updated ensures the best security.
How do I manage passkeys in 🪟 Windows 11?
To manage where your Windows passkeys are saved, open the Settings app on your device. Then, go to Accounts, select Passkeys, and choose Advanced options. Here, you can turn the passkey services on or off.
Where are my passkeys stored in 🪟 Windows 11?
And liking the video, it’s quick and easy to go and see the saved passwords and credentials in Windows 11. So to get started, come to the bottom and press search. What you want to do is go and type in
What is a passkey manager?
A passkey manager is a special tool that creates, saves, and automatically uses passkeys – digital credentials that prove who you are without needing a password. While regular password managers protect text passwords, passkey managers use a more advanced system involving public and private keys.
Was this guide helpful?

About the Author
Richard
Tech Writer, IT Professional
Richard, a writer for Geek Rewind, is a tech enthusiast who loves breaking down complex IT topics into simple, easy-to-understand ideas. With years of hands-on experience in system administration and enterprise IT operations, he’s developed a knack for offering practical tips and solutions. Richard aims to make technology more accessible and actionable. He's deeply committed to the Geek Rewind community, always ready to answer questions and engage in discussions.


No comments yet — be the first to share your thoughts!