

This article explains how to enable or disable the “Allow Storage Sense temporary files cleanup” in Windows 11.
Storage Sense is a feature in Windows 11 (and also available in Windows 10) that helps free up space on your computer by automatically deleting temporary files, emptying the recycle bin, and removing files in the Downloads folder for a certain period.
The Storage Sense feature is off by default. However, you can enable it to run when your device is low on disk space so that it cleans up unnecessary temporary files.
A Policy setting in Windows lets you enable or disable whether Storage Sense should automatically clean temporary files on your computer. This can be enforced for a single user or all users on the computer.
Enable or disable Allow Storage Sense temporary files cleanup
As mentioned, users can enforce a Storage Sense feature to clean up temporary files automatically.
Here’s how to do it.
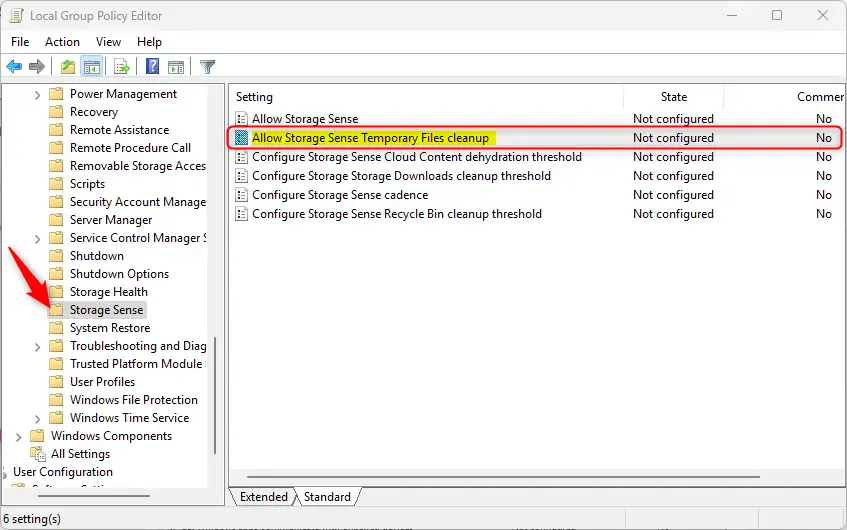
First, open the Local Group Policy Editor (gpedit.msc). (Search for “Edit group policy”) on the Start menu.
Then, navigate the folders below:
Computer Configuration -> Administrative Templates -> System -> Storage Sense
In the Storage Sense details pane on the right, locate and double-click the “Allow Storage Sense Temporary Files cleanup” settings.
On the “Allow Storage Sense Temporary Files cleanup” window, set the option to Not Configure, Enabled, or Disabled.
- Not Configured (default)
- Enabled – Storage Sense will delete the user’s temporary files that are not in use. Users cannot disable this setting in Storage settings.
- Disabled – Storage Sense will not delete the user’s temporary files. Users cannot enable this setting in Storage settings.
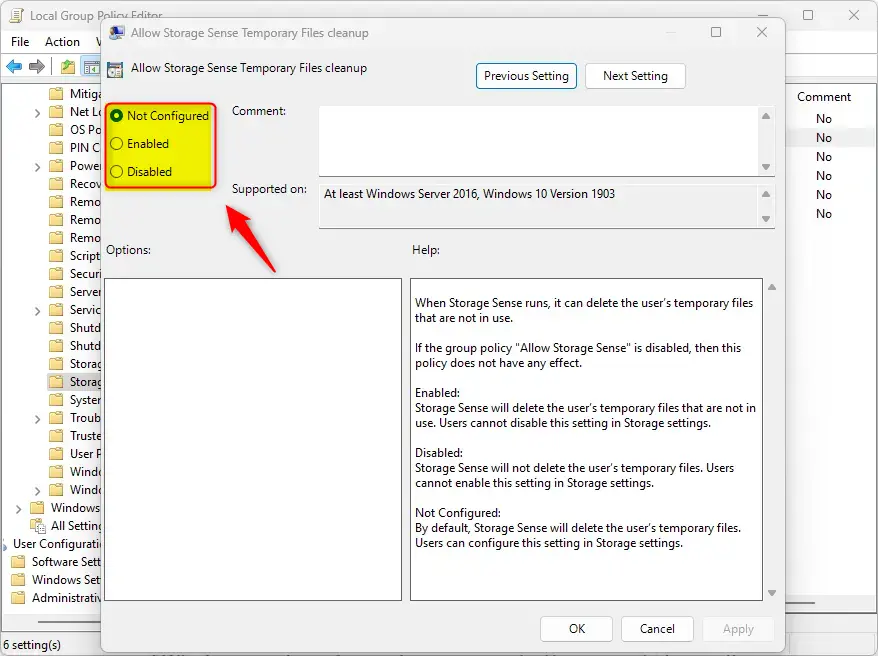
Click OK to save your changes. You may have to reboot your device to apply the settings.
Turn on or off Allow Storage Sense temporary files cleanup using the Windows Registry Editor
Yet another way to enable or disable “Allow Storage Sense temporary files cleanup” in Windows is to use the Windows Registry editor.
First, open the Windows Registry editor as administrator.
Then, navigate to the registry key below.
ComputerHKEY_LOCAL_MACHINESOFTWAREPoliciesMicrosoftWindowsStorageSense
Next, double-click the “AllowStorageSenseTemporaryFilesCleanup” REG_DWORD name on the StorageSense key’s right pane to open it.
Then, type 0 to disable the “Allow Storage Sense Temporary Files cleanup” in Windows.
If you do not see the “AllowStorageSenseTemporaryFilesCleanup” item, right-click a blank area and create a new DWORD (32-bit) Value registry item.
Then, type “AllowStorageSenseTemporaryFilesCleanup” and enter 0 to disable the “Allow Storage Sense Temporary Files cleanup” feature.
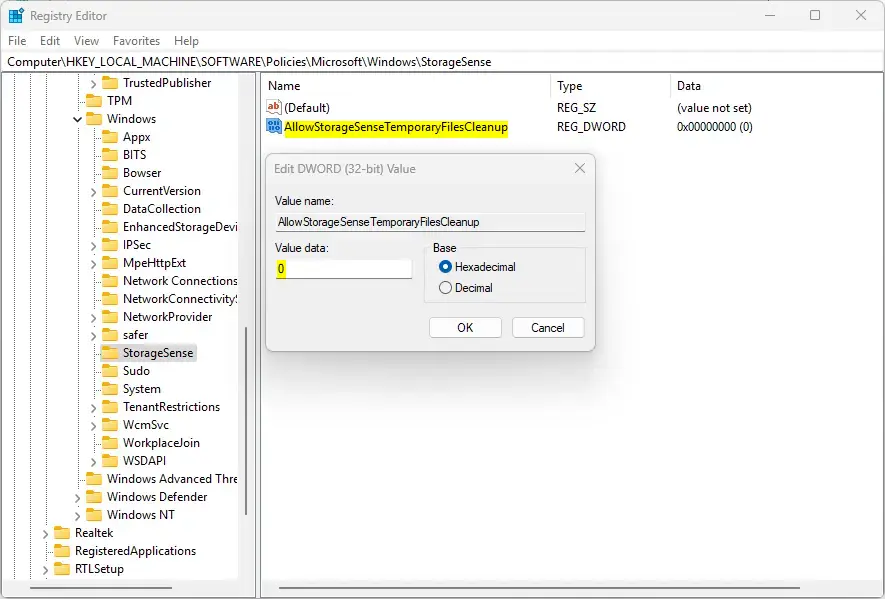
To restore the default behavior and continue to allow users to manage this feature, delete the “AllowStorageSenseTemporaryFilesCleanup” item created above.
That should do it!
Conclusion:
- Enabling or disabling the “Allow Storage Sense temporary files cleanup” feature in Windows 11 can help manage disk space efficiently.
- Users can utilize the Local Group Policy Editor or the Windows Registry Editor to customize this setting according to their preferences.
- It’s essential to understand the implications of enabling or disabling this feature to keep the system running smoothly while managing temporary files.


Leave a Reply