
This tutorial will show you how to turn Wake on LAN (WOL) on or off for your network adapters in Windows 11.
What is Wake on LAN?
Wake on LAN (WOL) is a feature that wakes up your computer from sleep mode. It works when your network adapter detects a WOL event, such as a magic packet sent over the network.
Why Use Wake on LAN?
WOL lets you turn on your computer remotely using another device on your network. This is useful if you want to access your computer without walking over to turn it on manually.
Note: You may need to disable Fast Startup for Wake on LAN to work properly. You must be signed in as an administrator to enable or disable Wake on LAN. Low Power for Wake on LAN – Windows drivers Wake On LAN for Surface devices – Surface Enabling Wake-on-LAN
Option One: Enable or Disable Wake on LAN in UEFI Firmware Settings
This option is needed to turn on WOL for Ethernet adapters built into your motherboard. WOL is usually turned on by default in UEFI.
- Boot into your UEFI Firmware Settings.
- Find and enable or disable the Power On By PCI-E or WOL (Wake-on-LAN) setting based on what you want.
The Power On By PCI-E setting is usually in the Advanced tab > Advanced\APM Configuration for some motherboards. For other motherboards, this setting may be in the Power or Power Management tab.
- When finished, select Exit and save your changes.
- You will also need to follow one of the options below to turn Wake on LAN on or off in Windows 11.
Option Two: Enable or Disable Wake on LAN in Settings
If you are turning on WOL for an Ethernet adapter on your motherboard, make sure you first completed Option One.
- Open Settings.
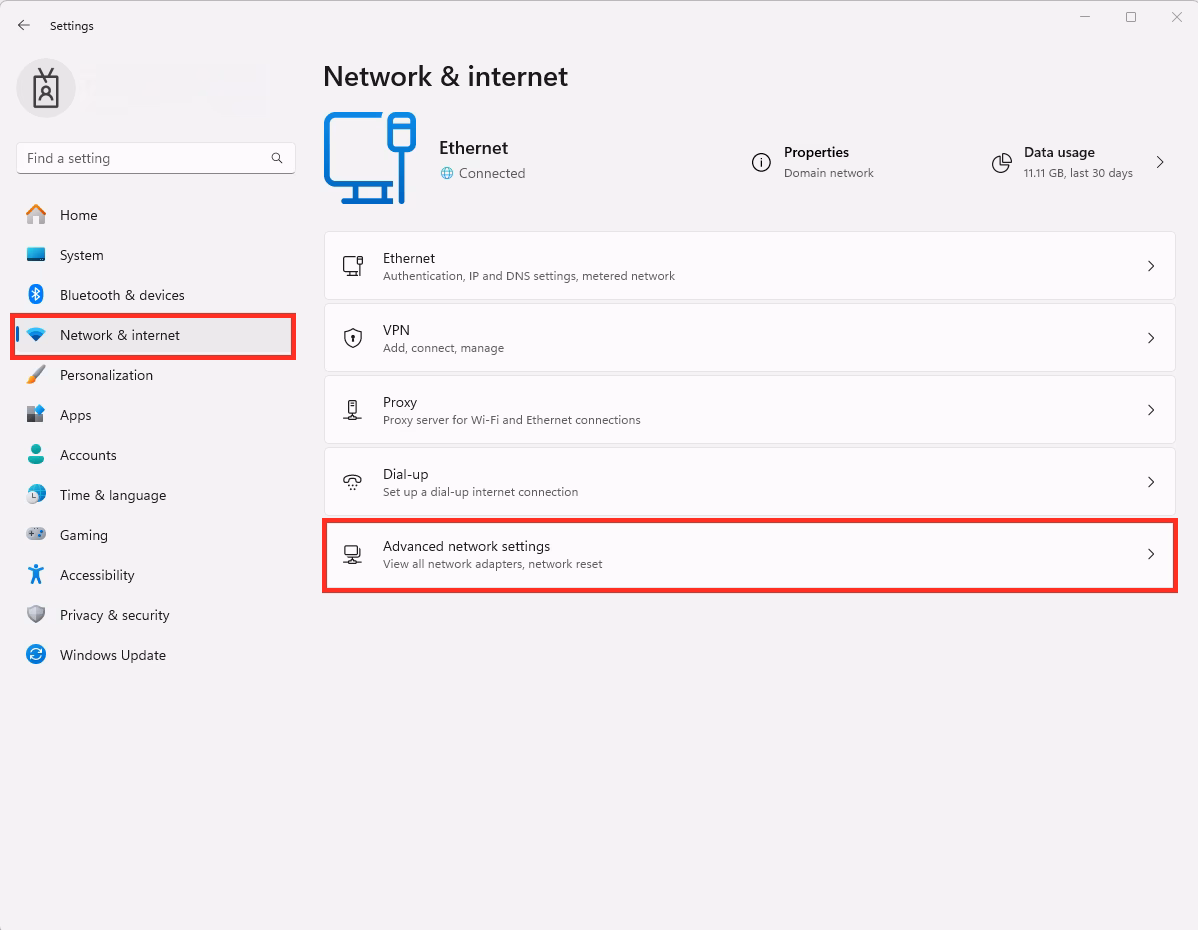
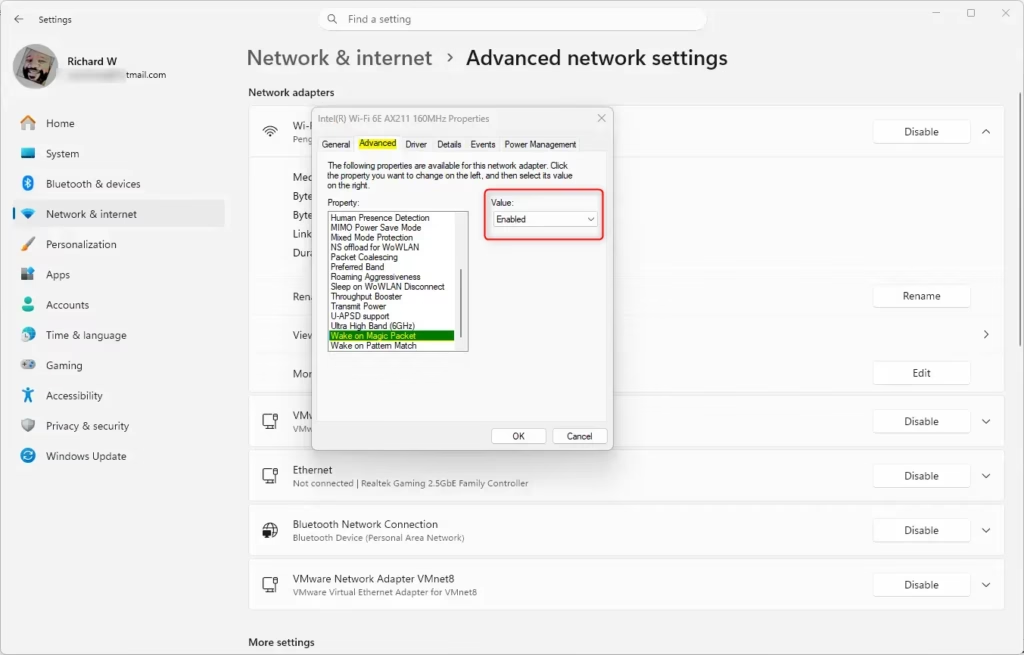
- Click on Network & internet on the right side, then click Advanced network settings on the right side.
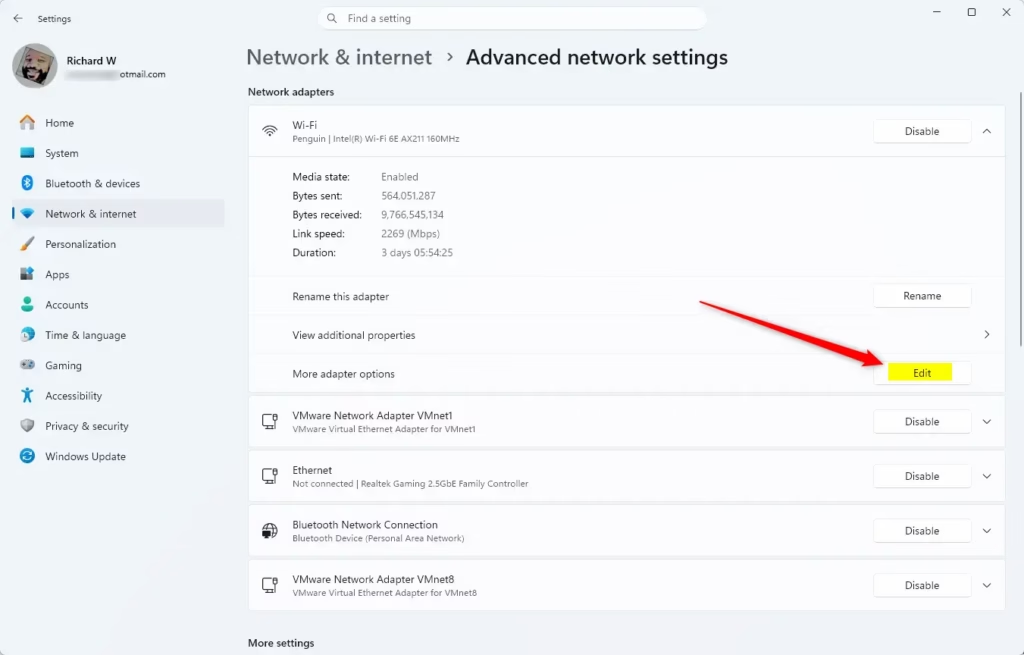
- Click on the Ethernet adapter you want to change to expand it.
- Click the Edit button for More adapter options.
- You can close Settings now if you like.
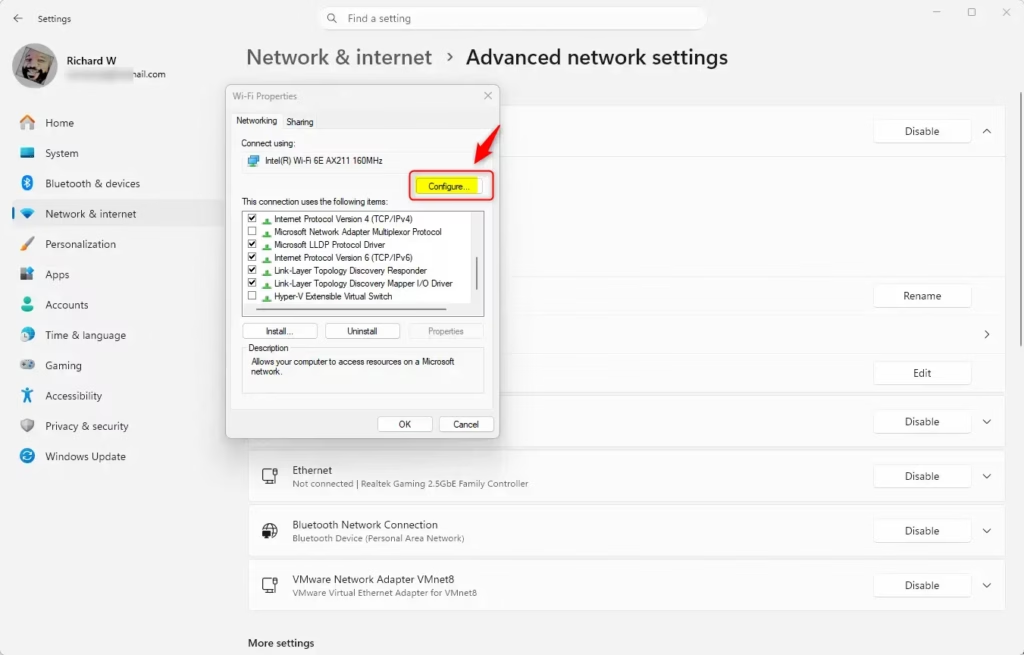
- Click Configure in properties.
- Follow these steps:
- Click the Advanced tab.
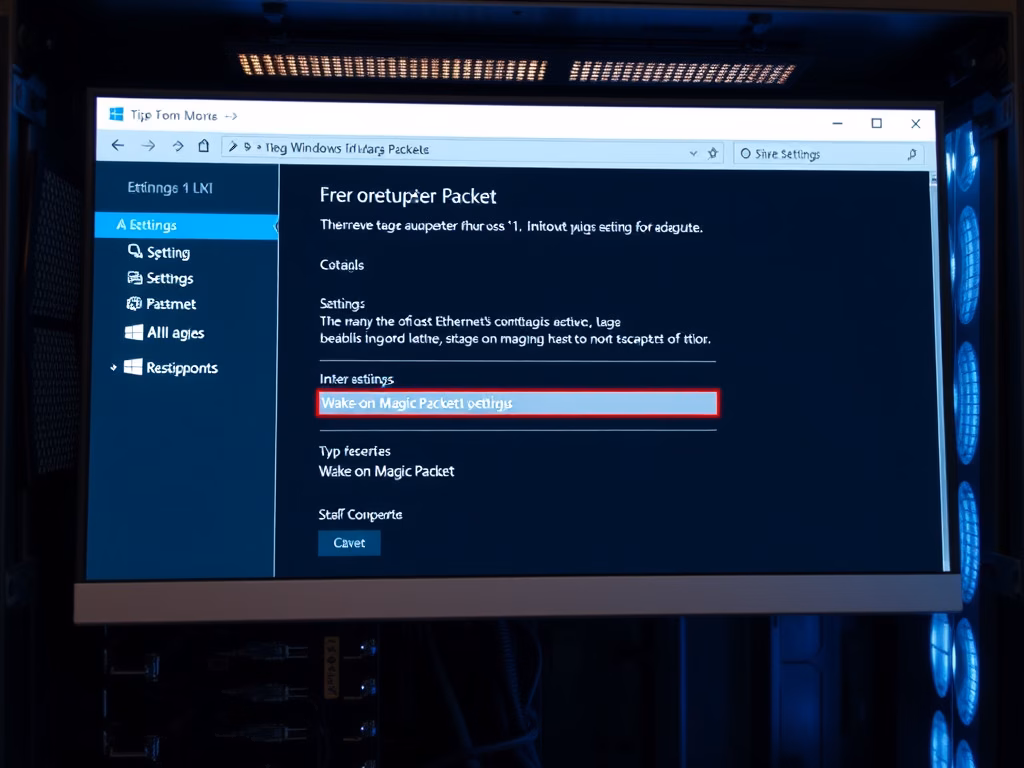
- Select Wake on Magic Packet (if available) in the Property list.
- Select Enabled (default) or Disabled based on what you want.
- Follow these steps:
- Click the Power Management tab.
- Check Allow the computer to turn off this device to save power.
- Check (enable – default) or uncheck (disable) Allow this device to wake the computer based on what you want.
- Check or uncheck (default) Only allow a magic packet to wake the computer based on what you want. Only allow a magic packet to wake the computer will be grayed out if you unchecked Allow this device to wake the computer.
- Click OK.

Option Three: Enable or Disable Wake on LAN in Device Manager
If you are turning on WOL for an Ethernet adapter on your motherboard.
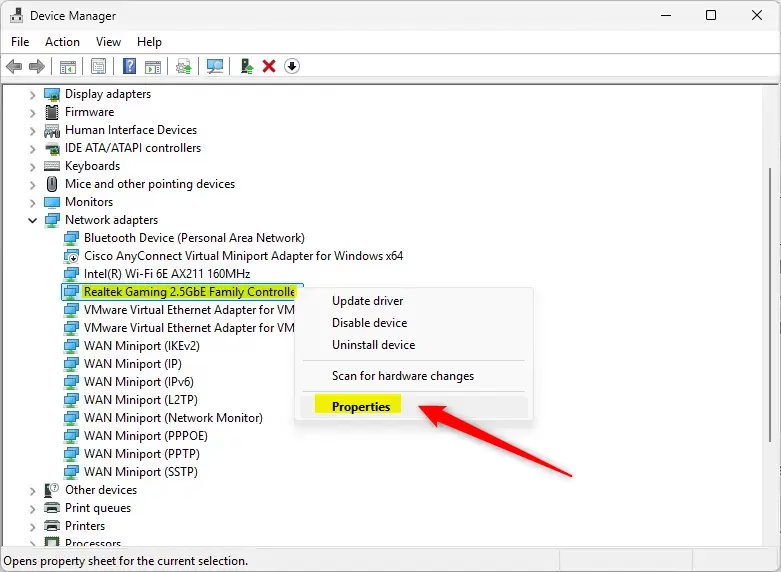
- Open Device Manager by typing
devmgmt.mscin the search bar. - Expand Network adapters in Device Manager. Double-click on the network adapter you want to change. This opens its properties page.
- Follow these steps:
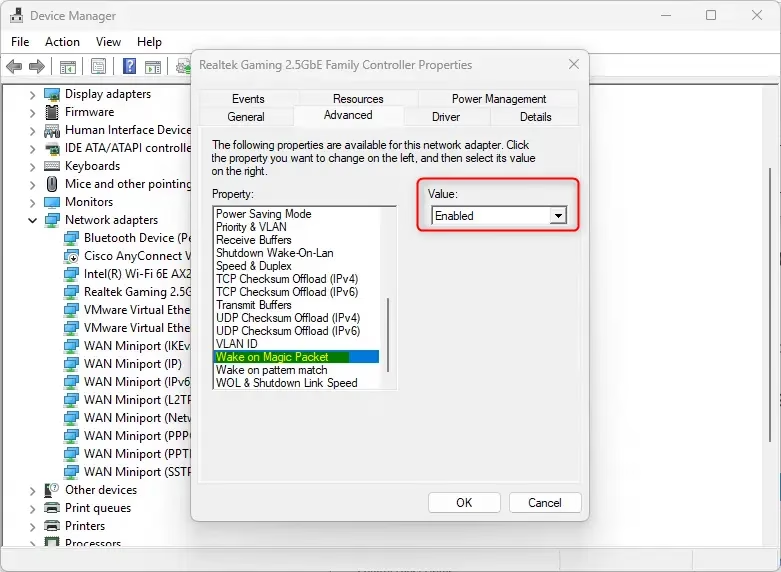
- Click the Advanced tab.
- Select Wake on Magic Packet (if available) in the Property list.
- Select Enabled (default) or Disabled based on what you want.
- Follow these steps:
- Click the Power Management tab.
- Check Allow the computer to turn off this device to save power.
- Check (enable – default) or uncheck (disable) Allow this device to wake the computer based on what you want.
- Check or uncheck (default) Only allow a magic packet to wake the computer based on what you want. Only allow a magic packet to wake the computer will be grayed out if you unchecked Allow this device to wake the computer.
- Click OK.
Option Four: Enable or Disable Wake on LAN in Network and Sharing Center
If you are turning on WOL for an Ethernet adapter on your motherboard.
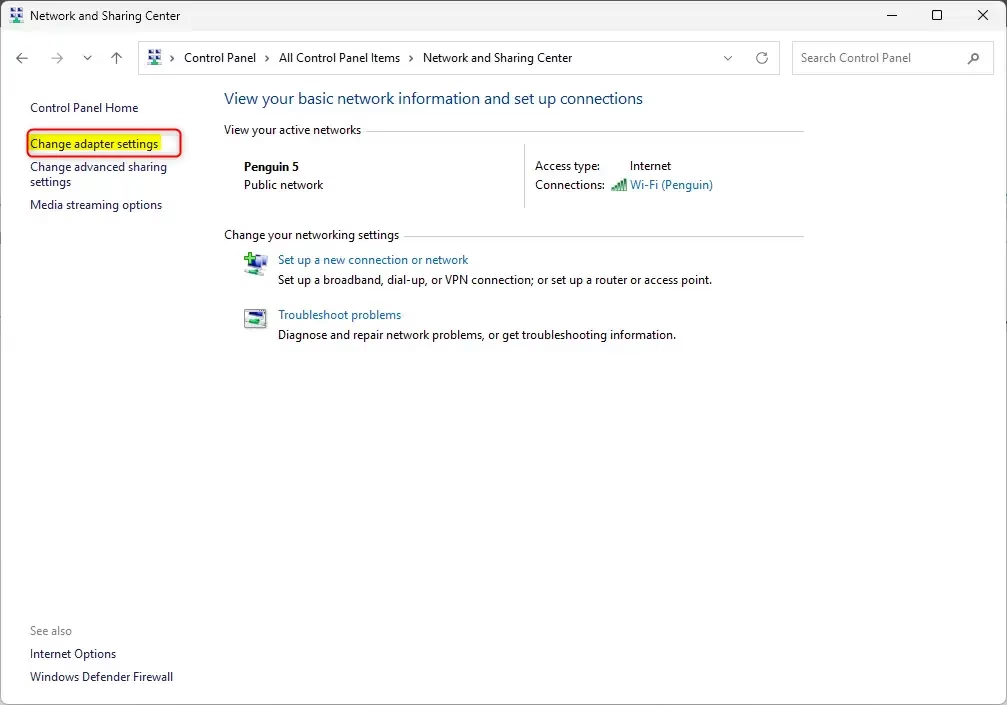
- Open Control Panel (icons view) and click the Network and Sharing Center icon.
- Click the Change adapter settings link on the left side of the Network and Sharing Center.
- Right-click on the Ethernet network adapter you want to change, and click Properties.
- Click Configure in properties.
- Follow these steps:
- Click the Advanced tab.
- Select Wake on Magic Packet (if available) in the Property list.
- Select Enabled (default) or Disabled based on what you want.
- Follow these steps:
- Click the Power Management tab.
- Check Allow the computer to turn off this device to save power.
- Check (enable – default) or uncheck (disable) Allow this device to wake the computer based on what you want.
- Check or uncheck (default) Only allow a magic packet to wake the computer based on what you want. Only allow a magic packet to wake the computer will be grayed out if you unchecked Allow this device to wake the computer.
- Click OK.
Option Five: Enable Wake on LAN Using Command
⚠️ Requires Admin Privileges
If you are turning on WOL for an Ethernet adapter on your motherboard.
- Open Windows Terminal as Administrator, and select either Windows PowerShell or Command Prompt.
- Copy and paste the command below into Windows Terminal, and press Enter. This shows a list of all devices that can be set to wake the computer.
powercfg -devicequery wake_programmable - Write down the name of the Ethernet adapter
- Type the command below into Windows Terminal, and press Enter.
Replace Device name in the command above with the actual device namepowercfg -deviceenablewake "Device name" - You can close Windows Terminal now if you like.
Option Six: Disable Wake on LAN Using Command
⚠️ Requires Admin Privileges
- Open Windows Terminal as Administrator, and select either Windows PowerShell or Command Prompt.
- Copy and paste the command below into Windows Terminal, and press Enter. This shows a list of all devices that are set to wake the computer.
powercfg -devicequery wake_armed - Write down the name of the Ethernet adapter
- Type the command below into Windows Terminal, and press Enter.
Replace Device name in the command above with the actual device namepowercfg -devicedisablewake "Device name" - You can close Windows Terminal now if you like.
Summary
Wake on LAN (WOL) lets you turn on your computer from another device on your network. You can enable or disable WOL using six different methods: UEFI firmware settings, Windows Settings, Device Manager, Network and Sharing Center, or command-line tools. Most motherboards have WOL enabled by default in UEFI. If you use Settings, Device Manager, or Network and Sharing Center, you can control which devices wake your computer and whether to allow magic packets only. For command-line users, you can use simple PowerShell or Command Prompt commands to enable or disable WOL quickly. Choose the method that works best for you.


Leave a Reply to Setting Up a Windows 11 PC to Wake Up from Sleep Mode Automatically - Geek Rewind Cancel reply