
This article explains how to change or resize the maximum size of the Recycle Bin for each volume on Windows 11.
By default, Windows automatically assigns a maximum size for the Recycle Bin on each volume.
Any time you delete something on Windows, it goes to the Recycle Bin. Whatever was deleted sits there in the Recycle Bin until you manually empty it or it reaches its default maximum size, at which point Windows deletes the oldest files to make room for new ones.
Computers with multiple hard drives or partitions will each have their own Recycle Bin settings. The settings are stored as a hidden system folder named “$RECYCLE.BIN” at the root of each volume.
In many cases, the default Recycle Bin size will be just fine. However, if you delete many files and folders regularly, and the Recycle Bin is typically full, older items will automatically be removed. If you want to restore these items, you may never get them back.
How to resize the recycle bin’s maximum size
As mentioned above, Windows automatically assigns the maximum size of the recycle bin.
To adjust the maximum size of the recycle bin, right-click on the Recycle Bin icon on your desktop, then select Properties from the context menu, as shown below.
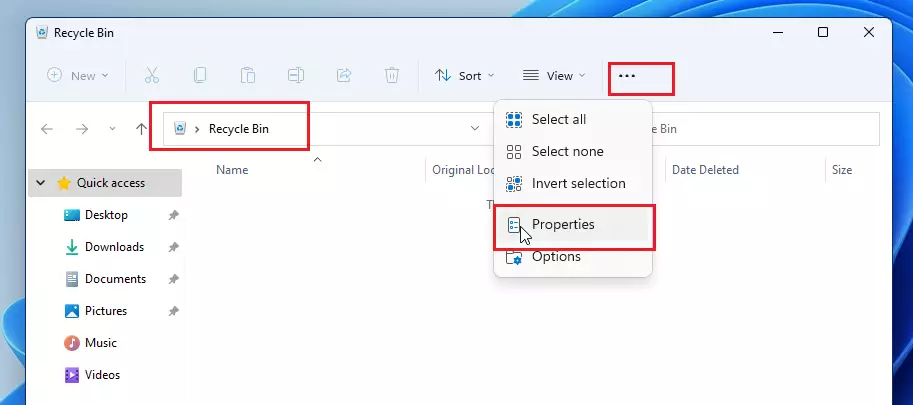
You can also access the Properties settings by opening the Recycle Bin, selecting the ellipsis (three dots on the toolbar menu), and selecting Properties.
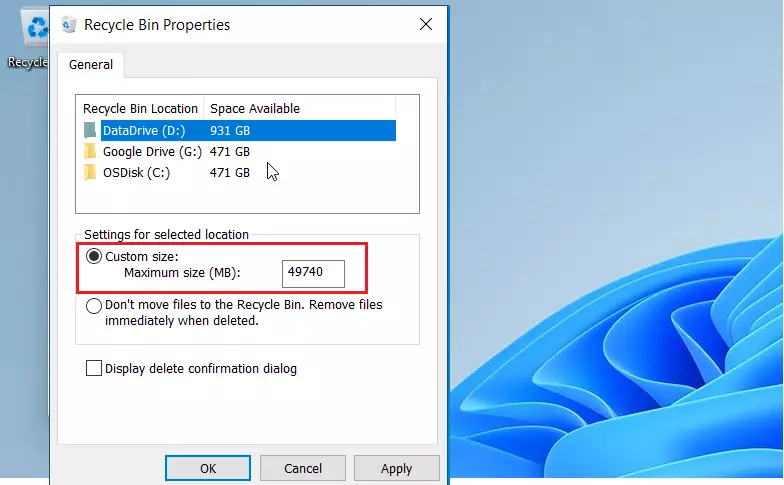
On the Recycle Bin Properties window, you’ll see each volume listed. If you have only one volume, then you’ll only see that. If you have multiple volumes, you’ll see all listed. Select the volume you want to change the size of, then type a specific size in MB in the “Custom Size” field.
Click OK to save your settings, and you’re done.
Those who prefer items are immediately deleted instead of setting them in the Recycle Bin. They can choose the option that reads “Don’t move files to the Recycle Bin. Remove files immediately when deleted“
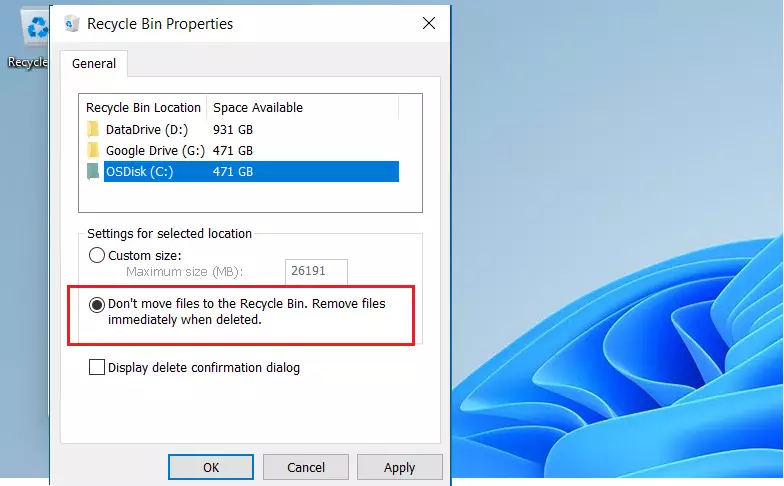
Additional settings can be enabled from the properties window, like “Displaying delete confirmation dialog” before deleting or emptying the Recycle Bin. These are all good settings and can be set on the Recycle Bin properties window.
That should do it!
Conclusion:
- Adjusting the maximum size of the Recycle Bin can help keep deleted items accessible for extended periods.
- Reviewing your Recycle Bin settings is advisable, especially if you frequently delete files.
- Consider enabling additional settings, such as delete confirmation dialogs for extra safety.
- Remember that emptying the Recycle Bin will permanently remove files, so proceed cautiously.
- Customize settings based on your habits to enhance your file management experience on Windows 11.


Leave a Reply