This article explains how to change the “Notification content” settings in the Signal app on Windows 11.
Signal is a cross-platform popular messaging app. It allows users to send and receive encrypted messages, make voice and video calls, and share files from their devices, including computers.
When you install and set up the Signal Desktop app, you can choose to have it open automatically when you log in to your computer. The app also allows you to turn on or off call relay through Signals’ servers to avoid revealing your IP address, turn disappearing messages on or off, and more.
By default, the Signal app will display the name, content, and action on the notification banner in Windows. You can change the notification content setting to display none to keep information private.
Changing the notification content settings in the Signal app can be useful if you want to keep your messages private. You can choose not to display content details on the notification banner so no one can see your screen and read your messages.
This is especially useful if you work in a public place or share your computer with others.
Change notification content settings in the Signal app
As mentioned above, users can change their notification content settings in the Signal app to keep their information private by not displaying content details on the notification banners.
Here’s how to do that.
First, launch the app by clicking the Start menu and selecting it on the All Apps list.
You can also launch the app from the Taskbar or Taskbar overflow.
When the app opens, click File and select Preferences ( CTRL + , ) on the menu. You can also get the Preferences window by clicking the Settings (gear) button at the bottom left.

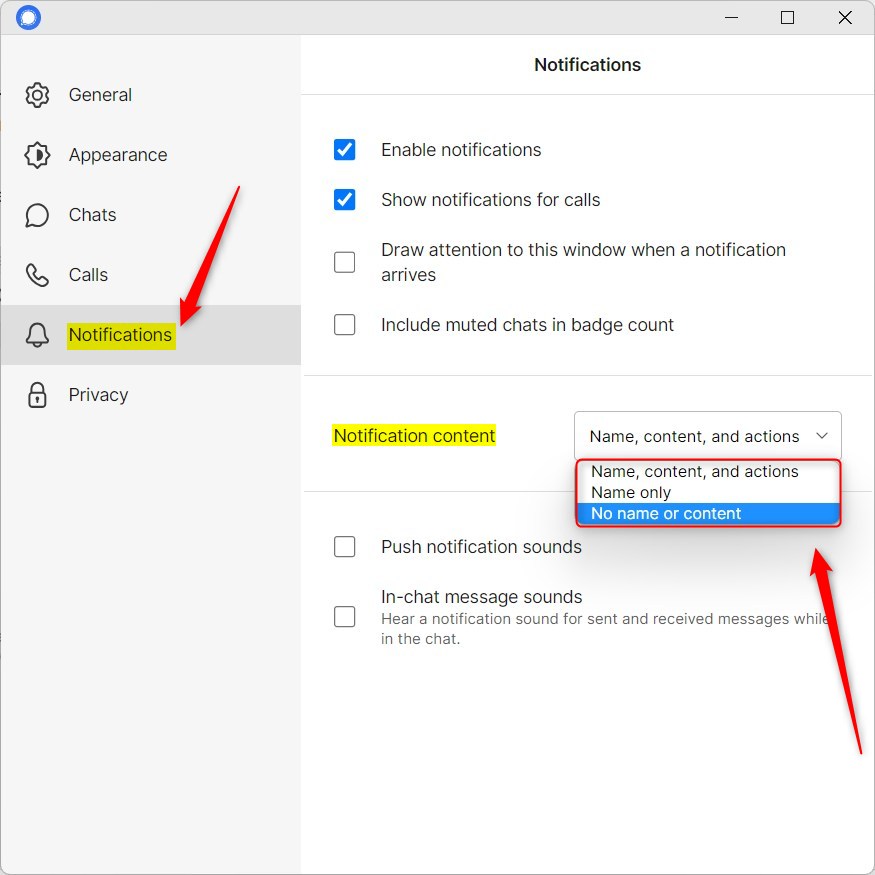
On the Preferences window, select Notifications on the left menu. On the right, select the “Notification content” tile. Then, select one of the following settings for notifications you received on Windows.
- Name, content, and actions
- Name only
- No name or content
To hide all notification content, select “No name or content.”
That should do it!
Conclusion:
- Changing the notification content settings in the Signal app on Windows allows users to maintain their privacy by not displaying content details on the notification banners.
- By following the simple steps outlined in this guide, users can choose to hide all notification content, ensuring their messages remain private and inaccessible to prying eyes.
- This feature is especially beneficial for individuals who work in public spaces or share their computers with others, providing an added layer of confidentiality and security.
- We hope this tutorial has empowered you to take control of your notification content settings and enhance your privacy while using the Signal app on Windows. If you have any feedback or additional insights, we welcome you to share them in the comments section below.


Leave a Reply to How to Manage Read Receipts in Signal App – Geek Rewind Cancel reply