

Does your mouse scroll feel backward or unnatural? This guide will show you how to change the scrolling direction in Windows 11. It’s easier than you think.
What is Mouse Scrolling Direction?
Mouse scrolling direction is how your screen moves when you roll the mouse wheel. Normally:
- Rolling the wheel up moves the page up.
- Rolling the wheel down moves the page down.
But Windows 11 can do the opposite. This is called reverse scrolling:
- Rolling the wheel up moves the page down.
- Rolling the wheel down moves the page up.
You can pick which way feels best to you. There are two main options:
- Reverse Scrolling: The page moves opposite to your wheel direction.
- Natural Scrolling: The page moves the same way as your wheel direction.
How to Change Mouse Scrolling Direction in Windows 11
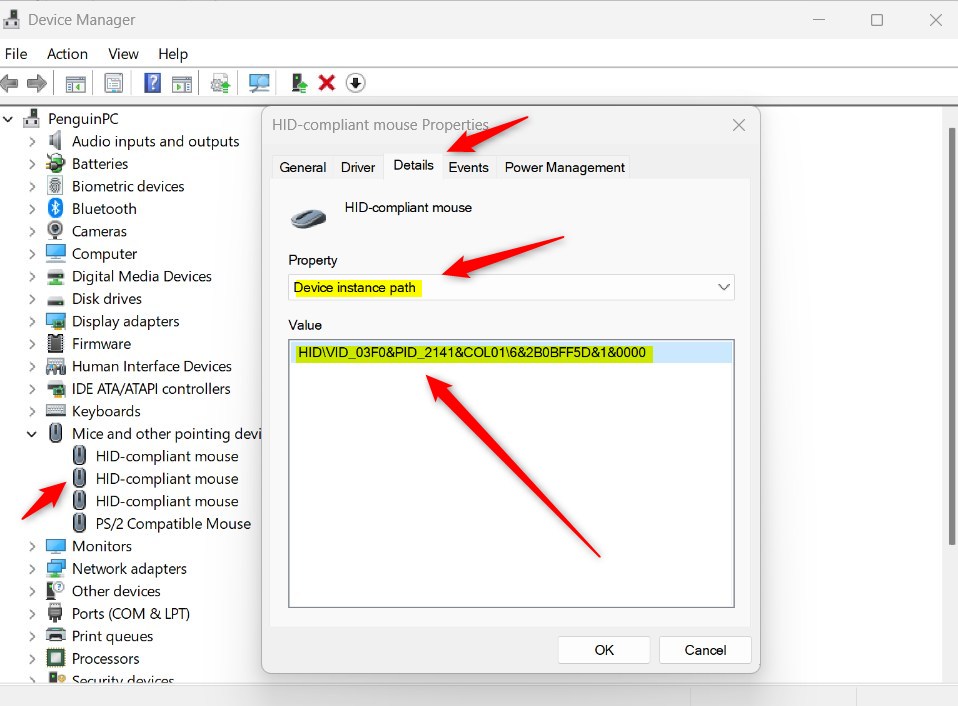
Step 1: Find Your Mouse Device ID
- Press Windows + R on your keyboard. A small box will pop up.
- Type
devmgmt.mscand press Enter. Device Manager will open. - Find Mice and other pointing devices and click the arrow next to it to expand the list.
- Double-click on your mouse device. A window will open showing its properties.
- Click the Details tab.
- Click the drop-down menu labeled Property.
- Select Device instance path.
- Look at the value that appears. It starts with HID and VID. Write this down or copy it. You’ll need it soon.
Step 2: Open the Registry Editor
- Press Windows + R again.
- Type
regeditand press Enter. - A prompt may appear asking for permission. Click Yes to allow it. ⚠️ Requires admin privileges
- For more help, check out this guide: How to Open Registry Editor in Windows 11
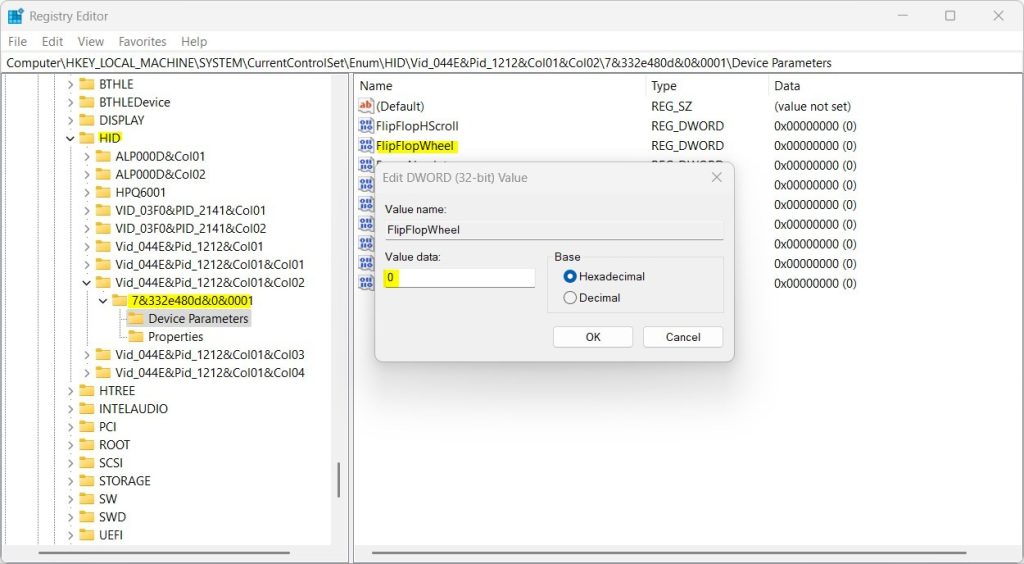
Step 3: Find Your Mouse in the Registry
- In the Registry Editor, go to this location:
Computer\HKEY_LOCAL_MACHINE\SYSTEM\CurrentControlSet\Enum\HID - Look through the folders inside. Find the one that matches the HID and VID number you copied earlier.
- Open that folder. Inside, find and open the Device Parameters folder.
Step 4: Change the Scrolling Direction
- On the right side of the window, look for an entry called FlipFlopWheel.
- If you see it, double-click it to open it.
- Change the value to one of these:
- 0 = Reverse scrolling (the default setting)
- 1 = Natural scrolling (works like a smartphone)
- If you don’t see FlipFlopWheel, right-click on an empty space on the right side. Choose New > DWORD (32-bit) Value. Name it FlipFlopWheel.
- Then double-click it and set the value to 1 for natural scrolling.
Step 5: Restart Your Computer
- Restart your PC to apply the changes. This makes sure everything works right.
Summary
Changing your mouse scrolling direction in Windows 11 takes just a few steps. You’ll need to find your mouse’s device ID, open the Registry Editor, locate your mouse settings, and change the FlipFlopWheel value. After you restart your computer, your mouse will scroll the way you want it to. Be careful when working in the Registry Editor. Changing the wrong settings can cause problems on your computer. When in doubt, follow each step carefully.


Leave a Reply Cancel reply