How to Add the Safely Remove Hardware and Eject Media icon to the system tray in Windows 11
The Safely Remove Hardware and Eject Media icon helps you disconnect USB drives and other external storage without risking data loss. This small icon appears in your Windows 11 system tray (that’s the area near your clock) when a device is connected.
Sometimes, this important icon might disappear from the system tray. Without it, you risk corrupting your files by yanking out a USB stick. Fortunately, restoring the Safely Remove Hardware icon is usually a quick fix.
Why You Need to Safely Remove Hardware
Why should you safely remove hardware? Windows sometimes holds onto files temporarily to speed things up. Pulling out a USB drive before Windows finishes can lead to lost work or damaged files.
Bringing Back the “Safely Remove Hardware” Icon
This icon can vanish from your system tray (the area near your clock). This often happens when no removable devices are connected. But if you want it visible, or if it’s missing even with a device plugged in, here’s how to make it reappear.
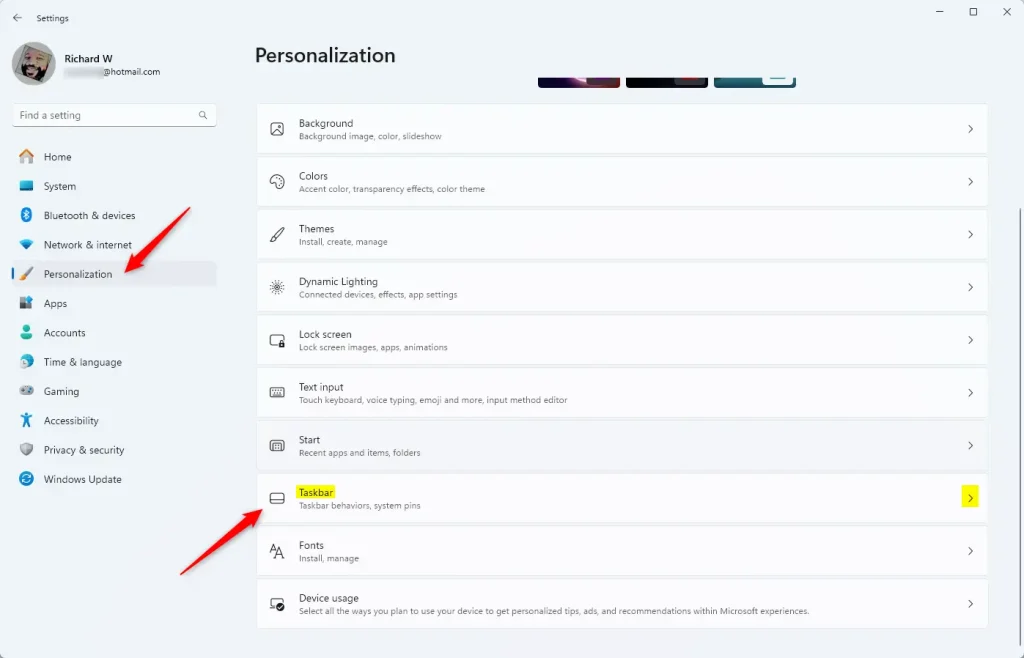
Step 1Open Taskbar Settings
Right-click an empty spot on your taskbar. Select “Taskbar settings” from the menu. This opens a window to change your taskbar’s behavior.
Tip: You can also go to Start > Settings > Personalization > Taskbar.
Step 2Find System Tray Options
In the Taskbar settings window, scroll down to the “ Notification area.” Click on “Other system tray icons.” This lets you control which icons show up.
Step 3Turn On the Safely Remove Hardware Icon
You’ll see a list of icons. Find the one that says “ Windows Explorer: Safely Remove Hardware and Eject Media” or similar. Make sure its switch is set to “On.”

As soon as you turn it on, the icon should appear in your system tray.
When the Icon Still Doesn’t Show Up
If the Safely Remove Hardware icon isn’t showing up even after you’ve tried the usual steps, it’s usually because Windows doesn’t detect a device that needs removing, like a USB stick.
- No Removable Device Connected: Windows often hides the icon if it doesn’t detect devices like USB drives that need safe removal. Try plugging in a USB drive to see if the icon appears.
- Device Not Recognized: Your PC might not be recognizing the connected device properly. If the icon still won’t show up, there could be a driver issue or a problem with the device itself.
Reference:
https://support.microsoft.com/en-US/Windows/Hardware/safely-remove-hardware-in-windows
Summary
Getting the “Safely Remove Hardware and Eject Media” icon back is a common requirement. By changing a few settings, you can ensure the icon is always there when you need to disconnect external storage safely and protect your data.
Was this guide helpful?

About the Author
Richard
Tech Writer, IT Professional
Richard, a writer for Geek Rewind, is a tech enthusiast who loves breaking down complex IT topics into simple, easy-to-understand ideas. With years of hands-on experience in system administration and enterprise IT operations, he’s developed a knack for offering practical tips and solutions. Richard aims to make technology more accessible and actionable. He's deeply committed to the Geek Rewind community, always ready to answer questions and engage in discussions.

No comments yet — be the first to share your thoughts!