How to Set Default Microphone in Ubuntu Linux


Setting a default microphone in Ubuntu Linux tells your computer which audio hardware to use for voice calls, video chats, and sound recordings. Ubuntu 22.04 LTS and newer releases manage this primary audio input directly through the main sound settings panel.
Selecting your main microphone stops the operating system from guessing when you plug in several sound devices, such as a USB webcam and a gaming headset. Picking the correct device keeps your voice clear and prevents audio dropouts in communication apps like Zoom or Discord.
The standard method takes about a minute, needs no terminal commands, and needs no restart. It works the same on a laptop with a built-in mic as on a desktop with external hardware. You can undo it at any time by choosing a different device in the same place. If a device is missing from the Settings list, there are other ways to set it, covered near the end of this guide.
Open Settings , click Sound in the sidebar, then under Input choose your microphone from the Input Device dropdown. Ubuntu 22.04 LTS and newer use this as the default for voice calls and recordings, and the change takes effect immediately with no restart needed. Apps with their own microphone setting, such as Zoom or Discord, will override it.
How to set the default microphone in Ubuntu Linux
Setting a default microphone in Ubuntu Linux takes just a few clicks through the system settings. The short version:
- Open the Settings app.
- Click Sound in the sidebar.
- Under Input, choose your preferred device.
After that, your voice apps and recorders use that microphone automatically, unless an app has its own microphone setting (more on that below). The sections below walk through each step and show what you should see on screen.
Ubuntu Linux tries to identify the best input device automatically. When you plug in a headset or USB microphone, it usually switches to the new device on its own. That guess is not always the one you want, especially when a webcam with a built-in mic is also connected.
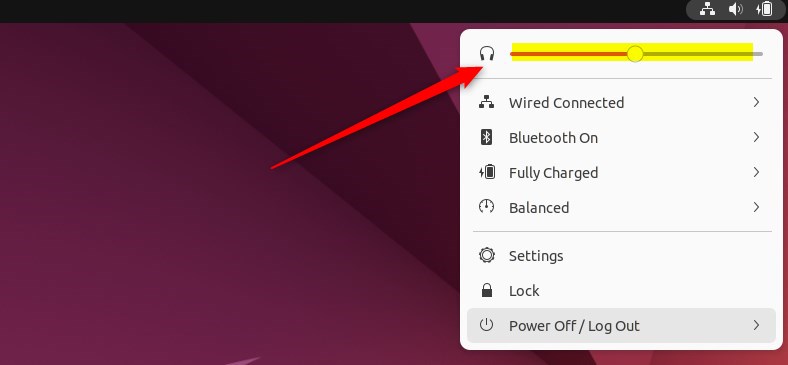
You can control the volume level from the system menu, though only one active device appears there at any given moment. To see every microphone Ubuntu has found, and to choose between them, you need the Sound panel in Settings.
Ubuntu keeps configuration options consolidated in the System Settings panel. This panel handles hardware preferences, user accounts, and software updates. Sound is one of the hardware entries in its sidebar, so you never have to hunt through separate tools to find the audio options.
Modern Ubuntu releases handle audio through PipeWire, which runs in the background and takes over the job PulseAudio used to do. The Sound panel is a front end for it. Any change you make there is the same change the other tools mentioned later in this guide make.
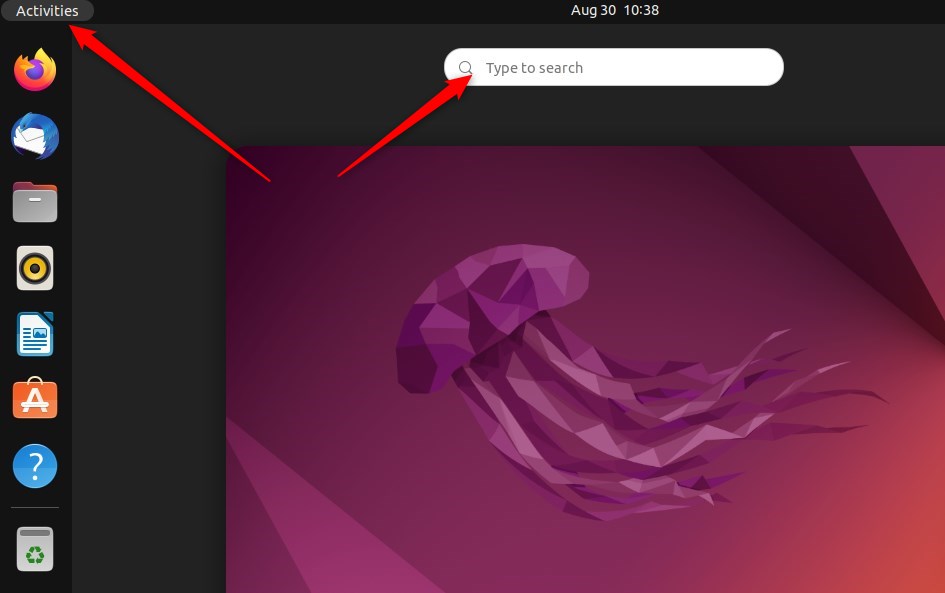
Then open the system menu.
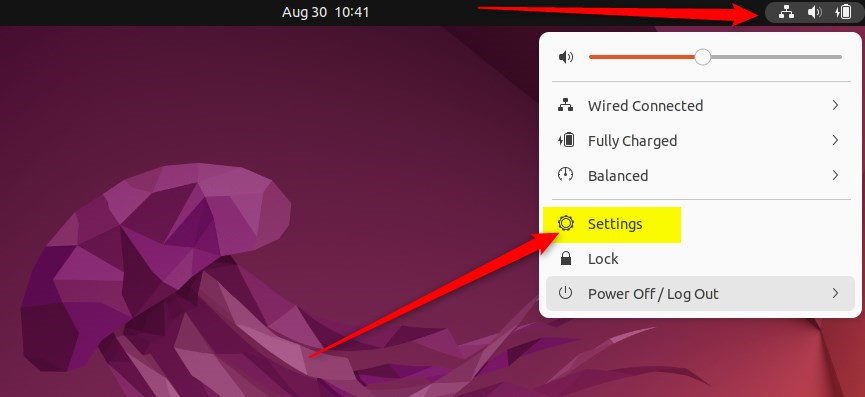
- Click the system menu in the top-right corner of the desktop screen. It is the group of small icons for network, volume and power.
A panel drops down with quick toggles, a volume slider, and buttons along the bottom.
- Choose Settings from the dropdown to open the main configuration panel. On current releases it is the gear icon near the bottom of the menu.
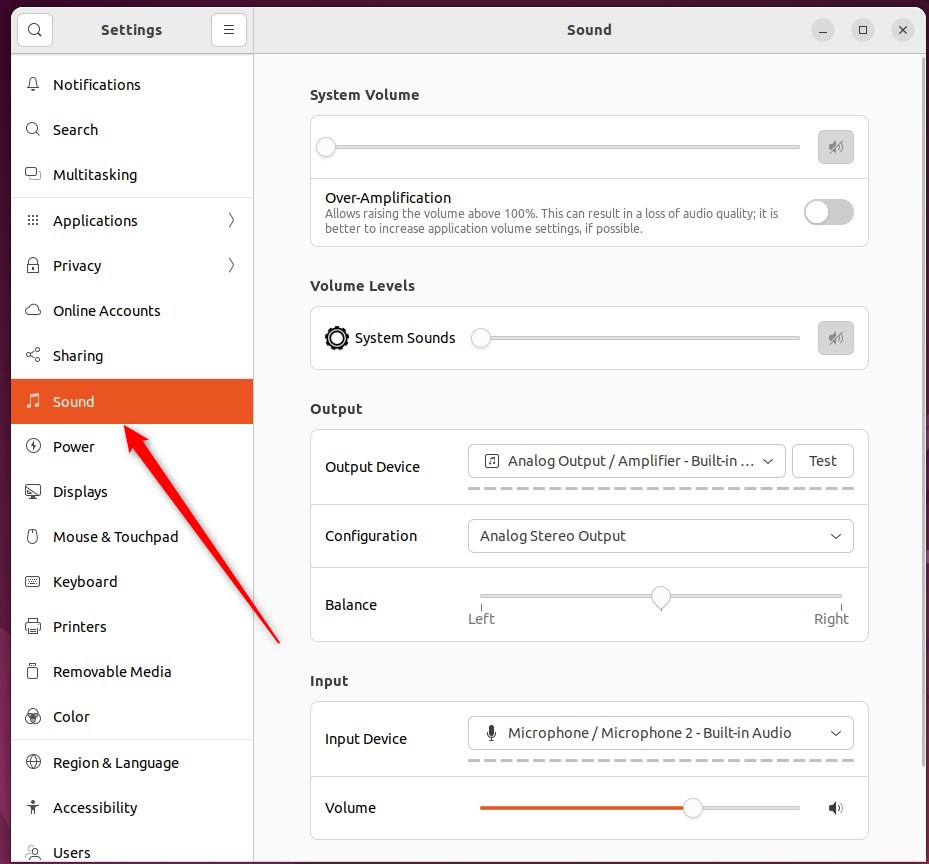
The Settings window opens with a list of categories down the left side.
- In the Settings app, click the Sound tile or sidebar entry to open the panel.
If you can’t see it, scroll down the sidebar or use the search icon at the top of the window and type “sound”. The Sound panel shows output and input options, plus volume sliders.
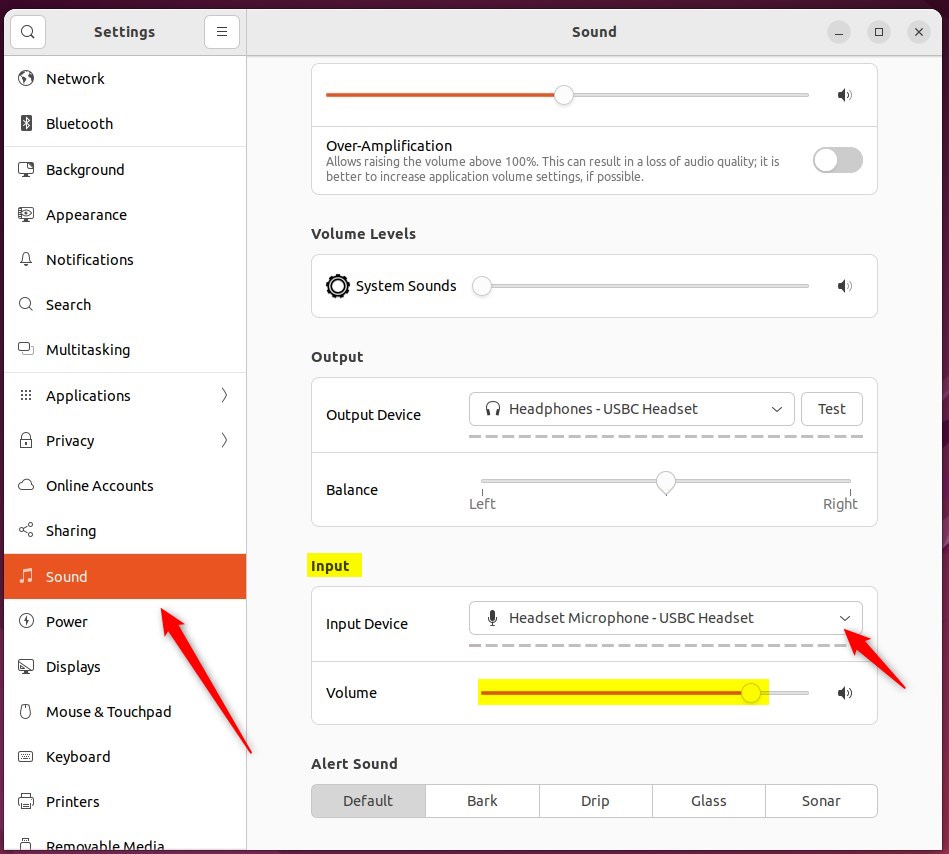
- In Settings Sound, scroll to the Input section.
- Select the device you want to use. On Ubuntu 24.04 this is the Input Device dropdown. Older releases may show a list of devices instead.
The device you pick becomes the default input. Anything you plug in later may take over automatically, so check this setting again after connecting new hardware.
Some apps have their own microphone setting, and that choice overrides the default you just set. Zoom and Discord both work this way. If one of them still picks the wrong mic, work through it like this:
- Open the audio or voice settings inside the app.
- Find the microphone or input device option.
- Change it from a specific device to the system default, or select the microphone you chose in Ubuntu.
- Run the app’s own mic test, if it has one, and confirm the level meter moves when you speak.
Browser-based calls work similarly. The browser usually asks which microphone to use the first time a site requests access, and it remembers your answer for that site.
Test the microphone to confirm you picked the right one. Speak at a normal volume while the Sound panel is open. The input level indicator responds when you speak, moving as your voice gets louder or quieter.
If the indicator stays flat, the selected device is not picking up sound. Try the other devices in the list, or check that the microphone is not muted or turned down to zero on the volume slider.
Missing hardware on the list means Ubuntu Linux failed to recognise the connected microphone. Work through these checks in order:
- Unplug the microphone and plug it in again, ideally into a different USB port.
- Check the connector. A headset with a single 3.5 mm plug works differently from one with separate mic and headphone plugs, and Ubuntu may ask which type you connected.
- Look for a physical mute switch on the headset, or a mute button on the cable. Also check that the input is not muted or set to zero in Settings Sound
- For a Bluetooth headset, make sure it is connected and that its profile is set to headset mode (HFP/HSP). In the high-quality music profile (A2DP), the headset works only as an output and has no microphone. If the Sound panel does not let you change the profile, pavucontrol has a Configuration tab where you can pick it.
- Restart the PipeWire audio services for your user session. If you are not comfortable with that, sign out and back in, which restarts them for you. Reboot if the device still does not appear.
If the device still doesn’t show up after that, try it on another computer to rule out faulty hardware.
If the microphone is detected but does not appear in the Settings list, or the Settings choice does not stick, you can set the default input another way. One option is PulseAudio Volume Control, installed as the package pavucontrol and often listed as PulseAudio Volume Control in the app menu. It still works on PipeWire systems.
- Open PulseAudio Volume Control (pavucontrol). If it is not installed, add it from the Ubuntu software centre or through your package manager.
- Click the Input Devices tab. You should see every microphone, with a level bar for each.
- Find your microphone and click the small tick icon on its row. The tooltip reads "Set as fallback device". Ubuntu now uses that device as the default input.
On the command line, the wpctl tool (PipeWire's WirePlumber control) and pactl set-default-source can set the default input as well. wpctl status lists the available devices with their ID numbers. Use these only if you are comfortable in a terminal, since the graphical tools do the same job.
Microphone volume, muting, and device switching all happen inside the Sound settings panel in Ubuntu Linux. Managing all available audio input devices occurs from this single location. If you want to change microphones later, return to Settings Sound and choose a different device under Input. This is also how you undo any change you make. If you used pavucontrol or a command to set the default, you can undo that the same way, by choosing another device in Settings Sound
- Close the Settings app using the X button in the title bar.
Closing the window finishes the process. Your choice is saved right away, so there is no Apply or Save button and no restart is needed. Apps that were already open during the change may need to be closed and reopened before they use the new microphone.
Setting the default input device ensures reliable audio across all applications. Here is a quick recap of what this guide covered.
- Setting the default input device in Ubuntu Linux is essential for a seamless user experience across all applications.
- Ubuntu's centralized System Settings panel simplifies selecting the default microphone.
- Users can monitor and adjust the input level indicator in the Sound panel to ensure the proper functioning of their chosen device.
- Users can troubleshoot and adjust settings if a connected mic device is not recognized.
- With the default mic configured, users can enjoy consistent audio input across various multimedia applications in Ubuntu Linux.
Have a question about this guide?
Answered by AI from this guide. Good questions may be added to this page — please don't include personal details.
Did this guide fix your problem?

About the Author
Richard
Tech Writer, IT Professional
Richard is a writer at Geek Rewind who turns complex IT tasks into clear, step-by-step guides. He draws on years of hands-on experience in system administration and enterprise IT operations, focusing on Windows, Linux and WordPress: the problems people actually run into, and the fixes that work. His server and WordPress guides come from systems he runs himself. Richard builds and maintains the platform behind Geek Rewind, from its Ubuntu servers and Nginx configuration to its custom WordPress plugins. Many new tutorials start with readers' questions, and he's always glad to answer them in the comments.
No comments yet — be the first to share your thoughts!