Deny Write Access to Unprotected Removable Drives in Windows 11
This guide will help you stop your Windows 11 computer from saving files to USB drives or other removable drives that don’t have BitLocker protection. BitLocker is a tool that keeps your data safe by encrypting your drives.
What is BitLocker?
BitLocker helps protect your files so only you or people you trust can access them. It works by encrypting your drive. This means it scrambles the data to keep it safe.
You can use BitLocker to protect:
- USB drives and other removable drives
- Fixed drives inside your PC
- Your Windows operating system drive
When BitLocker is turned on for your Windows system drive, your PC can unlock it automatically when it starts up.
Why Deny Write Access to Unprotected Drives?
Sometimes you want to make sure files can only be saved to drives protected by BitLocker. This keeps your data more secure. It also prevents accidentally saving data to unsafe drives.
How to Deny Write Access Using Local Group Policy Editor
Follow these simple steps:
Step 1: Open the Local Group Policy Editor
- Click the Start button
- Type
Edit group policyand press Enter
Step 2: Navigate to the BitLocker Settings
In the window that opens, go to this location:
Computer Configuration → Administrative Templates → Windows Components → BitLocker Drive Encryption → Removable Data Drives
Step 3: Find and Change the Setting
Look for the setting named “Deny write access to removable drives not protected by BitLocker” and double-click it.
Step 4: Choose Your Option
You will see these options:
- Not Configured (default) – Same as disabled. No restrictions.
- Enabled – You can only write to drives protected by BitLocker. Unprotected drives become read-only (you can view files, but not save new ones).
- Disabled – You can write to all removable drives, whether protected or not.
Select Enabled to protect your data.
Step 5: Save and Restart
Click OK to save your changes.
Restart your PC to apply the changes.
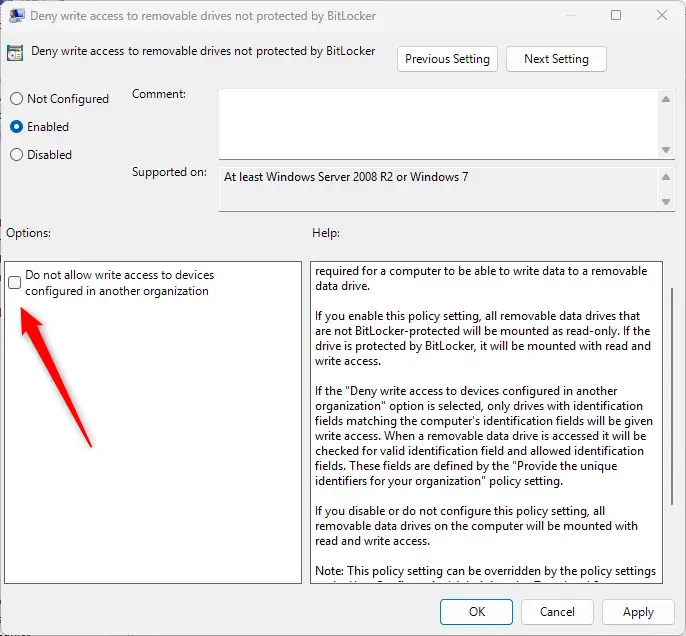
Extra option: When you enable this setting, you can also choose to allow write access only to devices set up by your organization. This is useful for work computers.
How to Deny Write Access Using Windows Registry Editor
You can also do this by changing settings in the Windows Registry. Be careful when editing the registry — it’s best to back it up first. ⚠️ Admin privileges required.
Step 1: Open the Registry Editor
- Press
Windows + Rkeys to open the Run box - Type
regeditand press Enter
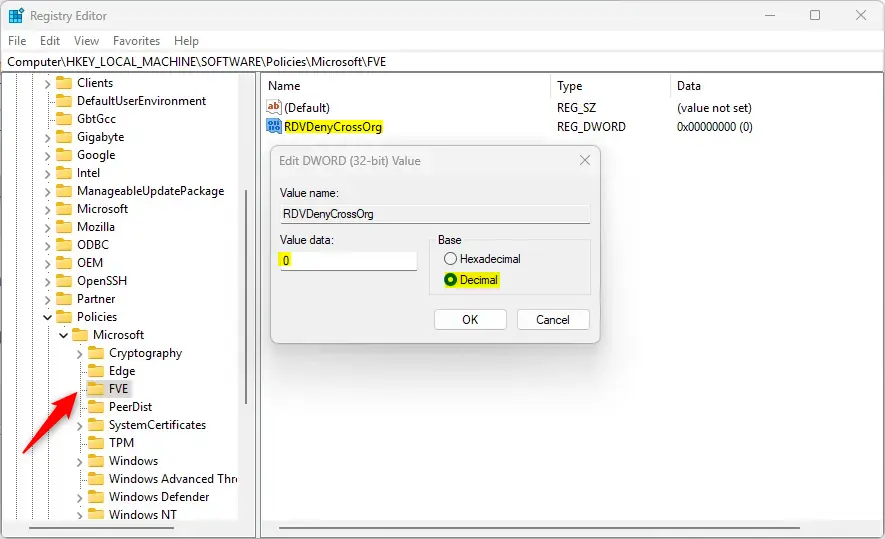
Step 2: Go to the First Registry Path
Navigate to this path:
HKEY_LOCAL_MACHINE\SOFTWARE\Policies\Microsoft\FVEStep 3: Create or Edit RDVDenyCrossOrg
Look for a value named RDVDenyCrossOrg. If it’s not there, create it:
- Right-click the right side of the window
- Click New → DWORD (32-bit) Value
- Name it
RDVDenyCrossOrg
Double-click RDVDenyCrossOrg and set the value to 0 (zero) to deny write access to unprotected drives.
Step 4: Go to the Second Registry Path
Next, navigate to this path:
HKEY_LOCAL_MACHINE\SYSTEM\CurrentControlSet\Policies\Microsoft\FVEStep 5: Create or Edit RDVDenyWriteAccess
Look for RDVDenyWriteAccess. If it’s missing, create it the same way.
Double-click RDVDenyWriteAccess and set the value to 1 to deny write access.
Step 6: Close and Restart
Close Registry Editor and restart your PC.
Note: If you want to only allow write access to devices from your organization, set both RDVDenyCrossOrg and RDVDenyWriteAccess to 1.
To go back to normal and allow writing to all drives, just delete these two values from the Registry.
Summary
You can protect your data by making sure Windows only allows writing to removable drives that have BitLocker encryption enabled.
You can set this up easily using the Local Group Policy Editor or by editing the Registry if you’re comfortable with it.
This helps keep your files safe and reduces the risk of data being saved to unprotected drives.
If you want to learn more about BitLocker, check out this helpful guide: How to Turn On BitLocker in Windows 11.
Was this guide helpful?

About the Author
Richard
Tech Writer, IT Professional
Richard, a writer for Geek Rewind, is a tech enthusiast who loves breaking down complex IT topics into simple, easy-to-understand ideas. With years of hands-on experience in system administration and enterprise IT operations, he’s developed a knack for offering practical tips and solutions. Richard aims to make technology more accessible and actionable. He's deeply committed to the Geek Rewind community, always ready to answer questions and engage in discussions.
📚 Related Tutorials


No comments yet — be the first to share your thoughts!