
This article explains switching to HTTPS with Drupal and Apache on Ubuntu Linux.
Switching to HTTPS with Drupal CMS is highly recommended for several reasons. Firstly, HTTPS ensures your website is secure and encrypted, protecting sensitive data such as login credentials, personal information, and financial transactions from prying eyes.
Secondly, Google and other search engines give preference to sites that are HTTPS-compliant, which can improve your website’s search engine rankings. Finally, with most website providers offering free HTTPS certificates, there’s no reason not to switch and enjoy HTTPS’s added security and benefits.
This brief tutorial will show students and new users how to easily convert existing Drupal websites from HTTP to HTTPS without losing your audience.
Setup Let’s Encrypt Free SSL / TLS
The first step in all HTTPS is obtaining SSL/TLS certificates for your domain or site. Since Let’s Encrypt is free, continue below to receive free certificates.
Before obtaining Let’s Encrypt certificates, ensure your Apache2 Configuration is set up correctly. For example, provide your site config file that defines the ServerName and ServerAlias.
<VirtualHost *:80>
     ServerAdmin [email protected]
     DocumentRoot /var/www/html/drupal/
     ServerName example.com
     ServerAlias www.example.com
.
.
When those settings are confirmed, continue to get the certificate for your domain name below.
To get the Let’s Encrypt SSL/TLS client installed on Ubuntu, run the commands below
sudo apt-get install python-certbot-apache
After that, run the commands below to obtain your site’s free Let’s Encrypt SSL/TLS certificate.
sudo certbot --apache -m [email protected] -d example.com -d www.example.com
After running the above commands, you should be prompted to accept the licensing terms. If everything is checked, the client should automatically install the free SSL/TLS certificate and configure the Nginx site to use the certs.
Please read the Terms of Service at
https://letsencrypt.org/documents/LE-SA-v1.2-November-15-2017.pdf. You must
agree in order to register with the ACME server at
https://acme-v01.api.letsencrypt.org/directory
-------------------------------------------------------------------------------
(A)gree/(C)ancel: A
Choose Yes ( Y ) to share your email address.
Would you be willing to share your email address with the Electronic Frontier
Foundation, a founding partner of the Let's Encrypt project and the non-profit
organization that develops Certbot? We'd like to send you email about EFF and
our work to encrypt the web, protect its users and defend digital rights.
-------------------------------------------------------------------------------
(Y)es/(N)o: Y
This is how easy it is to obtain your free SSL/TLS certificate for your Nginx-powered website.
Please choose whether or not to redirect HTTP traffic to HTTPS, removing HTTP access.
-------------------------------------------------------------------------------
1: No redirect - Make no further changes to the webserver configuration.
2: Redirect - Make all requests redirect to secure HTTPS access. Choose this for
new sites, or if you're confident your site works on HTTPS. You can undo this
change by editing your web server's configuration.
-------------------------------------------------------------------------------
Select the appropriate number [1-2] then [enter] (press 'c' to cancel): 2
Pick option 2 to redirect all traffic over HTTPS. This is important!
After that, the SSL client should install the cert and configure your website to redirect all traffic over HTTPS.
Congratulations! You have successfully enabled https://example.com and
https://www.example.com

You should test your configuration at:
https://www.ssllabs.com/ssltest/analyze.html?d=example.com
https://www.ssllabs.com/ssltest/analyze.html?d=www.example.com
-------------------------------------------------------------------------------

IMPORTANT NOTES:
 - Congratulations! Your certificate and chain have been saved at:
   /etc/letsencrypt/live/example.com/fullchain.pem
   Your key file has been saved at:
   /etc/letsencrypt/live/example.com/privkey.pem
   Your cert will expire on 2018-02-24. To obtain a new or tweaked
   version of this certificate in the future, simply run certbot again
   with the "certonly" option. To non-interactively renew *all* of
   your certificates, run "certbot renew"
 - If you like Certbot, please consider supporting our work by:

   Donating to ISRG / Let's Encrypt:   https://letsencrypt.org/donate
   Donating to EFF:                    https://eff.org/donate-le
The highlighted code block should be added automatically to your Apache2 Drupal configuration file automaticEncrypt certbot. After that, your Drupal site will be ready to use over HTTPS.
<VirtualHost *:80>
  ServerAdmin [email protected]
     DocumentRoot /var/www/html/drupal/
     ServerName example.com
     ServerAlias www.example.com

     <Directory /var/www/html/drupal/>
        Options +FollowSymlinks
        AllowOverride All
        Require all granted
     </Directory>

     ErrorLog ${APACHE_LOG_DIR}/error.log
     CustomLog ${APACHE_LOG_DIR}/access.log combined

RewriteEngine on
RewriteCond %{SERVER_NAME} =example.com [OR]
RewriteCond %{SERVER_NAME} =www.example.com
RewriteRule ^ https://%{SERVER_NAME}%{REQUEST_URI} [END,NE,R=permanent]
</VirtualHost>
A new configuration file for the domain should also be created named /etc/apache2/sites-available/example-le-ssl.conf. This Apache2 SSL module configuration file should contain the defined certificate definitions.
<IfModule mod_ssl.c>
<VirtualHost *:443>
     ServerAdmin [email protected]
     DocumentRoot /var/www/html/drupal/
     ServerName example.com
     ServerAlias www.example.com

      <Directory /var/www/html/drupal/>
        Options +FollowSymlinks
        AllowOverride All
        Require all granted
     </Directory>
     ErrorLog ${APACHE_LOG_DIR}/error.log
     CustomLog ${APACHE_LOG_DIR}/access.log combined

SSLCertificateFile /etc/letsencrypt/live/example.com/fullchain.pem
SSLCertificateKeyFile /etc/letsencrypt/live/example.com/privkey.pem
Include /etc/letsencrypt/options-ssl-apache.conf
</VirtualHost>
</IfModule>
Change the Drupal Site URL
After configuring Apache2 to use HTTPS above, change the Drupal site URL to HTTPS. This can be done by editing the settings.php file in your Drupal root directory.
sudo nano /var/www/html/example.com/sites/default/settings.php
Open the Drupal settings.php file in your Drupal root directory and add the lines below:
?php

//Use HTTPS for Drupal
$_SERVER['HTTPS'] = 'on';
$conf['https'] = TRUE;
$base_url = 'https://example.com';
Save the file
Now, you can log on to the Drupal admin dashboard via HTTPS.
Install Secure Login Plugin
Finally, log in to the Drupal dashboard and install the Secure Login plugin to redirect all HTTP references to HTTPS.
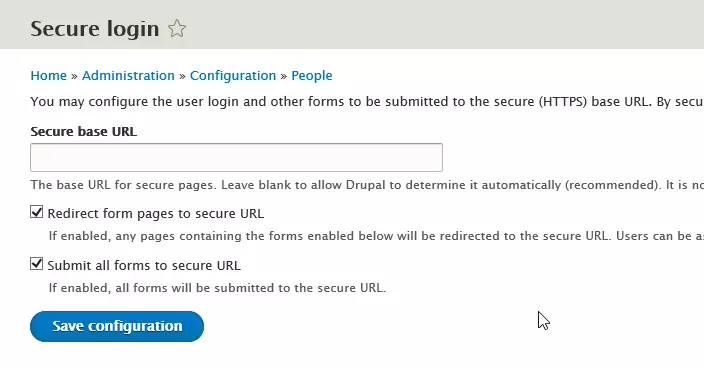
After installing and activating the plugin, go to Configuration –> Secure Login. Then, check the box to redirect all pages to the secure URL. Including all forms
This should do it.
After that, your site should be HTTPS compliant.
Congratulations! You’ve successfully converted from HTTP to HTTPS
To set up a process to automatically renew the certificates, add a cron job to execute the renewal process.
sudo crontab -e
Then add the line below and save.
0 1 * * * /usr/bin/certbot renew & > /dev/null
The cron job will attempt to renew 30 days before expiring
You may also like the post below:
Leave a Reply