Set Up Nginx Basic Authentication in Ubuntu 24.04
This article explains how to set up Nginx basic authentication to protect directories in Ubuntu 24.04.
Apache Basic Authentication is a method used to restrict access to web resources on an Apache server by requiring users to provide a username and password.
Setting up basic authentication with Nginx is an effective way to secure certain areas of your website or application. By default, username and password are sent with plain text on Basic Authentication, so you want to set up SSL/TLS before transmitting credentials.
This is because HTTPS encrypts the data exchanged between the user’s browser and the server, adding a significant layer of security.
Protect directories with Nginx basic authentication
With Nginx installed, run the command below to install Apache utilities.
sudo apt install apache2-utils
After installing the utilities, continue below to protect a directory with a username and password.
For this post, we’ll protect /var/www/html/sensitive-doc with a password. Anyone who wants to access this directory must type a username and password.
To do that, first, open the default Nginx server block file. You can create a new one, but we will use the default file for this post.
sudo nano /etc/nginx/sites-available/default
Next, add the highlighted block to the server {} section in the file.
# Default server configuration
#
server {
        listen 80 default_server;
        listen [::]:80 default_server;
        root /var/www/html;
        index index.html index.htm index.nginx-debian.html;

        server_name example.com;

        location /sensitive-doc {
              auth_basic            "Basic Auth";
              auth_basic_user_file  "/etc/nginx/.htpasswd";
        }

        location / {
                # First attempt to serve request as file, then
                # as directory, then fall back to displaying a 404.
                try_files $uri $uri/ =404;
        }

        # pass PHP scripts to FastCGI server
        #
..........
..........
Exit and save the file when you’re done.
Create accounts
After setting up the config above, use the command below to create an account to log on to the directory.
sudo htpasswd -Bc /etc/nginx/.htpasswd username
Replace username with the actual username you want to use.
When prompted, type and confirm a new password for the account.
Create the protected directory
Create the protected directory using the command below.
sudo mkdir /var/www/html/sensitive-doc
Once created, enable the Nginx server block and reload its services by running the commands below.
sudo systemctl reload nginx
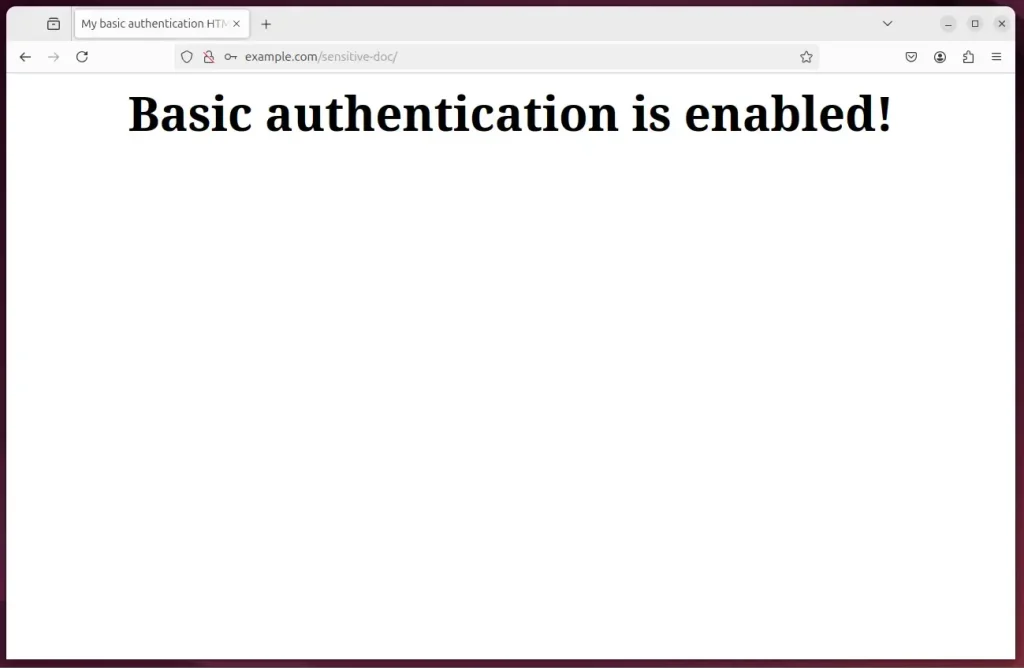
Next, run the command below and add a basic HTML ‘index.html‘ file.
sudo nano /var/www/html/sensitive-doc/index.html
Copy and paste the lines below into the file and save.
<html>
<title>My basic authentication HTML page</title>
<body>
<p style="width: 100%; font-weight: bold; font-size: 60px; text-align: center;">
Basic authentication is enabled!
</p>
</body>
</html>
Save the file and exit.
Test Nginx basic authentication
Finally, open your browser and browse to the protected directory.
http://example.com/sensitive-doc/
You will see a prompt to enter a username and password.
You must enter the correct username and password to sign in.
That should do it!
Conclusion:
Setting up Nginx basic authentication provides a simple yet effective way to secure specific directories on your Ubuntu server. By following the steps outlined in this article, you can ensure that sensitive information is protected. Here are the key takeaways:
- Increased Security: Implement basic authentication to control access to sensitive directories.
- Use of SSL/TLS: Prioritize setting up SSL/TLS to encrypt data before transmitting credentials.
- Nginx Configuration: Modify your Nginx server block to enable authentication for designated locations.
- User Management: Easily create and manage user accounts with the
htpasswdcommand. - Testing: Verify that authentication works as expected by accessing the protected directory from a web browser.
- Simple Implementation: Quickly secure your directories with straightforward command-line instructions.
With these steps, you’ve fortified your web application, ensuring only authorized users can access protected resources.
Frequently Asked Questions
What is Nginx basic authentication?
How do I install Apache utilities for Nginx basic authentication?
How can I protect a directory with Nginx basic authentication?
What command do I use to create a user for Nginx basic authentication?
Why should I use SSL/TLS with Nginx basic authentication?
Was this guide helpful?

About the Author
Richard
Tech Writer, IT Professional
Richard, a writer for Geek Rewind, is a tech enthusiast who loves breaking down complex IT topics into simple, easy-to-understand ideas. With years of hands-on experience in system administration and enterprise IT operations, he’s developed a knack for offering practical tips and solutions. Richard aims to make technology more accessible and actionable. He's deeply committed to the Geek Rewind community, always ready to answer questions and engage in discussions.

No comments yet — be the first to share your thoughts!