How to Show or Hide Recommendations in Windows 11 Start Menu
Windows 11 shows helpful tips, shortcuts, and new apps in your Start Menu. This guide will show you how to turn these recommendations on or off.
Open Settings, navigate to Personalization, then Start, and toggle off “Show recommendations for tips, shortcuts, new apps, and more” to hide them. Turn it on to display recommendations again.
What Are Recommendations in the Start Menu?
Recommendations in the Windows 11 Start Menu show you apps you’ve recently added, files you’ve opened, and helpful tips or new app suggestions.
- Pinned: Your favorite apps you’ve saved for quick access.
- All Apps: A complete list of every app on your computer.
- Recommended: Shows new apps you recently added, files you opened lately, and suggestions for helpful tips and new apps.
Some Windows 11 users in the Insider Preview program (people testing new Windows versions) can see new recommendations. But you can manage these settings even if you’re not in that program.
Why Would You Want to Change This?
Some users enjoy recommendations for discovering new apps and handy tips. Others prefer a cleaner Start Menu, showing only the apps they’ve pinned.
How to Turn Recommendations On or Off Using Settings
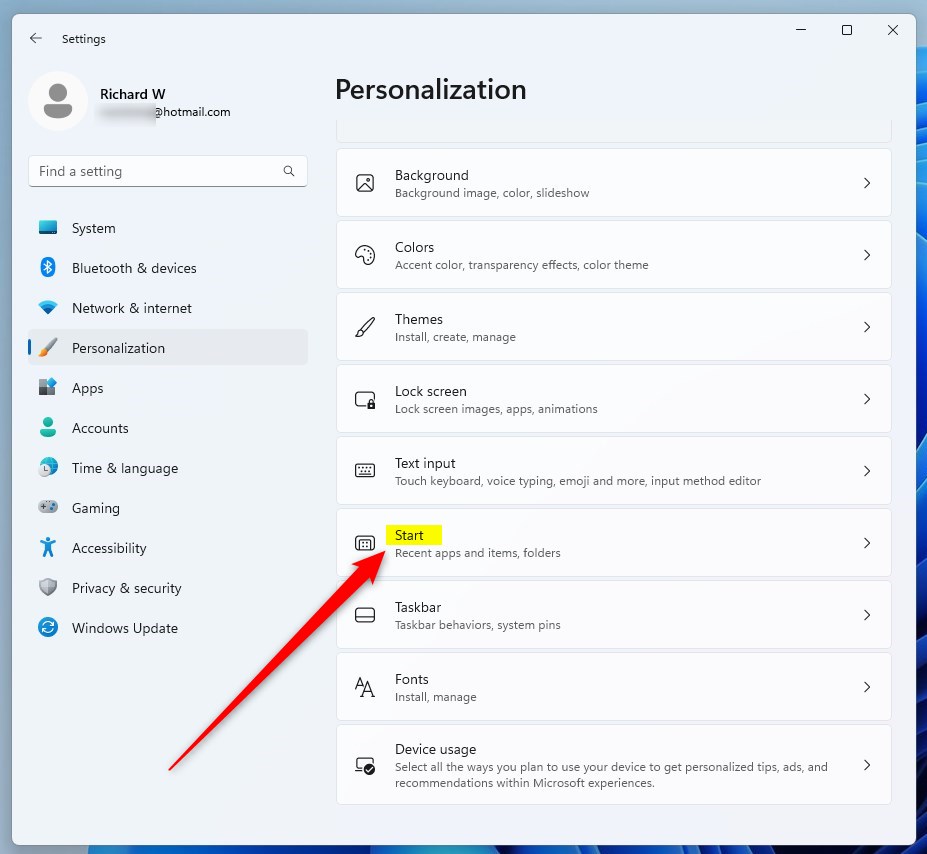
You can easily turn Windows 11 Start Menu recommendations on or off using the Settings app by going to Personalization and then Start.
- Click the Start button (Windows icon) on your taskbar. Then click Settings. Or just press
Windows key + Ion your keyboard to open Settings right away. - In the Settings window, click Personalization on the left side menu.
- Click Start on the right side to see Start Menu options.
- Find the option that says “Show recommendations for tips, shortcuts, new apps, and more” and toggle it On to see recommendations or Off to hide them.
- Close the Settings window when you’re done.
Go to Personalization in Windows Settings
Click Start to find recommendation settings

Turn recommendations on or off with this switch
How to Turn Recommendations On or Off Using the Registry (Advanced Users Only)
For advanced users, you can turn Windows 11 Start Menu recommendations on or off by making changes in the Registry Editor, but be very careful as this can affect your system.
- ⚠️ Admin required: Press
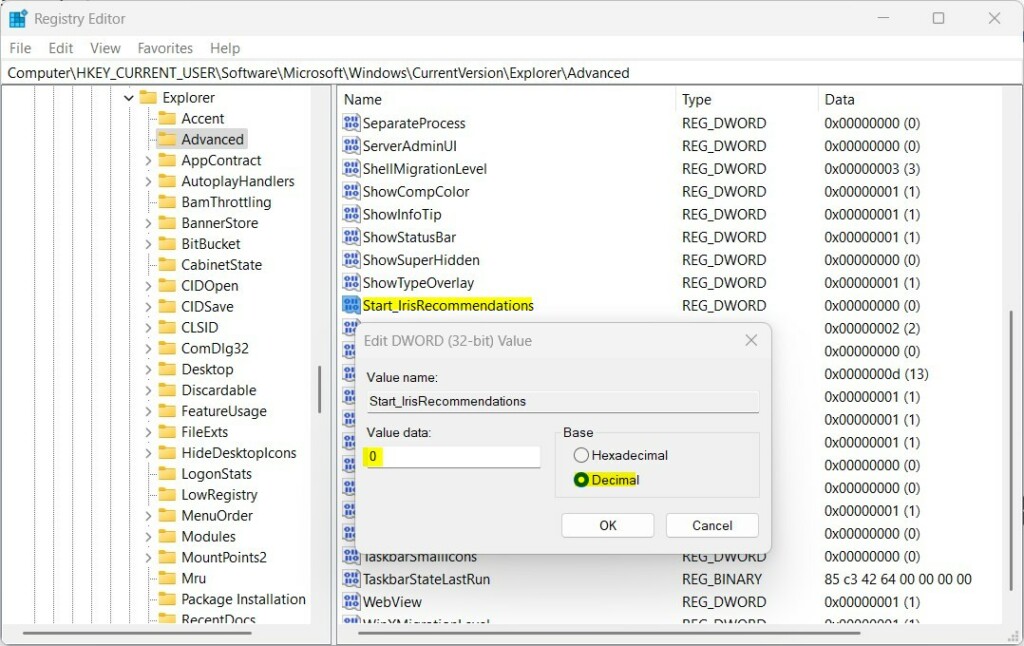
Windows key + R, typeregedit, and press Enter to open the Registry Editor. If a security window appears, click Yes. - In Registry Editor, go to this folder path:
HKEY_CURRENT_USER\Software\Microsoft\Windows\CurrentVersion\Explorer\Advanced - If you don’t see the Advanced folder, right-click on Explorer, choose New > Key, and name it Advanced.
- With the Advanced folder selected, right-click on the right side, choose New > DWORD (32-bit) Value.
- Name the new item
Start_IrisRecommendations. - Double-click on
Start_IrisRecommendations, set the Base to Decimal, and enter the value:1to show recommendations.0to hide recommendations.
- Click OK and close the Registry Editor.
- Restart your computer to apply the changes.
Use Registry Editor to change recommendation settings
Summary
- You can turn recommendations on or off in the Windows 11 Start Menu using the Settings app or the Registry Editor.
- The Settings app is easier and safer for most users.
- The Registry method is for advanced users who want more control.
- Some features may only be available if you’re part of the Microsoft Insider Preview program (Windows testers).
- Try these steps to make your Start Menu show only what you want.
In summary, you can control Windows 11 Start Menu recommendations using either the simple Settings app or the more advanced Registry Editor.
What is the recommended Start menu in 🪟 Windows 11?
The Recommended section in the Windows 11 Start menu displays your recently opened files, installed apps, and frequently used items. It’s a helpful section that lets you quickly open apps.
Was this guide helpful?

About the Author
Richard
Tech Writer, IT Professional
Richard, a writer for Geek Rewind, is a tech enthusiast who loves breaking down complex IT topics into simple, easy-to-understand ideas. With years of hands-on experience in system administration and enterprise IT operations, he’s developed a knack for offering practical tips and solutions. Richard aims to make technology more accessible and actionable. He's deeply committed to the Geek Rewind community, always ready to answer questions and engage in discussions.


No comments yet — be the first to share your thoughts!