How to let Windows 11 Change Brightness Automatically based on Content
You can let Windows 11 automatically adjust your screen brightness based on the content displayed to improve your viewing experience and save battery life.
This feature, known as Content Adaptive Brightness Control (CABC), dynamically alters brightness levels by analyzing the visual elements on your screen. For instance, it will dim the display during dark scenes in a video and brighten it for lighter content.
You’ll typically find CABC available on devices with HDR (High Dynamic Range) displays, though its availability can vary. Enabling this setting in Windows 11 is straightforward and can significantly enhance your comfort when viewing different types of media.
Windows 11 lets you automatically adjust screen brightness based on content by going to Settings > System > Display. Under Brightness, select your preference from the “Change brightness based on content” drop-down menu.
What is Content Adaptive Brightness?
Imagine your screen is like a picture. When you watch a movie with dark scenes, the picture is mostly dark. Then, a bright scene comes, and the whole picture gets lighter. Content adaptive brightness works similarly. It analyzes what’s on your screen. Then it makes small changes to the brightness and contrast. So, a dark movie scene might make your screen a little dimmer, while a bright one could make it brighter. This keeps the picture looking its best, no matter what you’re doing. It’s great for movies, photos, or even just browsing the web. Plus, it helps save battery on laptops, as darker content uses less power.
How to Turn On and Change Content Adaptive Brightness
Getting this set up is quick. You have a few choices for how it works. You’ll find all these settings in your Windows 11 Display settings.
Open Display Settings
First, you need to go to the right place. The fastest way is to right-click on your desktop. Then, pick Display settings from the menu that pops up. You can also click the Start button. Type settings and then choose Settings from the search results. Once Settings is open, go to System, and then click on Display.

Find Brightness Settings
Once you’re in Display settings, scroll down a bit. Look for the Brightness section. This is where you control your screen’s brightness.
Enable Content Adaptive Brightness
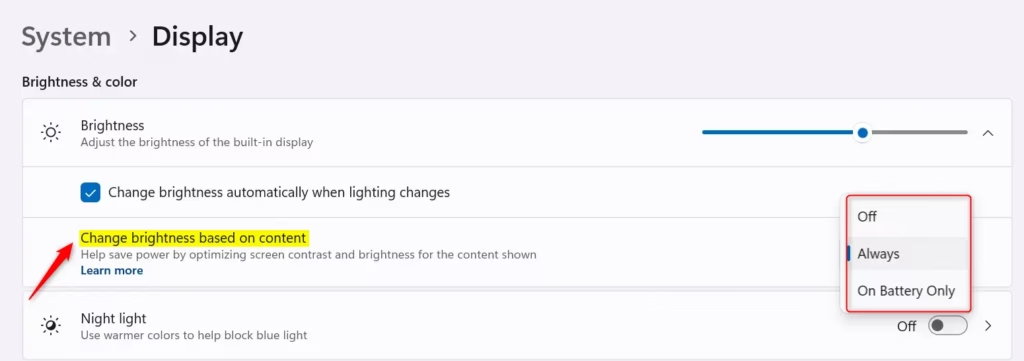
Under the Brightness section, you should see a drop-down menu that says Change brightness based on content. This is the setting you want!
Click this drop-down menu to see your choices:
- Off: This is the default if the feature is not turned on. Your screen brightness and contrast will not change based on what’s on the screen. You have full control, but you won’t get the battery saving or better viewing for different scenes. Your battery will also likely run out faster.
- Always: When you choose ‘Always’, content adaptive brightness will be on all the time. This works whether your device is plugged in or running on battery. This gives you the best experience for brightness and contrast for everything you do.
- On Battery Only: This is a good choice for laptop users. When you choose this, adaptive brightness will only work when your device is running on battery power. This helps save battery when you are out and about. When you are plugged in, you will still have normal brightness control.
Reference:
Summary
Content adaptive brightness in Windows 11 automatically adjusts your screen’s brightness and contrast based on what you’re viewing. This can improve your visual experience, especially for videos and games, and help save battery life on laptops. You can turn it on and choose whether it works always, only on battery, or not at all through the Display settings in Windows 11.
Was this guide helpful?

About the Author
Richard
Tech Writer, IT Professional
Richard, a writer for Geek Rewind, is a tech enthusiast who loves breaking down complex IT topics into simple, easy-to-understand ideas. With years of hands-on experience in system administration and enterprise IT operations, he’s developed a knack for offering practical tips and solutions. Richard aims to make technology more accessible and actionable. He's deeply committed to the Geek Rewind community, always ready to answer questions and engage in discussions.

No comments yet — be the first to share your thoughts!