How to Install and Use Quick Assist in Windows 11
Quick Assist in Windows 11 lets you remotely help others or get help on your PC from someone you trust.
This built-in Windows tool acts like a digital helping hand, allowing another person to see your screen and control your mouse and keyboard with your permission. It’s incredibly useful for fixing common computer issues, guiding someone through a new setup, or simply assisting family members with their PCs.
For example, you can use Quick Assist to troubleshoot software problems without needing to be physically present. It’s available on Windows 11 and can be downloaded from the Microsoft Store.
Install Quick Assist from the Microsoft Store by searching for it. Open the app via the Start menu or by pressing Ctrl + Windows key + Q. Use it to give or receive remote computer assistance.
Step 1Install Quick Assist
Quick Assist is already on your Windows 11 PC, so you don’t need to install it from the Microsoft Store.
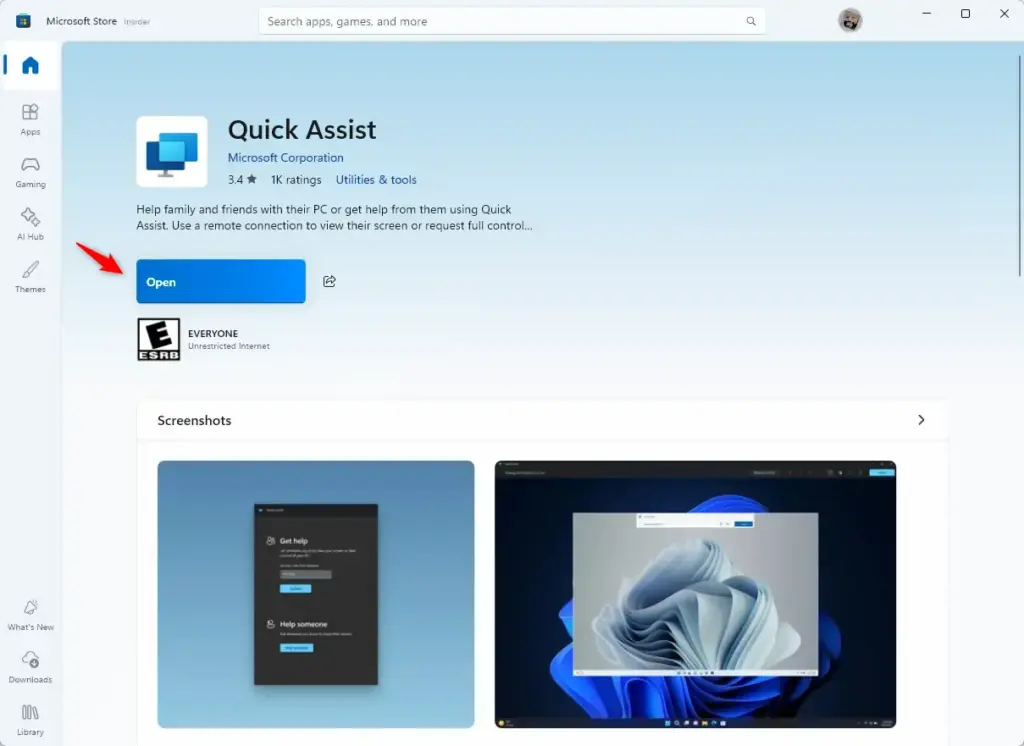
Open the Microsoft Store: Click the Start button. You should see the Microsoft Store app there. If you don’t see it, type “Microsoft Store” in the search bar and click it when it appears.
Tip: You can pin the Microsoft Store to your Start menu or taskbar. This makes it faster to open later.
Find Quick Assist: When the Store is open, look for the search bar at the top. Type “Quick Assist” and press Enter.
Install the App: Quick Assist should appear in the search results. Click on it. You will see a button that says “Get” or “Install.” Click that button.
Important: If your computer is managed by an organization (like a school or work), you may see a message preventing app installations. This is due to company policies. You’ll need to contact your IT support or administrator for assistance.
Give Permission: Windows might ask for your okay to install the app. Click “Yes” or “Allow.”
All Done! The button will now say “Open.” You can now use Quick Assist!
Good to know: The Microsoft Store updates Quick Assist. This means you will always have the latest features and security fixes.
Step 2Open Quick Assist
Now that Quick Assist is installed, let’s open it. There are a couple of ways to do this.
Method 1Through the Start Menu
- Click the Start button (the Windows logo) in the bottom-left corner.
- Start typing “Quick Assist” in the search bar.
- The Quick Assist app should appear in the results. Click on it to open it.

Method 2The Keyboard Shortcut
You can open Quick Assist quickly using a keyboard shortcut if you prefer not to search for it.
- Press and hold the Windows key and the Q key at the same time (Ctrl + Windows key + Q).
Tip: This shortcut saves time once you know it. It skips the need to search or go through menus.
No matter which way you choose, Quick Assist will open and be ready to help.
Why Use Quick Assist?
Quick Assist is a handy tool for when you need help with your computer or want to help someone else fix their PC.
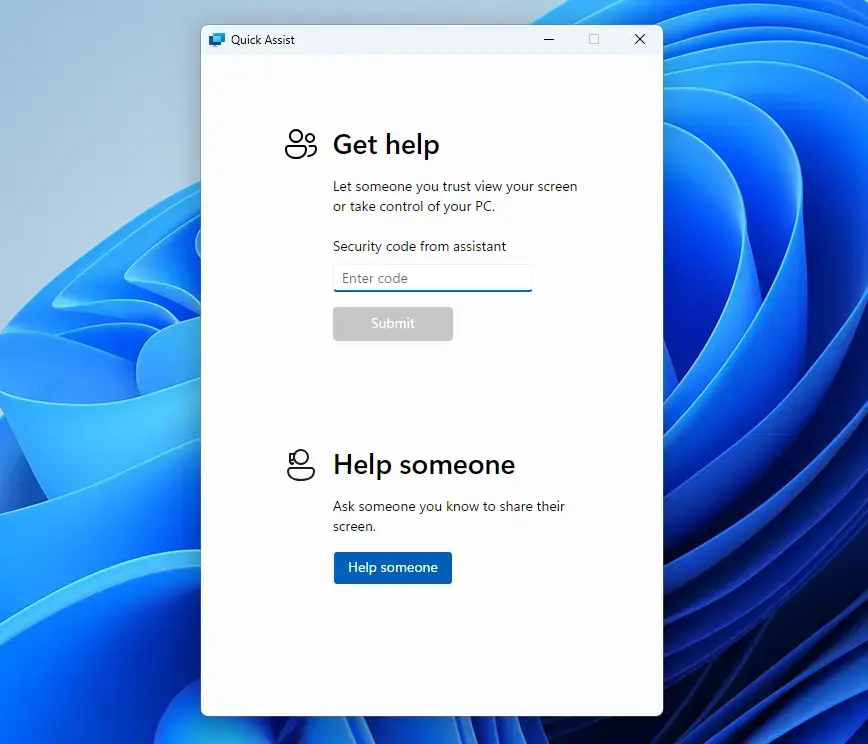
What Happens When You Use Quick Assist?
When you start Quick Assist, you’ll choose whether to give or get help, and a connection code is used to link the computers.
Reference:
Summary
Quick Assist is a built-in Windows 11 tool that lets you easily get or give remote computer help to others.
Was this guide helpful?

About the Author
Richard
Tech Writer, IT Professional
Richard, a writer for Geek Rewind, is a tech enthusiast who loves breaking down complex IT topics into simple, easy-to-understand ideas. With years of hands-on experience in system administration and enterprise IT operations, he’s developed a knack for offering practical tips and solutions. Richard aims to make technology more accessible and actionable. He's deeply committed to the Geek Rewind community, always ready to answer questions and engage in discussions.


No comments yet — be the first to share your thoughts!