
This article explains enabling or disabling Microsoft accounts on Windows 11 devices.
A Microsoft account is an online account that allows you to access Microsoft services, such as Outlook, OneDrive, Microsoft Teams, Skype, and Xbox Live. It is also used to sign in to Windows devices, including Windows 10 and Windows 11, and to access the Microsoft Store.
Suppose you don’t want users adding a Microsoft account or switching from a local to a Microsoft account on Windows 11. In that case, you can do that using the Local Security Policy Editor and Windows Registry Editor.
This also allows or denies signing in to a Windows 11 device with their Microsoft accounts.
Enabling or disabling Microsoft accounts on Windows 11 devices can be useful for a few reasons. For instance, in certain organizations, IT administrators may want to restrict the use of Microsoft accounts on company-owned devices to maintain control over user access and data security.
Additionally, some users may prefer a local account to a Microsoft account for privacy reasons or to avoid syncing their personal information across devices. Users and administrators can choose how to access and manage their devices and data by enabling or disabling Microsoft accounts.
Enable or disable using a Microsoft account with the Local Security Policy editor
As mentioned, sysadmin can allow or deny using a Microsoft account on a Windows device.
Here’s how to do it.
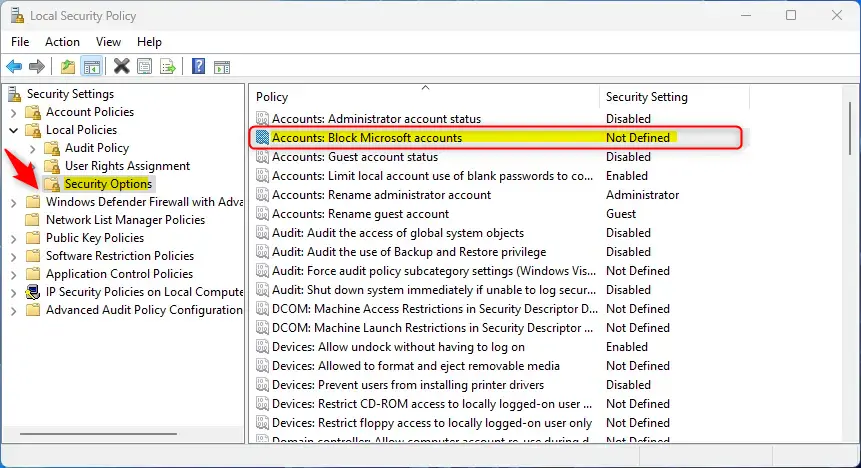
First, open the Local Security Policy (secpol.msc).
Then, expand the Local Policy > Security Options folders.
Local Policy > Seuciryt Options
Then, double-click the “Accounts: Block Microsoft account” policy to open it.
On the policy window, choose one of the options available:
- This policy is disabled
- Users can’t add Microsoft accounts
- Users can’t add or log on with Microsoft accounts
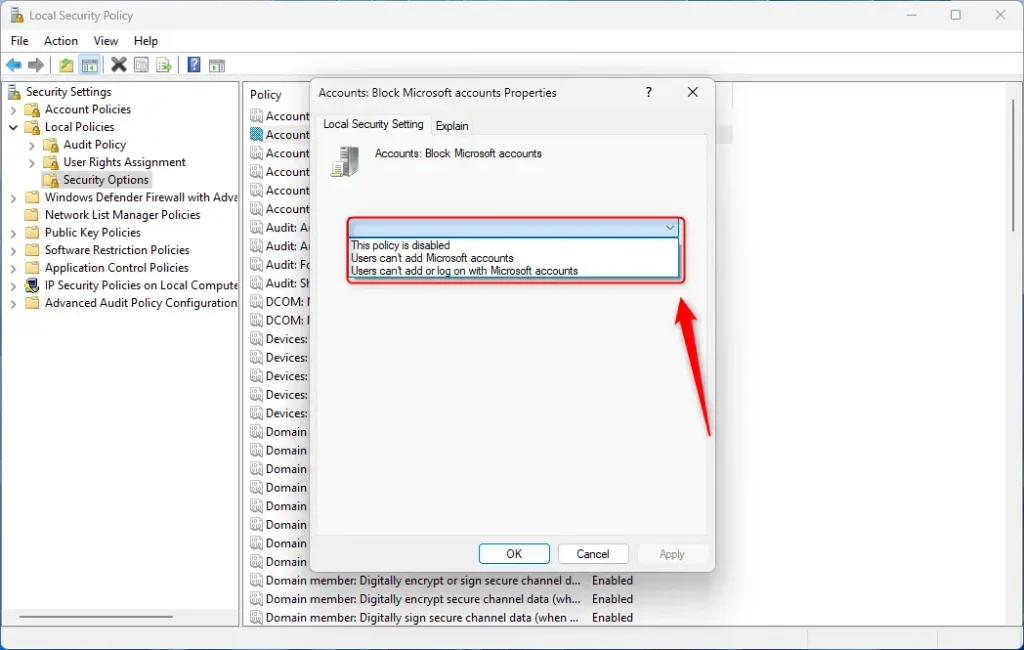
Select an option that fits your environment and click OK to save it.
Allow or block Microsoft accounts using the Windows Registry
Another way to allow or block a Microsoft account on Windows 11 devices is to use the Windows Registry editor.
First, open the Windows Registry and navigate to the folder key path below.
ComputerHKEY_LOCAL_MACHINESOFTWAREMicrosoftWindowsCurrentVersionPoliciesSystem
Next, double-click the value (REG_DWORD) name on the NoConnectedUser key’s right pane to open it.
Then, use the value table below to allow or deny the creation of Microsoft accounts on Windows 11.
- Enter a value
1to disable adding new Microsoft accounts - Enter a value
3to disable adding or signing in with a Microsoft account. - Delete the “
NoConnectedUser” name to restore its default behavior by allowing Microsoft accounts.
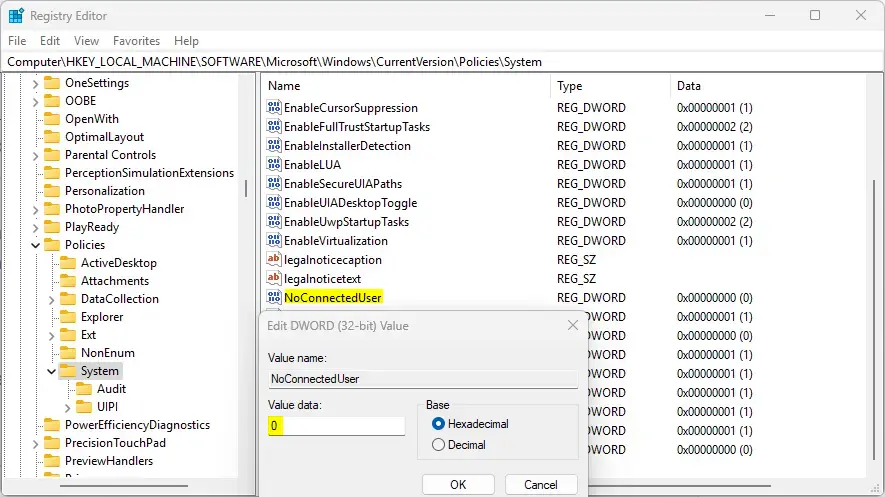
If you do not see the “NoConnectedUser” item, right-click a blank area and create a new DWORD (32-bit) registry item.
Then, enter the name “NoConnectedUser” and a desired value to enable or disable Microsoft accounts on Windows devices.
Warning: Editing the Registry can be risky and, if not done correctly, may cause irreversible damage to your installation. It’s recommended that you back up your PC before proceeding.
That should do it!
Conclusion:
- Enabling or disabling Microsoft accounts on Windows 11 can be crucial for controlling user access and data security in organizational settings.
- Sysadmins can utilize the Local Security Policy Editor to allow or deny using Microsoft accounts on Windows 11 devices.
- The Windows Registry Editor offers an alternative method to control the creation and signing in with Microsoft accounts on Windows 11.
- It’s important to exercise caution when editing the Windows Registry to avoid potential risks to the system.
- By following the instructions provided, users and administrators can effectively manage the usage of Microsoft accounts on Windows 11 devices.


Leave a Reply Cancel reply