
This tutorial will show you how to enable or disable password expiration for an account in Windows 10 and Windows 11.
Why Password Expiration Matters
When you enable password expiration for an account, the user will be forced to change their password the next time they sign in when it expires.
A local account password will expire when a maximum (42 days by default) and minimum (0 days by default) password age has been reached by default.
A Microsoft account password will expire every 72 days by default.
Option One
Enable or Disable Password Expiration for Local Account in Local Users and Groups
⚠️ Requires admin privileges
Note: Local Users and Groups is only available in the Windows 10/11 Pro, Enterprise, and Education editions. All editions can use Option Two.
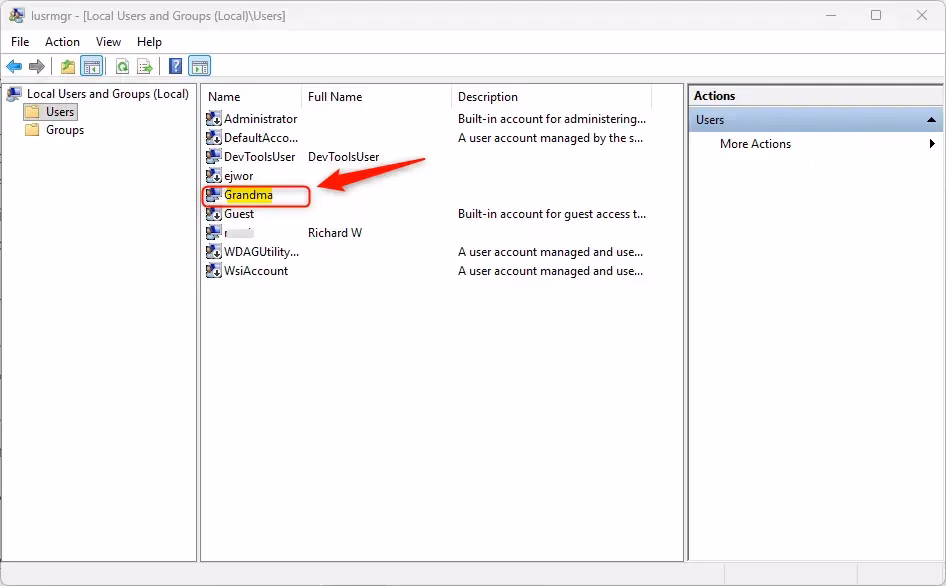
- Open Local Users and Groups (
lusrmgr.msc). - Do the following:
- Click on the Users folder in the left panel.
- Double-click on the local account name you want to change in the middle panel.
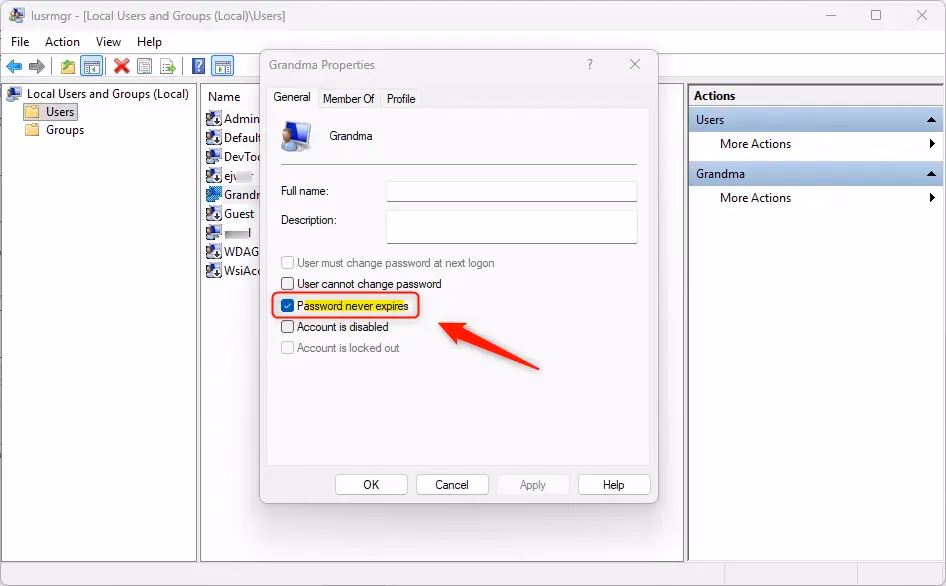
- In the General tab, check (to disable – this is the default) or uncheck (to enable) Password never expires for what you want. Then click OK.
Note: The Password never expires option will be grayed out if the User must change password at next logon box is checked.
- If you want, you can also change the maximum and minimum password age for local accounts.
- You can now close Local Users and Groups if you want.
Option Two
Enable or Disable Password Expiration for Local Account in Command Prompt
⚠️ Requires admin privileges
- Open Windows Terminal (Admin), and select Command Prompt.
Enable Password Expiration for Local Account(s)
What happens: Your password will need to be changed after it expires.
- Type one of the commands below into the command prompt and press Enter:
For all existing local accounts:
wmic UserAccount set PasswordExpires=TrueOR
For a specific local account:
wmic UserAccount where Name="adminuser" set PasswordExpires=TrueReplace
adminuserwith the actual username of the local account you want to enable password expiration for. - If you want, you can also change the maximum and minimum password age for local accounts.
Disable Password Expiration for Local Account(s)
Note: This is the default setting.
What happens: Your password will never expire and you won’t be forced to change it.
- Type one of the commands below into the command prompt and press Enter:
For all existing local accounts:
wmic UserAccount set PasswordExpires=FalseOR
For a specific local account:
wmic UserAccount where Name="adminuser" set PasswordExpires=FalseReplace
adminuserwith the actual username of the local account you want to disable password expiration for. - You can now close Windows Terminal (Admin) if you want.
Option Three
Enable or Disable Password Expiration for Local Account in PowerShell
⚠️ Requires admin privileges
- Open Windows Terminal (Admin), and select Windows PowerShell.
Enable Password Expiration for Local Account(s)
What happens: Your password will need to be changed after it expires.
- Type one of the commands below into the command prompt and press Enter:
For all existing local accounts:
Get-LocalUser | Set-LocalUser -PasswordNeverExpires $falseOR
For a specific local account:
Set-LocalUser -Name 'adminuser' -PasswordNeverExpires $falseReplace
adminuserwith the actual username of the local account you want to enable password expiration for. - If you want, you can also change the maximum and minimum password age for local accounts.
- When finished, go to step 5 below.
Disable Password Expiration for Local Account(s)
Note: This is the default setting.
What happens: Your password will never expire and you won’t be forced to change it.
- Type one of the commands below into the command prompt and press Enter:
For all existing local accounts:
Get-LocalUser | Set-LocalUser -PasswordNeverExpires $trueOR
For a specific local account:
Set-LocalUser -Name 'adminuser' -PasswordNeverExpires $trueReplace
adminuserwith the actual username of the local account you want to disable password expiration for. - You can now close Windows Terminal (Admin) if you want.
Option Four
Enable or Disable Password Expiration for Microsoft Account Online at Microsoft
Note: This option will also require you to change your Microsoft account’s password.
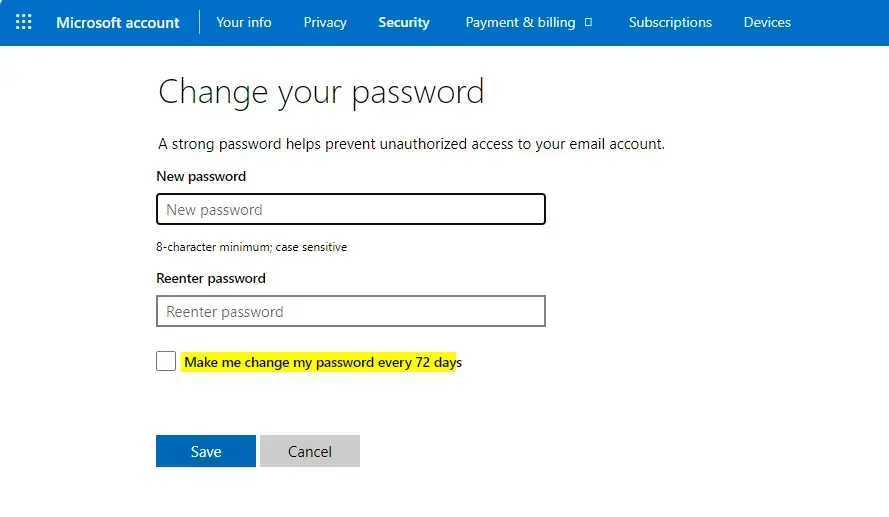
- Go to the Change your password site at Microsoft for your Microsoft account.
- Sign in to the Microsoft site with your Microsoft account to verify.
- Do the following:
- Type your current password.
- Type a new password.
- Reenter the password to confirm.
- Check (to enable) or uncheck (to disable – this is the default) Make me change my password every 72 days for what you want.
- Click Save.
- Sign in to the Microsoft site with your Microsoft account’s new password to verify.
Summary
You now know how to enable or disable password expiration in Windows 11. You have four options to choose from:
- Option One: Use Local Users and Groups (easiest for beginners, Pro/Enterprise/Education editions only)
- Option Two: Use Command Prompt with WMIC commands (works on all editions)
- Option Three: Use PowerShell commands (works on all editions)
- Option Four: Change settings online for your Microsoft account
Password expiration helps keep your account more secure by forcing you to update your password regularly. However, if you find it inconvenient, you can disable it. Remember that you need admin privileges to make these changes on your computer.

Leave a Reply Cancel reply