How to Change Preferred Band for Wi-Fi adapter in Windows 11
This tutorial will show you how to change the preferred band (6GHz, 5GHz, or 2.4GHz) for your Wi-Fi adapter in Windows 11.
Open Settings, navigate to Network & internet, then Wi-Fi, and click Hardware properties. Select Edit under More adapter options, click Configure, go to the Advanced tab, and choose your preferred band from the Value dropdown.
Why Change Your Wi-Fi Band?
Your Windows 11 computer automatically picks the Wi-Fi band with the strongest signal, but this isn’t always the fastest. Sometimes it connects to the slower 2.4GHz band when a faster one is available. Changing your preferred band can give you a better internet experience.
When you connect to a Wi-Fi network with multiple bands, Windows automatically connects to the band with the strongest signal. But this isn’t always the best choice. You might get connected to the slower 2.4GHz band instead of a faster 5GHz or 6GHz band.
By setting a preferred band, you tell your Wi-Fi adapter which band to prioritize when it’s available.
Important: Setting a preferred band doesn’t guarantee your device will always use it. It’s only preferred. To guarantee a specific band, you need to set your Wi-Fi router to use single individual bands instead of multiband. This way you can always connect to the specific network name for the specific band you want.
Understanding the Three Bands
2.4GHz
The 2.4 GHz Wi-Fi spectrum is 70 MHz wide, with devices typically limited to three 20 MHz channels.
2.4 GHz can deliver a typical maximum speed of up to 100 Mbps.
It’s older and slower. However, it boasts the longest range and best wall-penetration capability of all available bands.
5GHz
The 5 GHz Wi-Fi band offers faster speeds than 2.4GHz, reaching up to 1 Gbps, because it uses wider channels. While it has more channels available, some can be affected by weather or radar, meaning you might not always get the fastest speeds.
5 GHz can deliver up to 1 Gbps.
6GHz
The 6 GHz Wi-Fi band is the newest and fastest, offering speeds up to 2 Gbps. It has a huge amount of space, allowing for very wide channels that don’t interfere with older Wi-Fi signals. This band is exclusive to new Wi-Fi 6E devices.
6 GHz can deliver up to 2 Gbps.
Reference:
2.4 GHz vs. 5 GHz vs. 6 GHz: What’s the Difference? – Intel We examine the differences between 2.4 GHz, 5 GHz, and 6 GHz frequencies and which is best suited to different scenarios.
Option 1Change Preferred Band Using Settings
You can change your Wi-Fi adapter’s preferred band directly in Windows 11 settings to prioritize faster speeds. This involves going into your network adapter’s properties through the Settings app and finding the advanced options to select your preferred band.
- Open Settings by pressing ⊞ Win+I on your keyboard.
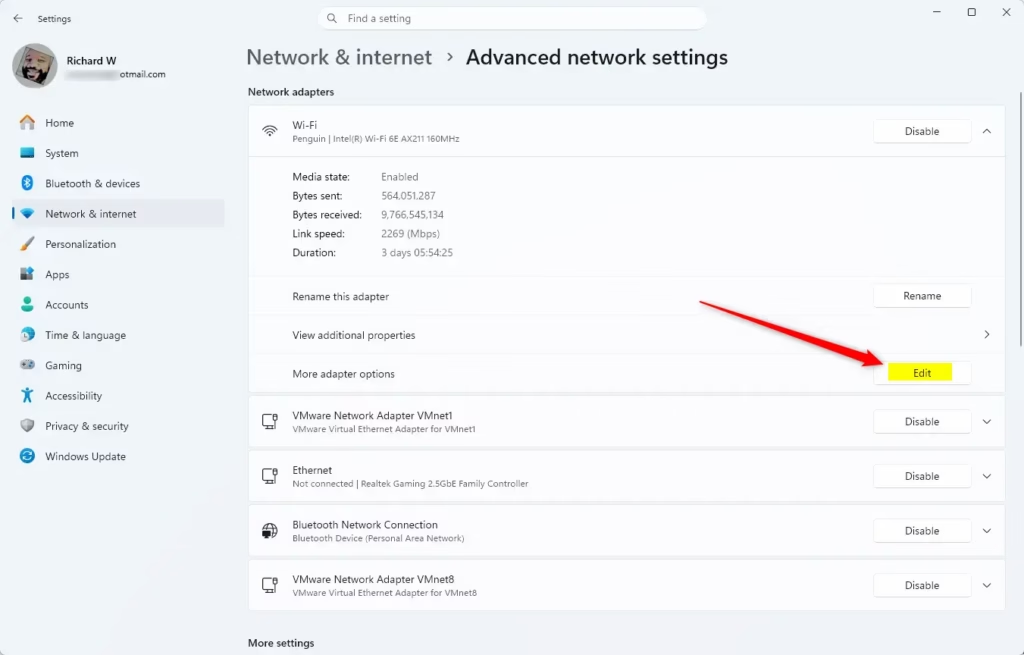
- Click or tap on Network & internet on the left side. Then click or tap on Wi-Fi on the right side. (See screenshot below)
- Click or tap on Hardware properties.
- Click or tap on the Edit button for More adapter options.
- Click or tap on the Configure button.
- Follow these steps to set a preferred band for your Wi-Fi adapter:
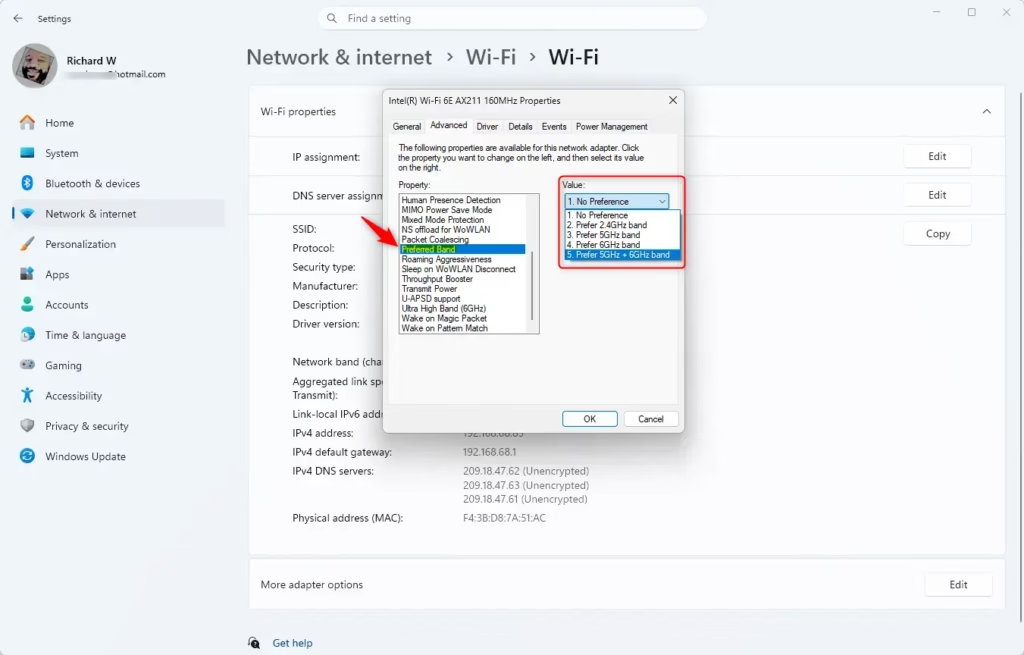
- Click or tap on the Advanced tab.
- Click or tap on Preferred band in the left “Property” pane.
- Select a band you prefer in the right “Value” dropdown menu. Only bands supported by your Wi-Fi adapter will be listed.
- Click or tap on OK.
Option 2Change Preferred Band Using Device Manager
Changing your Wi-Fi adapter’s preferred band using Device Manager is a powerful way to control your connection. You’ll need to open Device Manager, find your wireless adapter, and adjust its advanced properties to select the band you want.
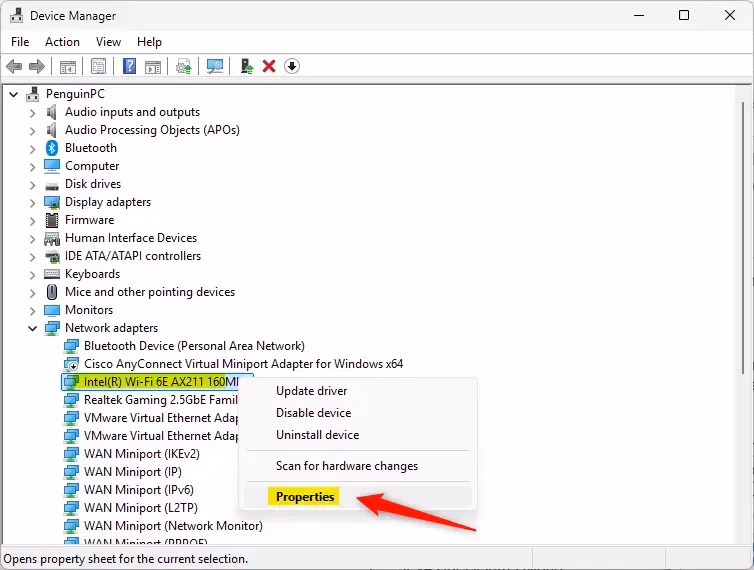
- Open Device Manager by typing
devmgmt.mscin the Run dialog. - Expand Network adapters in Device Manager. Double click or tap on your wireless network adapter.
- Follow these steps to set a preferred band for your Wi-Fi adapter:
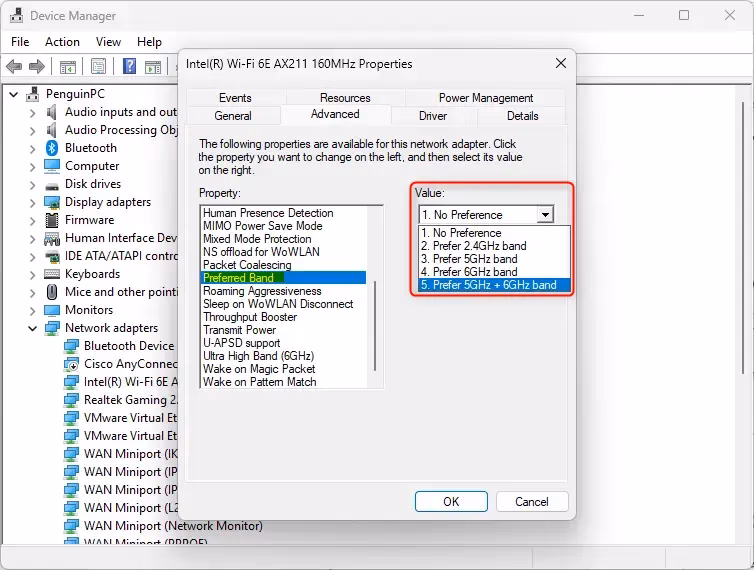
- Click or tap on the Advanced tab.
- Click or tap on Preferred band in the left “Property” pane.
- Select a band you prefer in the right “Value” dropdown menu. Only bands supported by your Wi-Fi adapter will be listed.
- Click or tap on OK.
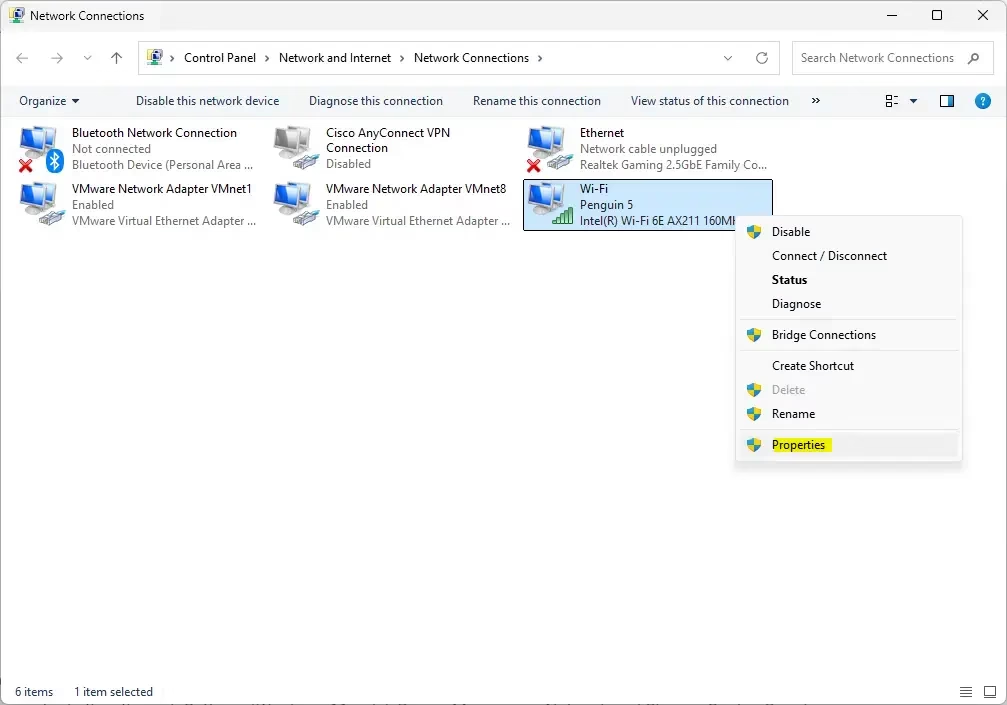
Option 3Change Preferred Band Using Network and Sharing Center
You can also change your Wi-Fi adapter’s preferred band through the classic Network and Sharing Center in Windows. This method requires accessing your adapter’s properties via the Control Panel and then navigating to the advanced settings to make your selection.
- Open Control Panel (icons view). Click or tap on the Network and Sharing Center icon.
- Click or tap on the Change adapter settings link on the left side of Network and Sharing Center.
- Right click on the Wi-Fi adapter you want. Click or tap on Properties.
- Click or tap on the Configure button.
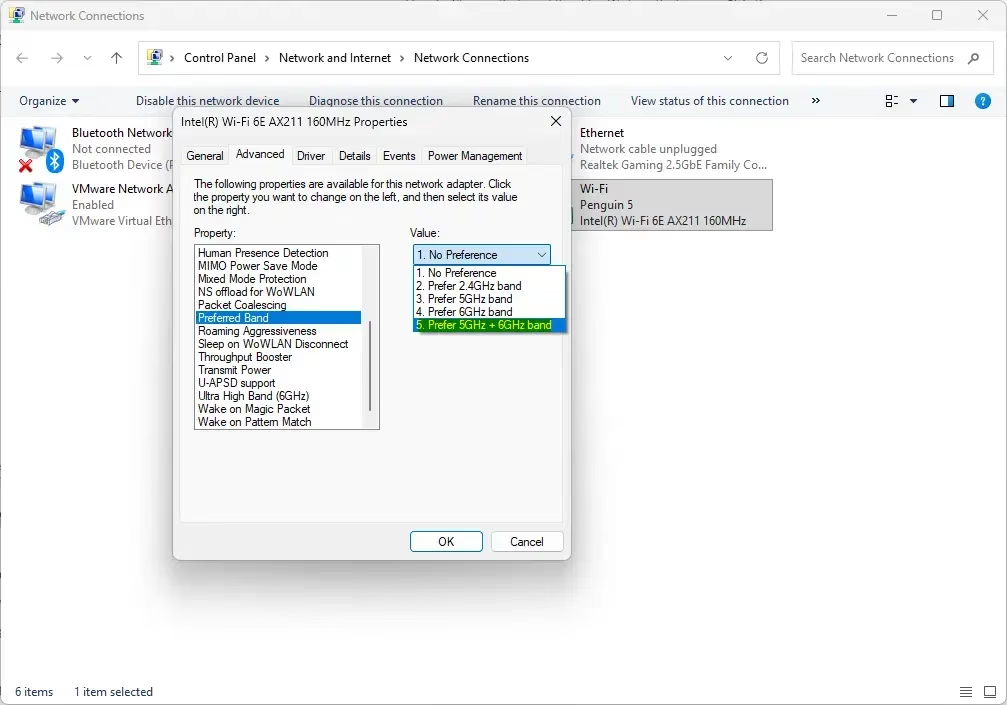
- Follow these steps to set a preferred band for your Wi-Fi adapter:
- Click or tap on the Advanced tab.
- Click or tap on Preferred band in the left “Property” pane.
- Select a band you prefer in the right “Value” dropdown menu. Only bands supported by your Wi-Fi adapter will be listed.
- Click or tap on OK.
Summary
You’ve learned three ways to change your Wi-Fi adapter’s preferred band in Windows 11: through Settings, Device Manager, or Network and Sharing Center. Choosing the right band—2.4GHz for range, 5GHz for speed and range, or 6GHz for top speed—can improve your connection.
How to change preferred Wi-Fi band in 🪟 Windows 11?
To change your preferred Wi-Fi band in Windows 11, open Device Manager and go to your wireless adapter’s Properties. Under the Advanced tab, find ‘Preferred Band’ and choose 5GHz or 6GHz from the list. Save your changes, and your computer will try to use that band.
How do I force my WiFi adapter to use 5GHZ 🪟 Windows 11?
To encourage your Windows 11 Wi-Fi adapter to use 5GHz, go to Device Manager, right-click your adapter, and select Properties. On the Advanced tab, set ‘Preferred Band’ to ‘Prefer 5GHz band.’ For a guaranteed 5GHz connection, you might need to set up separate network names on your router.
Is 20MHz or 40MHz better for 2.4 GHz?
For the 2.4 GHz Wi-Fi band, using a 20MHz channel is usually better and more stable than 40MHz. While 40MHz can be faster, it causes more interference in crowded areas because it takes up more space, making 20MHz a more reliable choice.
How do I manually change Wi-Fi between 2.4 and 5GHZ?
The most effective way to manually switch between bands is to configure your router to broadcast separate network names (SSIDs) for the 2.4GHz and 5GHz bands. Once separated, you can then select the specific network name in your Windows 11 Wi-Fi settings to force your device onto the desired frequency.
Was this guide helpful?

About the Author
Richard
Tech Writer, IT Professional
Richard, a writer for Geek Rewind, is a tech enthusiast who loves breaking down complex IT topics into simple, easy-to-understand ideas. With years of hands-on experience in system administration and enterprise IT operations, he’s developed a knack for offering practical tips and solutions. Richard aims to make technology more accessible and actionable. He's deeply committed to the Geek Rewind community, always ready to answer questions and engage in discussions.


No comments yet — be the first to share your thoughts!