This article explains how to enable or disable the Touchpad on laptops running Windows 11.
Some laptops have touchpads that add the same functionality as a mouse without needing an external mouse. If you have an external mouse and don’t need the Touchpad enabled, you can simply turn it off with a few clicks on Windows 11.
A user might want to disable the Touchpad because of accidental movement of the mouse pointer or cursor with the palm while typing. You can also disable it when using the internal keyboard on your laptop.
If your laptop doesn’t have a button or a way to quickly turn the Touchpad on or off, use the steps below.
Turn off the laptop touchpad when using Windows 11
For those who want to disable the Touchpad on laptops running Windows 11, the steps below should help them.
Windows 11 has a centralized location for the majority of its settings app. From system configurations to creating new users and updating Windows, all can be done from the System Settings pane.
To get to System Settings, you can use the Windows key + I shortcut or click on Start ==> Settings, as shown in the image below:

Alternatively, you can use the search box on the taskbar to search for Settings. Then select to open it.
In Windows Settings, click Bluetooth & devices, and select Touchpad on the right pane of your screen , asshown in the image below.
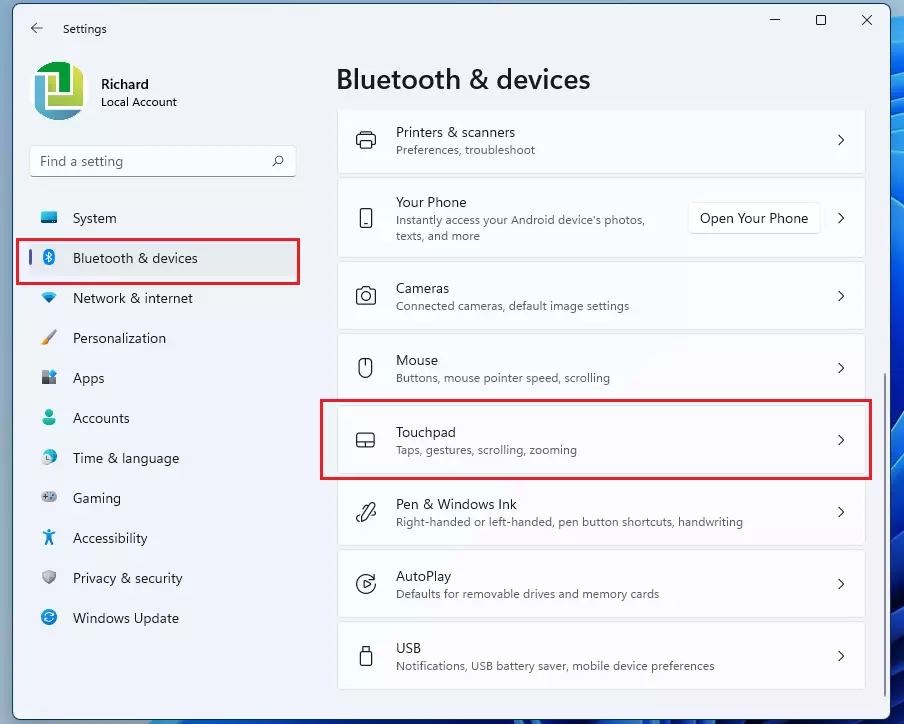
On the Touchpad settings pane, toggle the button to the Off position to disable the Touchpad. Once the Touchpad is disabled, you need an external mouse or even your keyboard to navigate in Windows 11.
How to disable touchpads from Device Manager
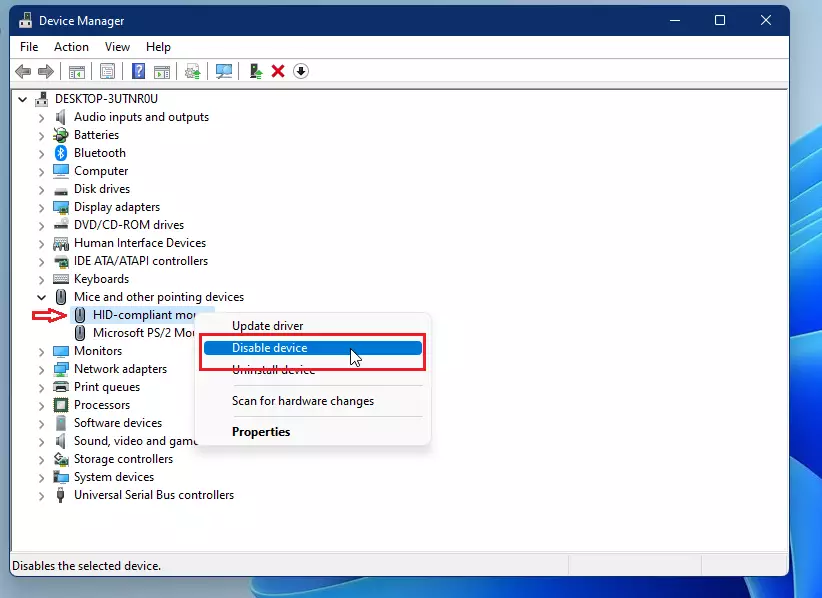
Another way to disable or enable the touchpads on laptop computer is by using Device Manager. To do that, click the Start button and search for Device Manager. Select to open the Device Manager app.

In Device Manager, expand Mouse and other pointing devices, then right-click on the HID-compliant mouse and select Disable device as highlighted below.
That should do it!
Conclusion:
- Disabling the Touchpad on Windows 11 can enhance the typing experience by preventing accidental cursor movements.
- You have multiple options for turning the Touchpad on or off, including the Settings menu and Device Manager.
- Ensure to check for any dedicated Touchpad buttons on your laptop, as they provide a quick toggle.
- Re-enabling the Touchpad is as simple as following the same steps in reverse.
- Familiarizing yourself with these settings can help improve your overall laptop usage.


Leave a Reply to How to Reverse the Scroll Direction of Your Touchpad on Windows 11 - Geek Rewind Cancel reply