
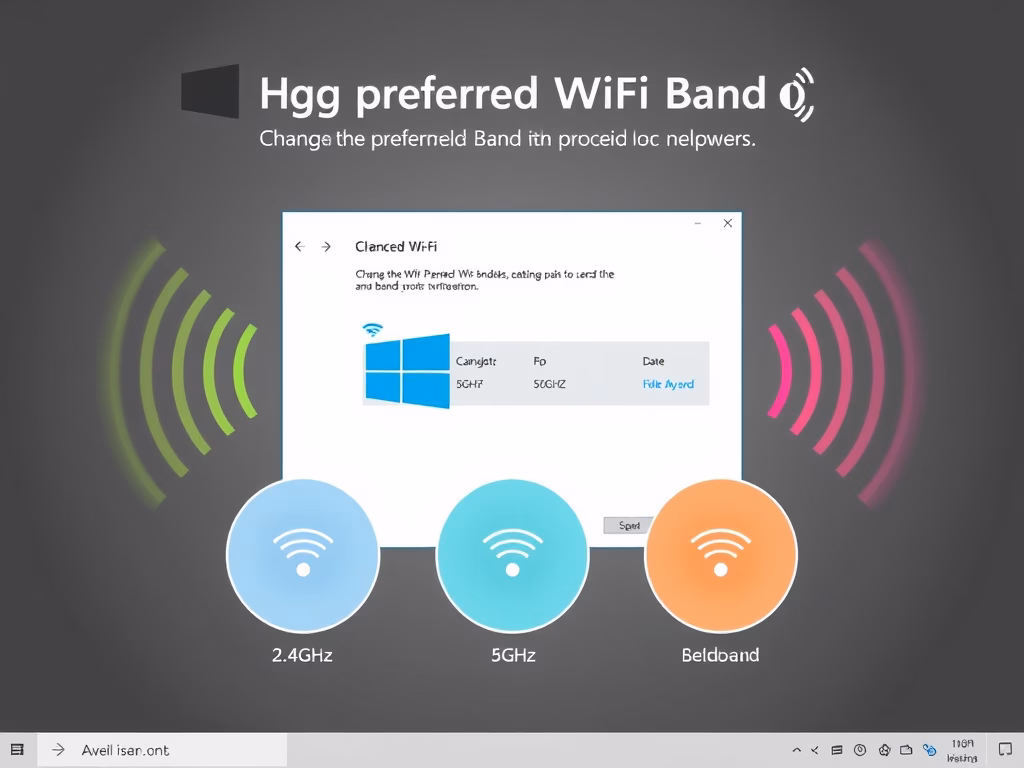
This tutorial will show you how to change the preferred band (6GHz, 5GHz, or 2.4GHz) for your Wi-Fi adapter in Windows 11.
Why Change Your Wi-Fi Band?
Wi-Fi is a wireless local area network (WLAN) technology. It uses high-frequency radio waves to give your Windows device wireless internet and network connections.
When you connect to a Wi-Fi network with multiple bands, Windows automatically connect to the band with the strongest signal. But this isn’t always the best choice. You might get connected to the slower 2.4GHz band instead of a faster 5GHz or 6GHz band.
By setting a preferred band, you tell your Wi-Fi adapter which band to prioritize when it’s available.
Important: Setting a preferred band doesn’t guarantee your device will always use it. It’s only preferred. To guarantee a specific band, you need to set your Wi-Fi router to use single individual bands instead of multiband. This way you can always connect to the specific network name for the specific band you want.
Understanding the Three Bands
2.4GHz
The 2.4 GHz Wi-Fi spectrum is 70 MHz wide. Devices are typically limited to three 20 MHz channels.
2.4 GHz can deliver a typical maximum speed of up to 100 Mbps.
It’s old and slower. But it has the longest range and best wall-penetration capability of all available bands.
5GHz
The 5 GHz Wi-Fi spectrum is approximately 500 MHz wide. Devices can use up to six larger 80 MHz channels for faster speeds. However, only two of the six channels are always readily available. Four channels may be restricted from use at times due to weather or airport radar.
5 GHz can deliver up to 1 Gbps.
6GHz
The 6 GHz Wi-Fi spectrum is 1200 MHz wide. That’s more than double the size of the 2.4 GHz and 5 GHz spectrums. It supports up to seven even larger 160 MHz channels. These channels are only accessible to new Wi-Fi 6E devices. They enable gigabit Wi-Fi speeds and allow operations free from legacy Wi-Fi interference.
6 GHz can deliver up to 2 Gbps.
Reference:
2.4 GHz vs. 5 GHz vs. 6 GHz: What’s the Difference? – Intel We examine the differences between 2.4 GHz, 5 GHz, and 6 GHz frequencies and which is best suited to different scenarios.
Option One: Change Preferred Band Using Settings
Note: This option is only for Windows 11.
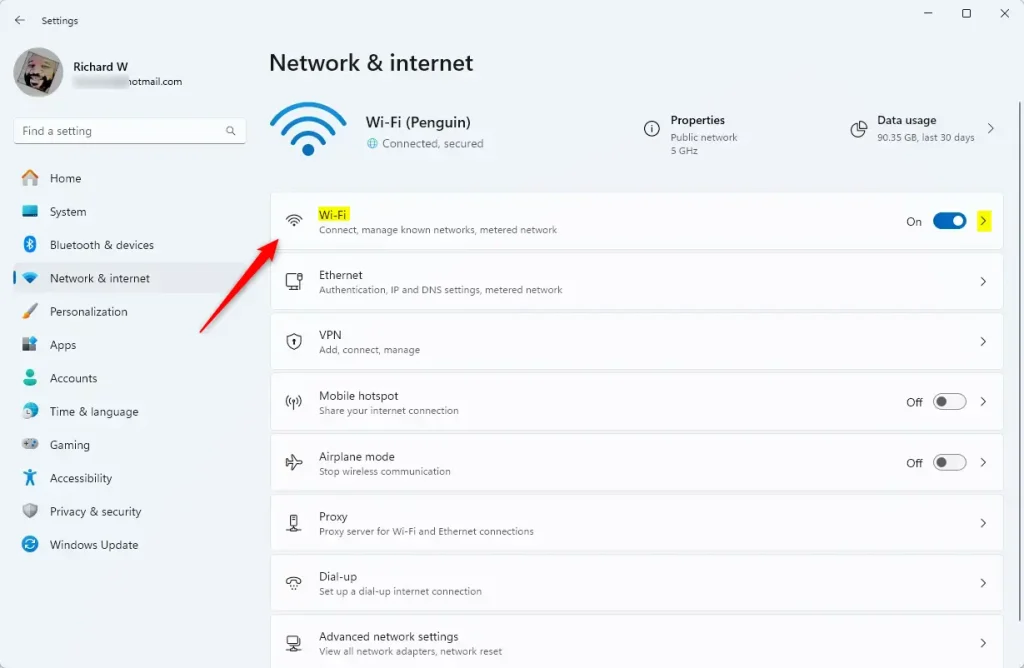
- Open Settings by pressing Win+I on your keyboard.
- Click or tap on Network & internet on the left side. Then click or tap on Wi-Fi on the right side. (See screenshot below)
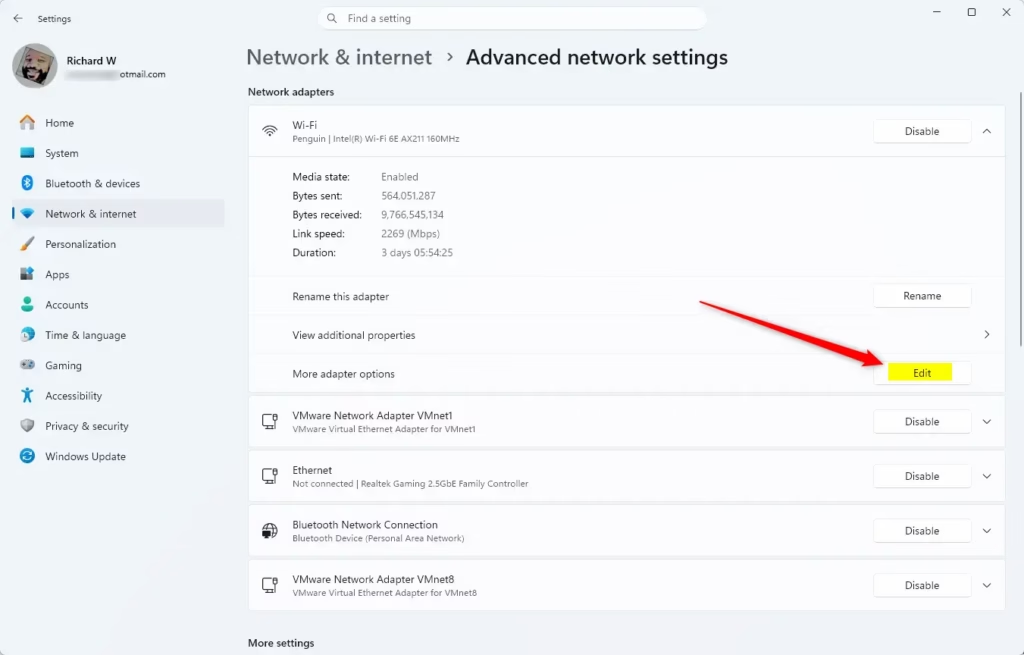
- Click or tap on Hardware properties.
- Click or tap on the Edit button for More adapter options.
- Click or tap on the Configure button.
- Follow these steps to set a preferred band for your Wi-Fi adapter:
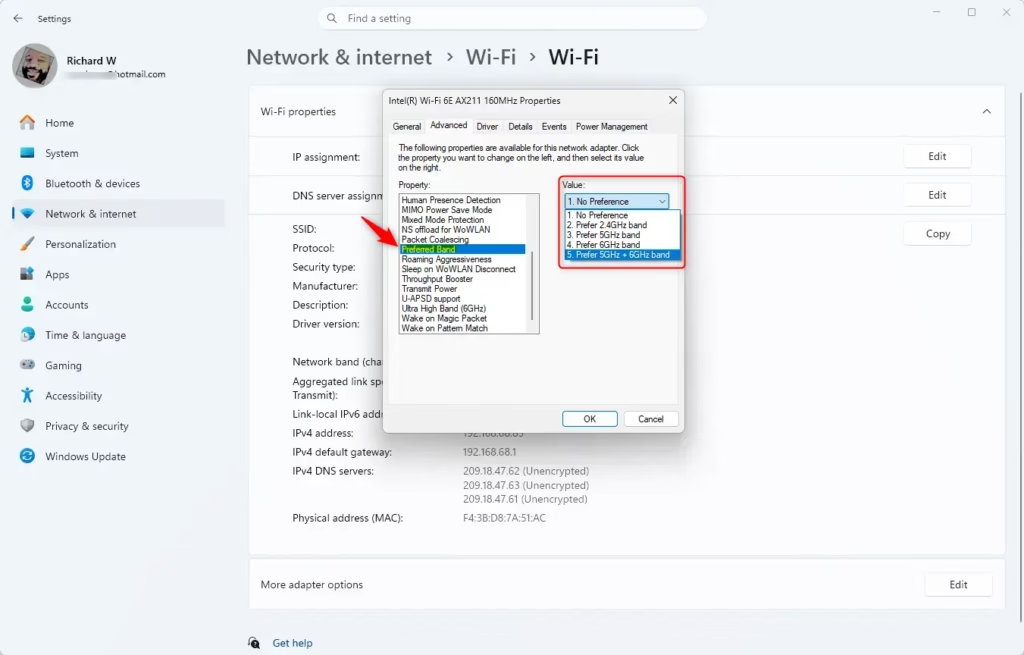
- Click or tap on the Advanced tab.
- Click or tap on Preferred band in the left “Property” pane.
- Select a band you prefer in the right “Value” dropdown menu. Only bands supported by your Wi-Fi adapter will be listed.
- Click or tap on OK.
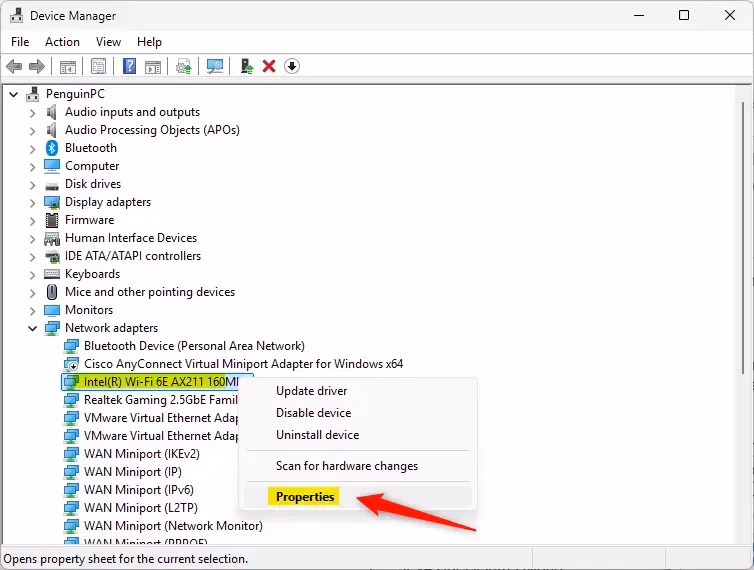
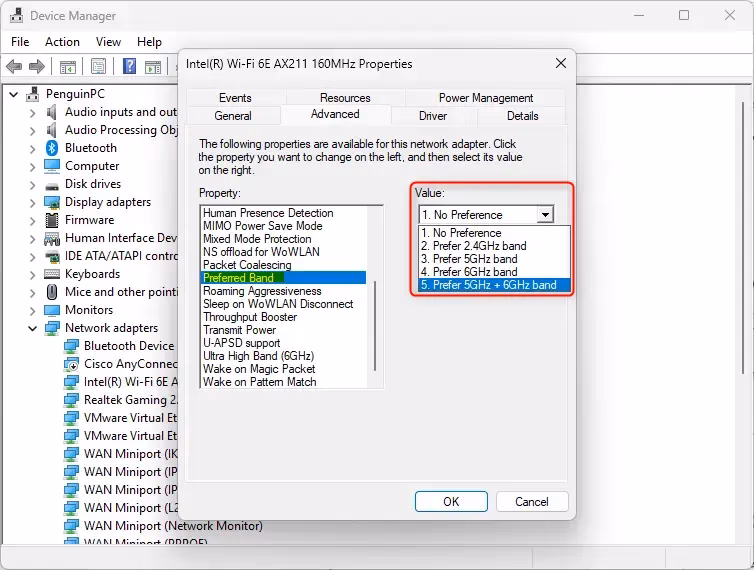
Option Two: Change Preferred Band Using Device Manager
**ADMIN PRIVILEGES REQUIRED**
- Open Device Manager by typing
devmgmt.mscin the Run dialog. - Expand Network adapters in Device Manager. Double click or tap on your wireless network adapter.
- Follow these steps to set a preferred band for your Wi-Fi adapter:
- Click or tap on the Advanced tab.
- Click or tap on Preferred band in the left “Property” pane.
- Select a band you prefer in the right “Value” dropdown menu. Only bands supported by your Wi-Fi adapter will be listed.
- Click or tap on OK.
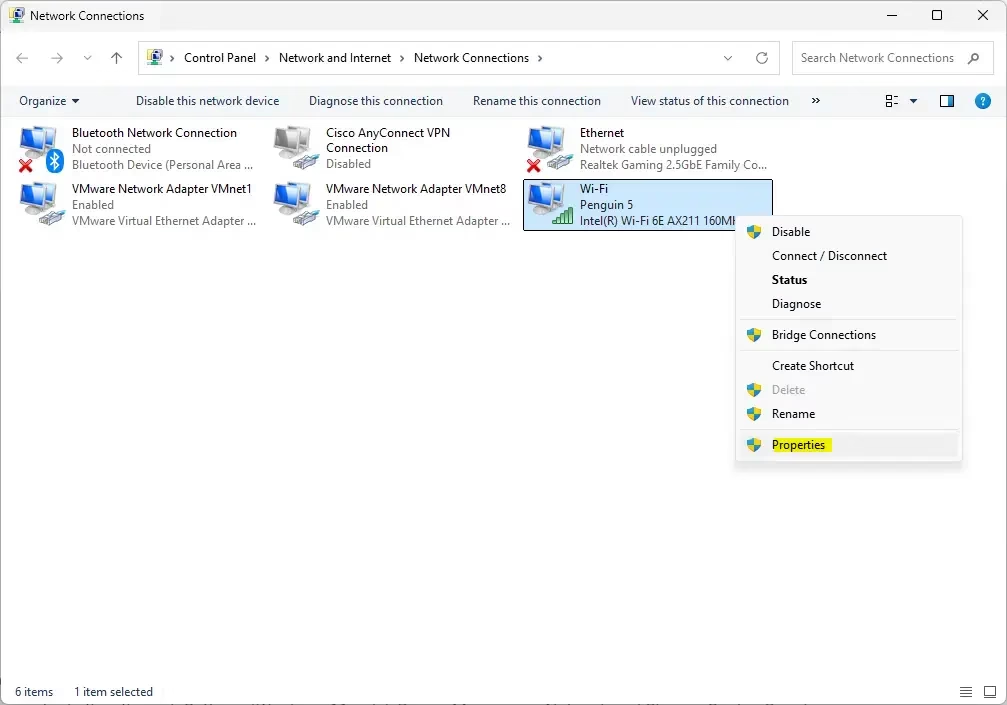
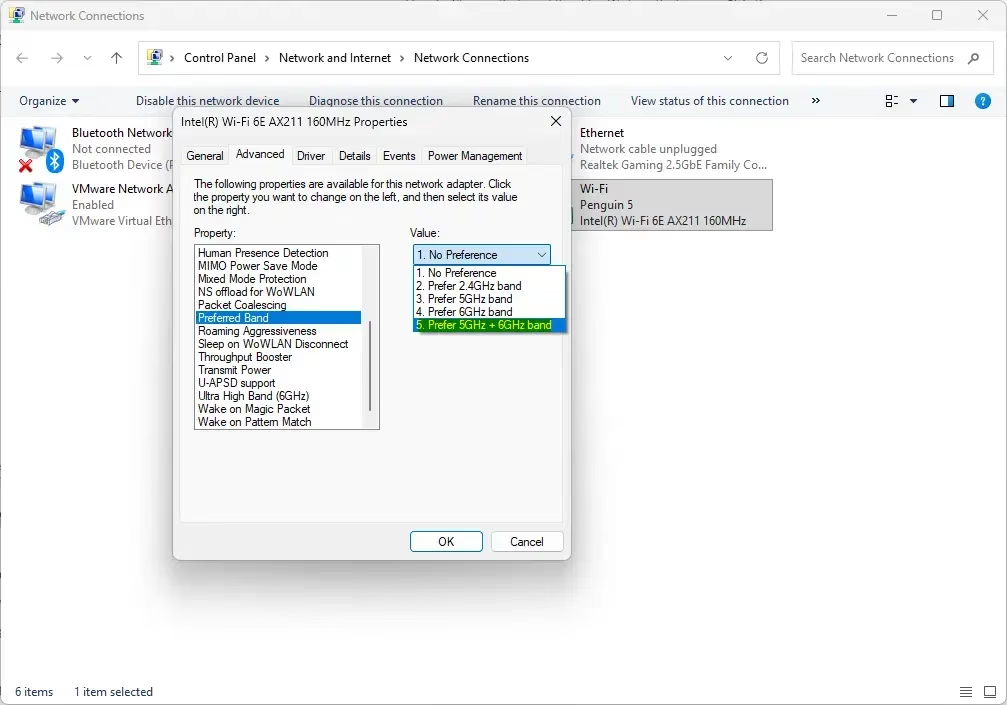
Option Three: Change Preferred Band Using Network and Sharing Center
**ADMIN PRIVILEGES REQUIRED**
- Open Control Panel (icons view). Click or tap on the Network and Sharing Center icon.
- Click or tap on the Change adapter settings link on the left side of Network and Sharing Center.
- Right click on the Wi-Fi adapter you want. Click or tap on Properties.
- Click or tap on the Configure button.
- Follow these steps to set a preferred band for your Wi-Fi adapter:
- Click or tap on the Advanced tab.
- Click or tap on Preferred band in the left “Property” pane.
- Select a band you prefer in the right “Value” dropdown menu. Only bands supported by your Wi-Fi adapter will be listed.
- Click or tap on OK.
Summary
You now know how to change the preferred band for your Wi-Fi adapter in Windows 10 and Windows 11. There are three ways to do this: through Settings (Windows 11 only), Device Manager, or Network and Sharing Center. Simply choose the band that works best for your needs—2.4GHz for range, 5GHz for a good balance of speed and range, or 6GHz for the fastest speeds. Remember that setting a preferred band only tells your device which band to prioritize. It doesn’t guarantee that band will always be used.

Leave a Reply Cancel reply