
This article explains how to create an Airsonic Media Streamer on Ubuntu Linux.
Airsonic is an open-source web media streamer based on Java. It allows you to stream your music and provide ubiquitous access to it anywhere there’s an Internet connection.
Airsonic is a great way to stream your music and provide ubiquitous access to it anywhere there’s an Internet connection. With Airsonic, you can easily handle extensive music collections, and it is optimized for MP3 streaming.
It works with any media format streamed over HTTP / HTTPS, including AAC, OGG, WMA, FLAC, APE, etc. Installing Airsonic on your Ubuntu Linux machine allows you to easily manage and stream your music collection from anywhere and on any device.
It is a great way to always have your music available without needing external storage devices or physical media.
For more about Airsonic, please check out its homepage.
Install Java 8
For Airsonic to work, you should have Java installed. To do that, run the commands below. Of course, the easiest way to install Oracle Java JDK 8 on Ubuntu is via a third-party PPA… To add that PPA, run the commands below.
sudo add-apt-repository ppa:webupd8team/java
After running the commands above, you should see a prompt to accept the PPA key onto Ubuntu… accept and continue.
Now that the PPA repository has been added to Ubuntu run the commands below to download the Oracle Java 8 installer…. the installer should install the latest Java JDK 8 on your Ubuntu machines.
sudo apt update
sudo apt install oracle-java8-installer
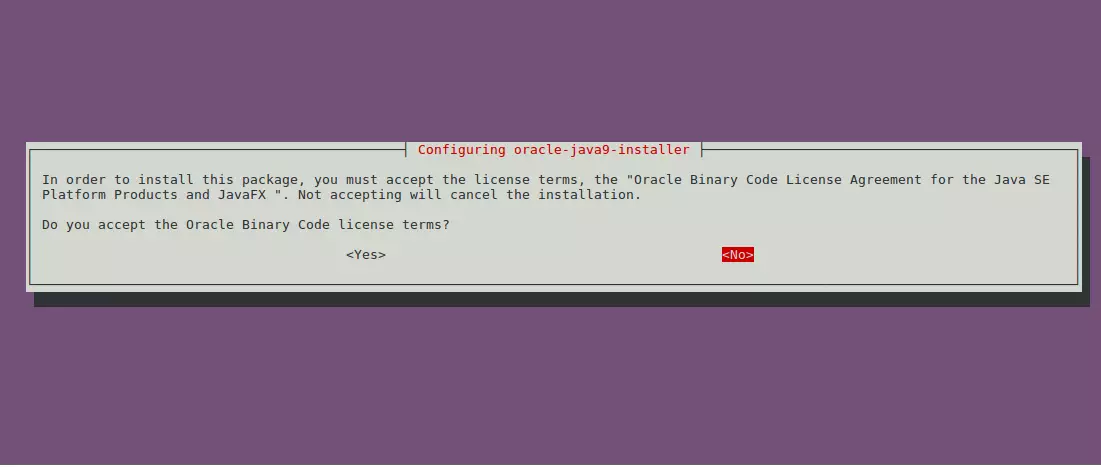
When you run the commands above, you’ll be prompted to access the license terms of the software… accept and continue.
Set Oracle JDK8 as default; install the oracle-java8-set-default package to do that. This will automatically set the JAVA env variable.
sudo apt install oracle-java8-set-default
Now that JAVA is installed run the commands below to set its home directory.
sudo nano /etc/environment
Then copy and paste the highlighted line below and save the file.
PATH="/usr/local/sbin:/usr/local/bin:/usr/sbin:/usr/bin:/sbin:/bin:/usr/games:/usr/local/games"
JAVA_HOME=/usr/lib/jvm/java-8-oracle
export JAVA_HOME
After that, run the commands below.
source /etc/environmentWhen you run echo $JAVA_HOME, you should see the Java home directory.
Download and Configure Airsonic
After installing Java, run the commands below to create the Airsonic home directory and download the Airsonic archived package.
sudo mkdir -p /opt/airsonic
cd /opt/airsonic && sudo wget https://github.com/airsonic/airsonic/releases/download/v10.1.1/airsonic.war
After that, create an Airsonic user and give the user access to the /opt/air sonic directory.
sudo useradd airsonic
Then, give the user access to that directory.
sudo chown -R airsonic:airsonic /opt/airsonic
Next, create an Airsonic system service. Run the commands below
sudo nano /etc/systemd/system/airsonic.service
Then, copy the content below into the file and save it.
[Unit]
Description=Airsonic Media Server
After=remote-fs.target network.target
AssertPathExists=/opt/airsonic

[Service]
Type=simple
Environment="JAVA_JAR=/opt/airsonic/airsonic.war"
Environment="JAVA_OPTS=-Xmx700m"
Environment="AIRSONIC_HOME=/opt/airsonic"
Environment="PORT=8080"
Environment="CONTEXT_PATH=/airsonic"
Environment="JAVA_ARGS="
EnvironmentFile=-/etc/sysconfig/airsonic
ExecStart=/usr/bin/java \
          $JAVA_OPTS \
          -Dairsonic.home=${AIRSONIC_HOME} \
          -Dserver.context-path=${CONTEXT_PATH} \
          -Dserver.port=${PORT} \
          -jar ${JAVA_JAR} $JAVA_ARGS
User=airsonic
Group=airsonic

[Install]
WantedBy=multi-user.target
Save the file and exit. After saving the file, run the commands below to reload the system.
sudo systemctl daemon-reload
After that, run the commands below to create the aircon default config file.
sudo nano /etc/default/airsonic
Then paste the content below:
# Set the location of the standalone war to use
JAVA_JAR=/opt/airsonic/airsonic.war

# Set any java opts separated by spaces
JAVA_OPTS=-Xmx700m

# Set a different location for the airsonic home.
# If this path is /opt/libresonic or even contains "libresonic",
# the data from a previous libresonic can be used as is (i.e. without
# renaming libresonic.properties,db/libresonic*, etc
AIRSONIC_HOME=/opt/airsonic

# Change the port to listen on
PORT=8080

# Change the path that is listened to on
CONTEXT_PATH=/airsonic

# Add any java args. These are different than JAVA_OPTS in that
# they are passed directly to the program. The default is empty:
#JAVA_ARGS=

# Note that there are several settings for spring boot, not explicitly listed
# here, but can be used in either JAVA_OPTS or JAVA_ARGS. The full list
# can be found here:
# https://docs.spring.io/spring-boot/docs/1.4.5.RELEASE/reference/htmlsingle/#common-application-properties
# For example to set debug across the board:
#JAVA_ARGS=--debug

# Or to change the IP address that is listened to:
JAVA_ARGS=--server.address=127.0.0.1
Save and exit.
Start Airsonic service.
sudo systemctl start airsonic
sudo systemctl enable airsonic
Open your browser and browse to the server name or IP address followed by port 8080
http://localhost:8080/airsonic
You should see the Airsonic login page.
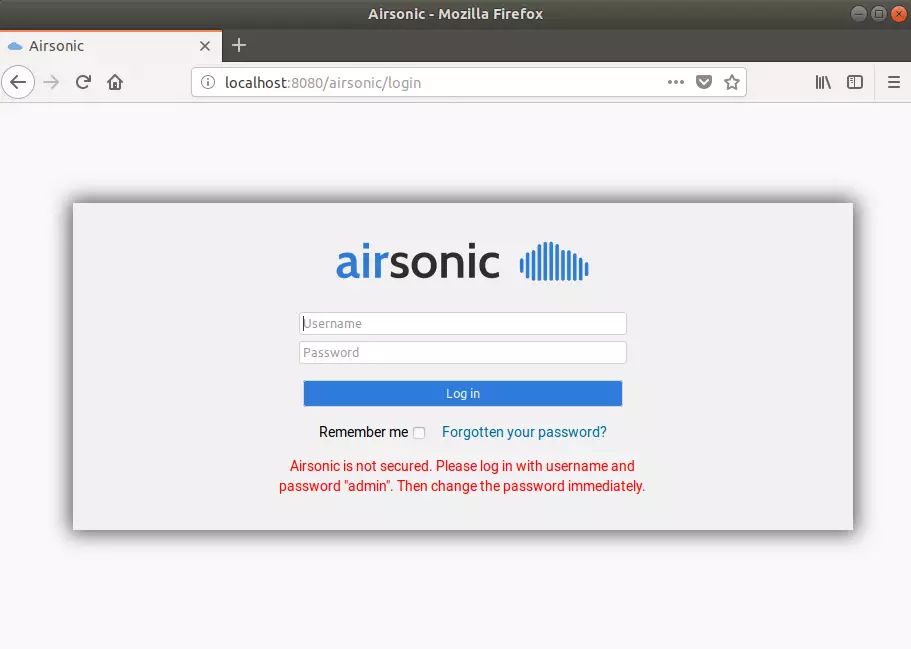
username: admin
password: admin
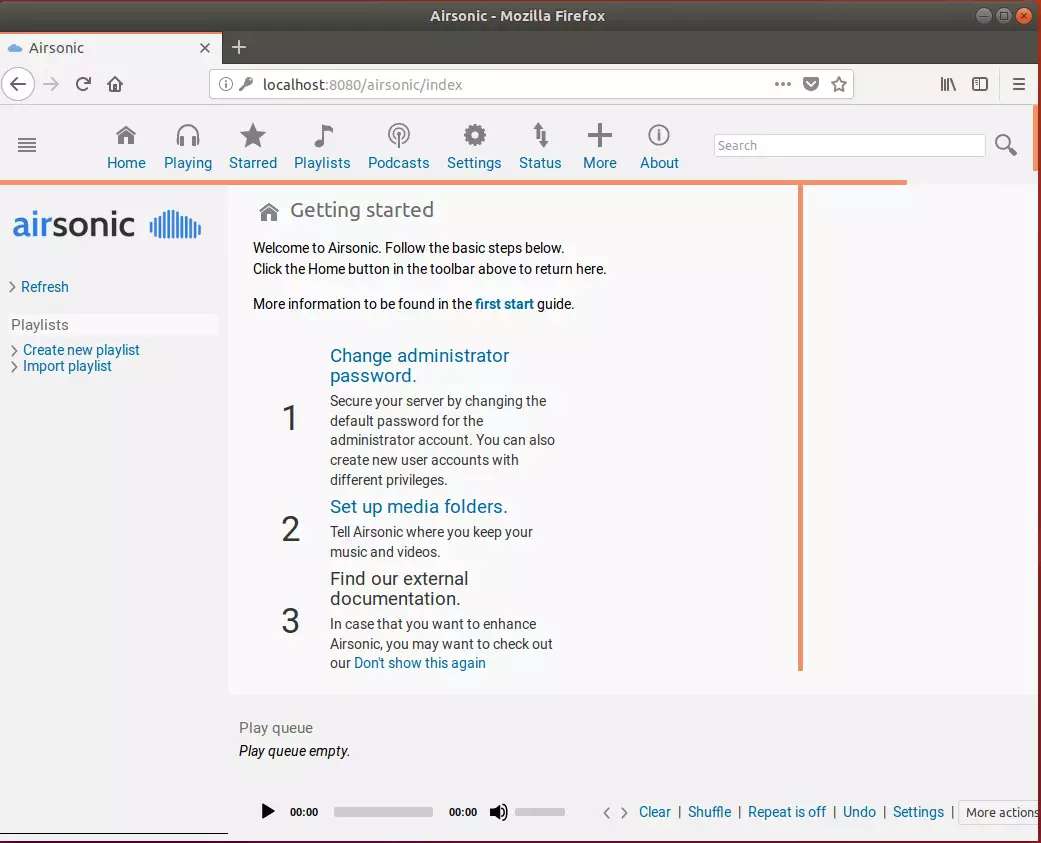
Enjoy!
You may also like the post below:


Leave a Reply Cancel reply