This brief tutorial shows students and new Users how to change a Windows computer name to Windows 10.
A computer name is a unique identifier given to a computer to distinguish it from other computers on a network. It is a name assigned to a computer during the initial setup of the operating system. The computer name is used by other devices on the network to identify and communicate with the computer.
The computer name can be changed at any time to reflect a more descriptive or personal name.
Changing a computer’s name can be useful in various situations. For instance, if you have multiple computers on your network, each computer should have a unique name to distinguish it from others. Changing your computer name can make it easier for you to identify and manage your devices.
Additionally, if you have a generic computer name, changing it to a more descriptive or personal name can make it easier for you to remember and identify your computer.
Change Windows PC name
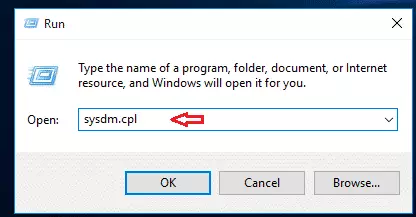
To quickly change your computer name in Windows, press Windows Logo Key + R on your keyboard.
When you press the shortcut key above, the Windows Run dialog box will appear. In the box, type this command and press the Enter key.
sysdm.cpl
The System Properties dialog box will appear.
You can change your computer and perform other tasks on this dialog window, such as enabling remote connection, creating a restore point for your computer, and other tasks.
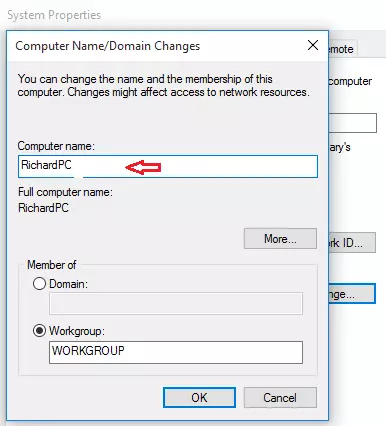
Click the Change button to change your computer name, as shown below.

Doing that will bring up yet another dialog box where you will type in the new computer name you want to use.
You must replace the name in the computer name field with the new name and select OK.
This will save the changes but prompt you to restart the computer for the changes to apply.
After you restart your computer, your computer will be referenced by the name new, which is how one changes a Windows PC name.
This tutorial can also change your Windows Workgroup or Domain membership.
That’s it!


Leave a Reply