
This article explains how to install Nextcloud AIO on Ubuntu Linux.
Nextcloud AIO (All-in-One) is a Docker-based solution that lets you easily set up a personal cloud server.
One might want to install Nextcloud AIO on Ubuntu Linux for several reasons. One of the main reasons is to easily set up a personal cloud server. Nextcloud AIO is a Docker-based solution that simplifies installation and allows you to easily manage your files, photos, and documents from anywhere.
Additionally, Nextcloud AIO provides a range of features and applications, including file sharing, collaboration, and more.
Installing Nextcloud AIO on Ubuntu Linux is also a secure and reliable way to store your data, giving you full control over your files and privacy.
Prerequisites
- A server running Ubuntu Linux with internet access.
- Sufficient privileges to execute commands (typically as the
rootuser or viasudo). - Docker and Docker Compose are installed on your system.
- Domain name pointing to your server’s IP address (for server with certificate).
Update the System
Before installing any new software, updating your system packages to the latest versions is a good idea.
sudo apt update
sudo apt upgrade
Install Docker
If Docker is not already installed on your system, proceed with the installation by executing the following commands:
sudo apt install apt-transport-https ca-certificates curl software-properties-common
curl -fsSL https://download.docker.com/linux/ubuntu/gpg | sudo apt-key add -
sudo add-apt-repository "deb [arch=amd64] https://download.docker.com/linux/ubuntu $(lsb_release -cs) stable"
sudo apt update
sudo apt install docker-ce
More about Docker can be found in the link below:
How to install Docker on Ubuntu Linux
Install Docker Compose
After installing Docker, you must install Docker Compose, which will manage multi-container Docker applications.
sudo curl -L "https://github.com/docker/compose/releases/download/1.29.2/docker-compose-$(uname -s)-$(uname -m)" -o /usr/local/bin/docker-compose
sudo chmod +x /usr/local/bin/docker-compose
More about Docker Compose can be found in the link below:
How to install Docker Compose on Ubuntu Linux
Set Up Docker to Run Without Sudo
To run Docker commands without sudo, add your user to the docker group.
sudo usermod -aG docker ${USER}
su - ${USER}
Run the id -nG command to check if your user is now added to the docker group.
In some cases, you may have to log out and back in or restart the computer for the above command to take effect.
Install Nextcloud AIO
Next, create a new directory for your Nextcloud installation and navigate into it.
mkdir nextcloud-aio
cd nextcloud-aio
Now create a docker-compose.yml file that will contain the configuration for the Nextcloud AIO services.
nano docker-compose.yml
Add the following configuration:
version: "3.8"

volumes:
  nextcloud_aio_mastercontainer:
    name: nextcloud_aio_mastercontainer

services:
  nextcloud:
    image: nextcloud/all-in-one:latest
    restart: always
    container_name: nextcloud-aio-mastercontainer
    volumes:
      - nextcloud_aio_mastercontainer:/mnt/docker-aio-config
      - /var/run/docker.sock:/var/run/docker.sock:ro
    ports:
      - 80:80
      - 8080:8080
      - 8443:8443
Save and exit the file.
Start Nextcloud AIO
Run the following command to start all services defined in your docker-compose.yml file.
docker-compose up -d
Access Nextcloud AIO
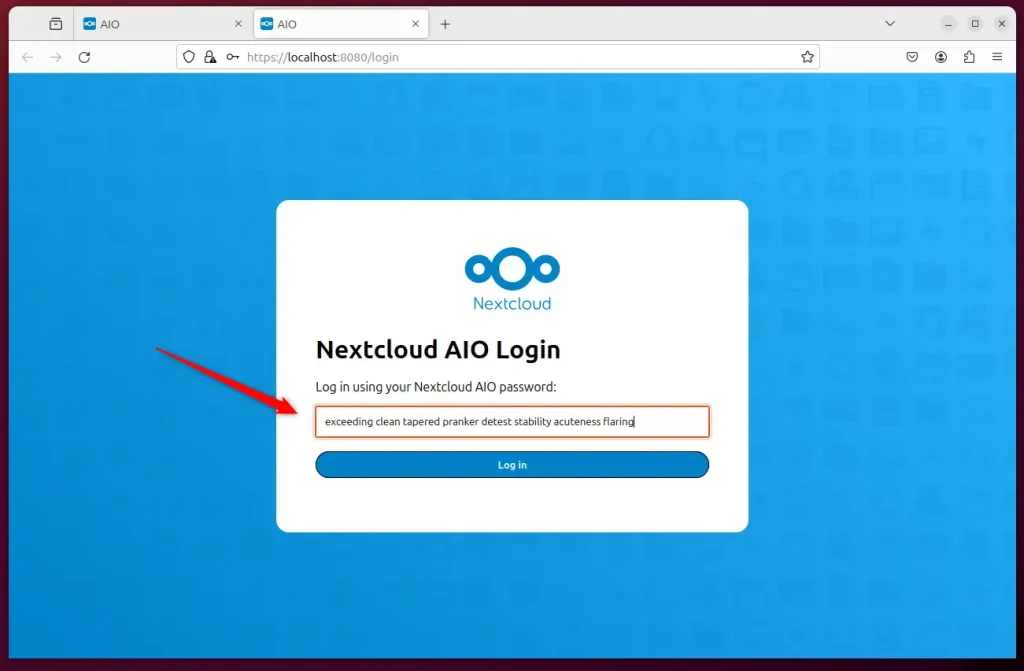
Open a web browser and navigate to http://your-server-ip:8080 or https://your-domain.com:8443 if you have configured a domain with SSL.
You will be presented with the Nextcloud AIO setup wizard, which will guide you through the rest of the setup process, including creating an admin account, database setup, and choosing other preferences.
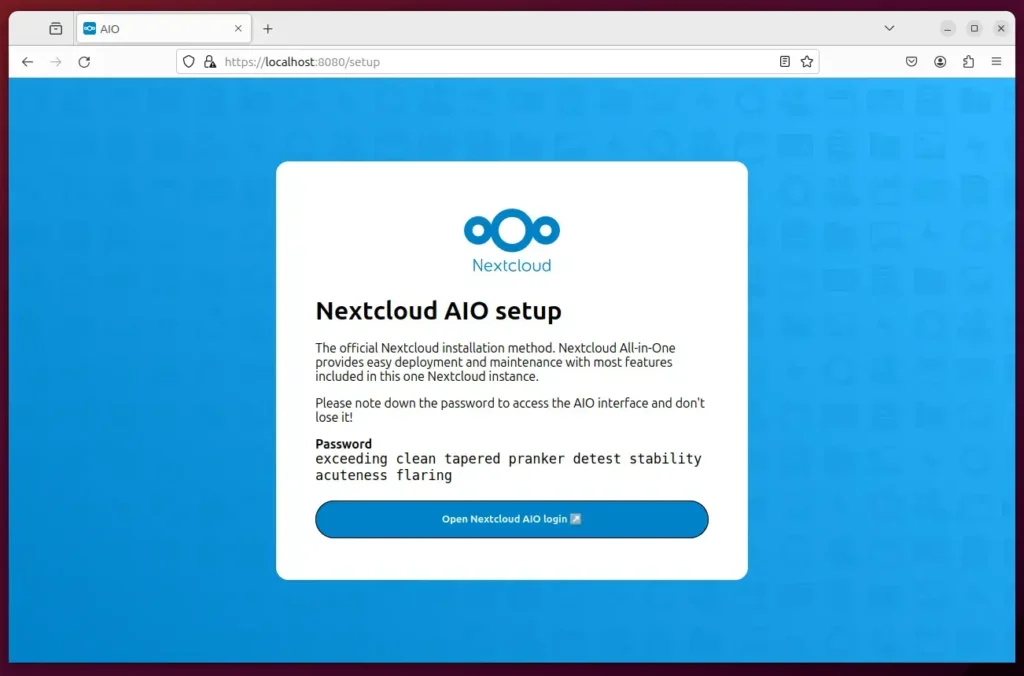
Don’t forget to copy the password from the previous screen and paste it into the password field.
Set Up SSL (Optional but Recommended)
You can secure your Nextcloud AIO installation with a free Let’s Encrypt SSL certificate when you have a domain name. The Nextcloud AIO docker container includes a built-in option to obtain and configure SSL for you.
Simply follow the on-screen instructions during the initial setup to configure SSL.
You can use Some important posts to get Nextcloud AIO to work effectively on Ubuntu Linux.
- Set up LeLet’sncrypt on Ubuntu Linux
- Set up Nginx reverse proxy on Ubuntu Linux
- Set up Apache reverse proxy on Ubuntu Linux
Conclusion:
- Nextcloud AIO on Ubuntu Linux offers a simple and secure way to set up a personal cloud server, providing easy management of files, photos, and documents from anywhere.
- Following the installation process gives you full control over your data, ensuring privacy and reliability.
- Leveraging Docker technology, Nextcloud AIO introduces various features and applications, including file sharing, collaboration, and more.
- Secure the installation with a Let’s Encrypt SSL certificate to enhance data protection and accessibility.
- Explore the official Nextcloud AIO documentation for advanced configuration options and detailed information.
Leave a Reply Cancel reply