
This brief tutorial will show students and new users how to install Strapi on Ubuntu 16.04 | 18.04 and 18.10 systems.
Strapi is an open-source content management framework built on Node.js and MongoDB that helps you develop database-driven websites, applications, and APIs in Node.js.
Strapi app Node.js 8 or higher provides features such as Admin Panel, Authentication & Permissions management, Content Management, API Generator, etc.
Strapi is used for many websites, from small nonprofits to large enterprises.
Using Strapi to edit your content on the web should be easy and fun—no need to learn templating and HTML. Strapi hides most of that stuff and focuses on what matters most.
For more about Strapi, check its homepage.
These are the packages we’re going to set up.
- Ruby version 2.5.3
- MongoDB
- Node.js 10
Install Ruby
You’ll need to install some dependencies to install Ruby and Rails on Ubuntu. To make that happen, install Node.js and Yarn repositories. This will make installing the dependencies easier.
First, install these curl and git packages.
sudo apt update
sudo apt install curl git
Then, run the commands below to add Node.js and Yarn repositories and keys to your system. Then, install some core packages to get your environment going.
curl -sL https://deb.nodesource.com/setup_10.x | sudo -E bash -
curl -sS https://dl.yarnpkg.com/debian/pubkey.gpg | sudo apt-key add -
echo "deb https://dl.yarnpkg.com/debian/ stable main" | sudo tee /etc/apt/sources.list.d/yarn.list

sudo apt-get update
sudo apt-get install nodejs yarn zlib1g-dev build-essential libpq-dev libssl-dev libreadline-dev libyaml-dev libsqlite3-dev sqlite3 libxml2-dev libxslt1-dev libcurl4-openssl-dev software-properties-common libffi-dev
When you’re done, Continue below:
After adding the repositories and installing the necessary packages above, install Ruby with your local profile settings using rbenv. You’ll then use rbenv to install ruby-build.
cd ~/
git clone https://github.com/rbenv/rbenv.git ~/.rbenv
echo 'export PATH="$HOME/.rbenv/bin:$PATH"' >> ~/.bashrc
echo 'eval "$(rbenv init -)"' >> ~/.bashrc
exec $SHELL

git clone https://github.com/rbenv/ruby-build.git ~/.rbenv/plugins/ruby-build
echo 'export PATH="$HOME/.rbenv/plugins/ruby-build/bin:$PATH"' >> ~/.bashrc
exec $SHELL
After setting up your local profile, run the commands below to install Ruby version 2.5.3. If a newer version is available, replace the version number with that. Visit this site to find out Ruby’s latest versions.
rbenv install 2.5.3
rbenv global 2.5.3
To verify that Ruby is installed, run the commands below:
ruby -v
You should see similar lines below:
ruby 2.5.3p105 (2018-10-18 revision 65156) [x86_64-linux]
Install Node.js
Now that the Ruby environment is set up run the commands below to install Node.js. First, run the commands below to install the Node.js repository, then install the Node.js package.
curl -sL https://deb.nodesource.com/setup_10.x | sudo -E bash -
sudo apt-get install -y nodejs
Now that Node.js is installed run the commands below to install Strapi.
Install MongoDB
MongoDB is the database that Strapi uses. So install MongoDB and ImageMagick before setting up your website projects.
sudo apt install mongodb
npm install mongodb --save
After installing the MongoDB server, open a new terminal window and try.
Then start an interactive Mongo prompt by typing the command below:
mongo
ctrl+c to exit.
Install Strapi
Now that your environment is ready run the commands below to install Strapi and build your first site. Next, run the commands below.
sudo npm install strapi@alpha -g
sudo npm install pm2 -g
Next, create a project folder, change it into the Strapi folder, and install it there.
cd ~
strapi new myproject
cd myproject
npm install --production
The generator will ask a couple of questions about the configuration. Go ahead and select the default options. Then, say Y when the generator asks to answer the questions:
Lets configurate the connection to your database:
? Choose your main database: MongoDB
? Database name: myproject
? Host: 127.0.0.1
? +srv connection: false
? Port (It will be ignored if you enable +srv): 27017
? Username: leave blank
? Password: leave blank
? Authentication database (Maybe "admin" or blank):
? Enable SSL connection: false
Once you’ve selected your requirements, the generator will prepare the skeleton of your app, configure the files, and install npm dependencies as required.
When you’re done, run the commands below to start the server from inside the Strapi project folder.
NODE_ENV=production pm2 start server.js --name api
Or
 strapi start
If the first commands above don’t work.
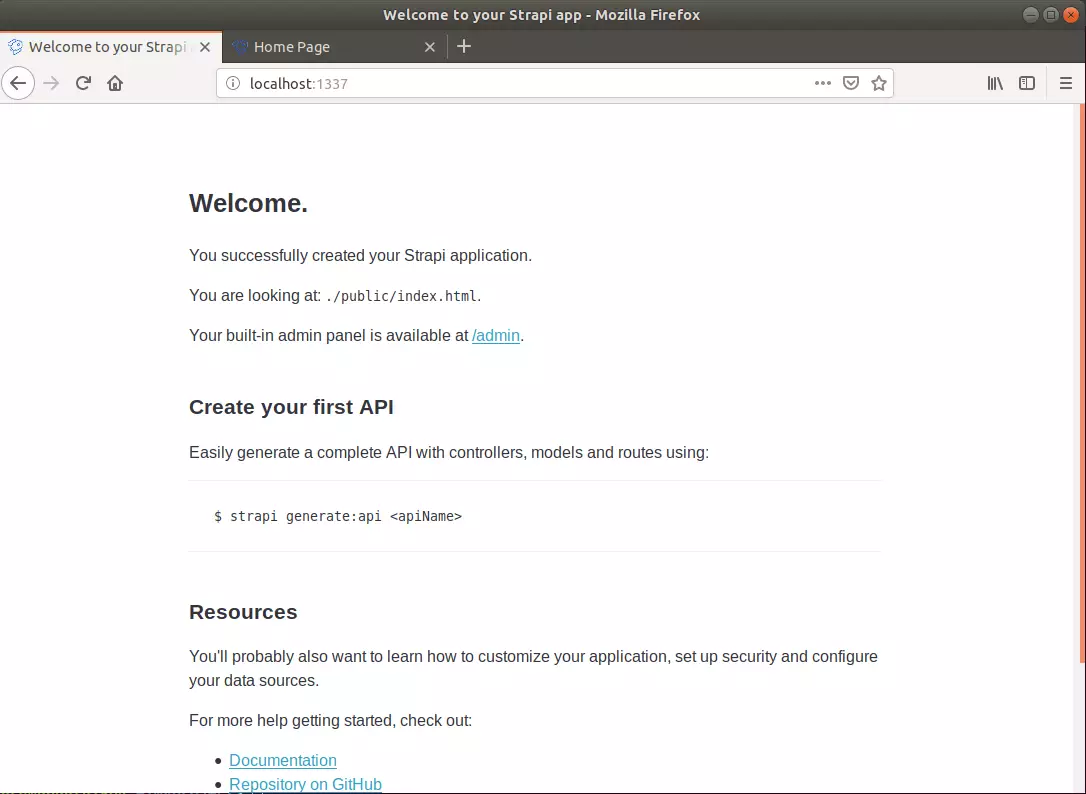
Now open your browser and browse to the hostname followed by port # 1337
http://localhost:1337
Your Strapi API should be accessible at the following URL: http://localhost:1337.
Then, stop the server by running ctrl + c.
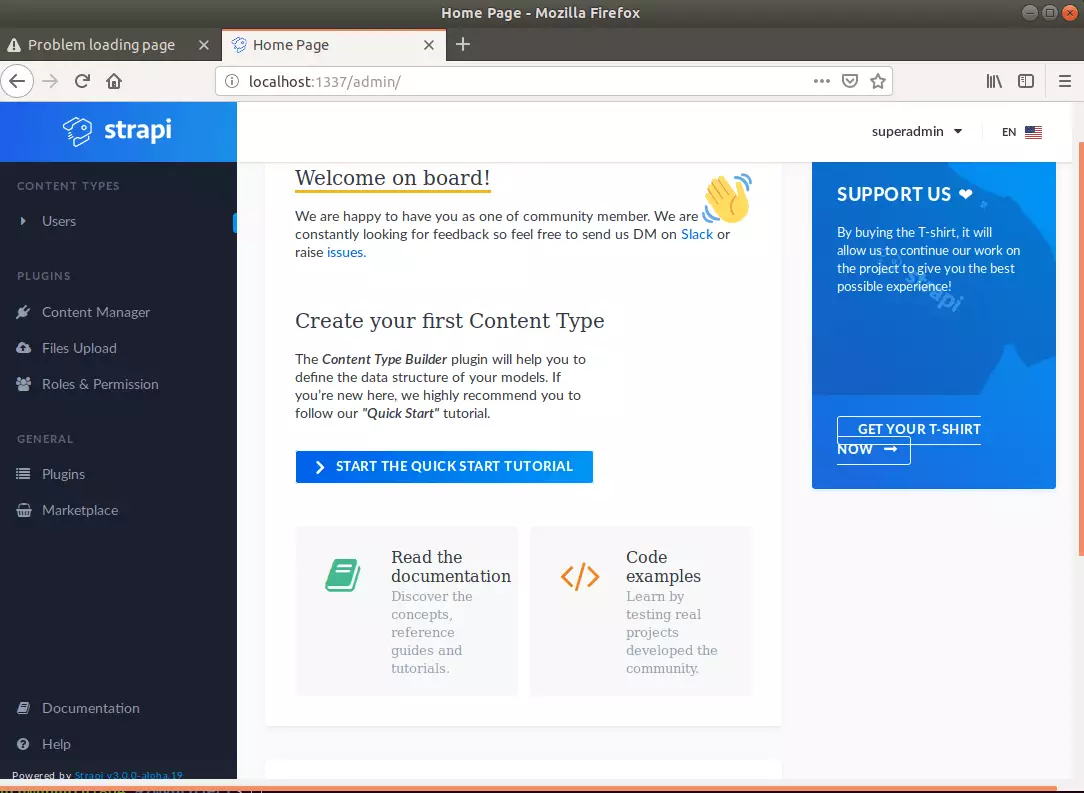
Next, log on to the back end and begin creating content.
Use the credential you created for admin above.
Now, you can start building your great content.
Congratulation! You have successfully installed the Strapi platform on Ubuntu 16.04 | 18.04 | 18.10
You may also like the post below:
Leave a Reply Cancel reply