

This article explains how to use the “Mouse Keys” feature to move the mouse pointer in Windows 11.
Windows has many accessibility features, including increasing the mouse pointer, changing the mouse pointer color, and others to help folks with low vision or some vision impairment.
Windows also allows users to use the numeric keypad on their keyboard, instead of the Mouse, to move the pointer. After you turn on the Mouse keys, you can use the numeric keypad to move the Mouse.
Before you use the Mouse keys to click items on your screen, you must select which mouse button you want to be active: the left, right, or both.
With all the accessibility features available in Windows 11, one can use Windows despite disabilities and low or impaired vision.
Below is how to turn on the Mouse Keys in Windows 11
How to enable turn off Mouse keys in Windows 11
As mentioned above, one can use the Mouse keys in Windows to move the mouse pointer in Windows 11. Below is how to do that.
Windows 11 has a centralized location for the majority of its settings app. From system configurations to creating new users and updating Windows, all can be done from the System Settings pane.
To get to System Settings, you can use the Windows key + I shortcut or click on Start ==> Settings, as shown in the image below:

Alternatively, you can use the search box on the taskbar and search for Settings. Then select to open it.
In Windows Settings, click Bluetooth & devices, and select Mouse on the right pane of your screen, shown in the image below.

On the Mouse settings pane, select the Mouse keys tile and toggle the button to the On position to enable Mouse keys.
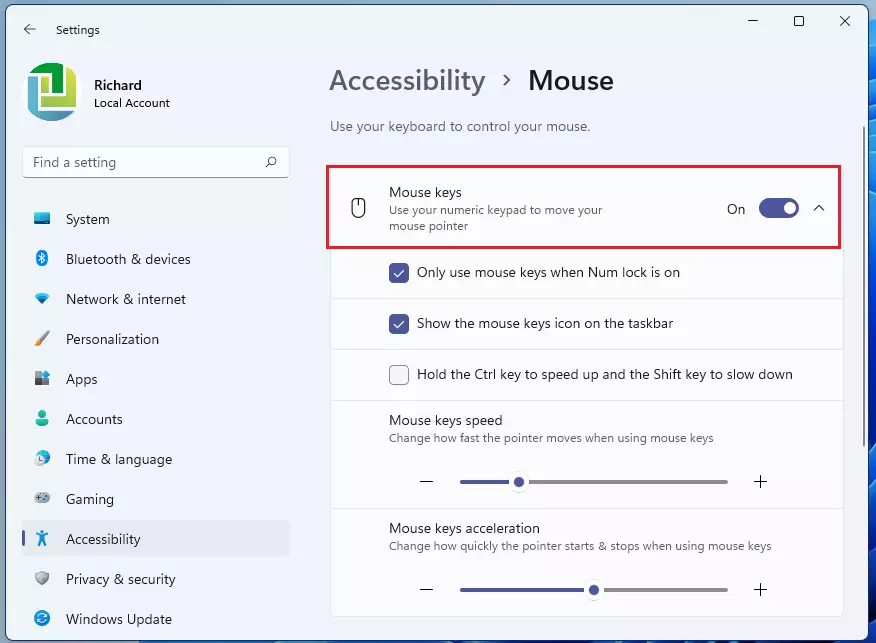
After turning it on, you must select which mouse button you want to be the active button: the left, right, or both.
| To | Press |
|---|---|
| Select the left mouse button | The forward slash (/) |
| Select both buttons | The asterisk (✲) |
| Select the right mouse button | The minus sign (-) |
After choosing a button, you can click items on your screen using the keys below.
| To | Do this |
|---|---|
| Click an item | With the left button selected as your active button, point to the item, and then press 5 |
| Right-click an item | With the right button selected as your active button, point to the item and then press 5 |
| Double-click an item | With the left button selected as your active button, point to the item and press the plus sign (+) |
Press the active mouse button to drag an item’s desired location, then release it.
| To | Do this |
|---|---|
| Drag an item | Point to the item and then press zero (0) |
| Drop an item | Point to the location where you want to move the item and then press the decimal point (.) |
That should do it!
Conclusion:
- The “Mouse Keys” feature in Windows 11 provides an alternative way to control the mouse pointer using the numeric keypad, enhancing accessibility for users with low vision or disabilities.
- Enabling Mouse Keys is straightforward through the System Settings menu, allowing the active mouse button to be customized.
- Users can click, double-click, and drag items on the screen with predefined keystrokes, making navigation easier without a traditional mouse.
- To disable Mouse Keys, simply reverse the enabling process in the Accessibility settings.
- Overall, Windows 11 offers robust accessibility features that empower users to navigate their devices more effectively despite potential challenges.


Leave a Reply Cancel reply