
This brief tutorial shows students and new users how to install and configure the Ganglia monitoring platform on Ubuntu 18.04 | 16.04.
Installing a Ganglia monitoring server on an Ubuntu Linux server helps system administrators monitor and analyze data across network systems. Ganglia is an open-source software that can run on all major operating systems, including Ubuntu.
It uses XML for data representation, XDR for compact and portable data transport, and RRDtool for data storage and visualization. Ganglia can scale to handle clusters with 2000 nodes and combine data from diverse systems and databases into a single platform.
By installing and setting up Ganglia on Ubuntu, system administrators can ensure that their network systems are running smoothly and identify potential issues before they cause significant problems.
For more about Ganglia, please visit its homepage.
Install Apache2 HTTP Server
Apache2 HTTP Server is the most popular web server, so install it since Ganglia needs it.
To install Apache2 HTTP on the Ubuntu server, run the commands below.
sudo apt update
sudo apt install apache2
After installing Apache2, the commands below can stop, start, and enable the Apache2 service to always start up with the server boots.
sudo systemctl stop apache2.service
sudo systemctl start apache2.service
sudo systemctl enable apache2.service
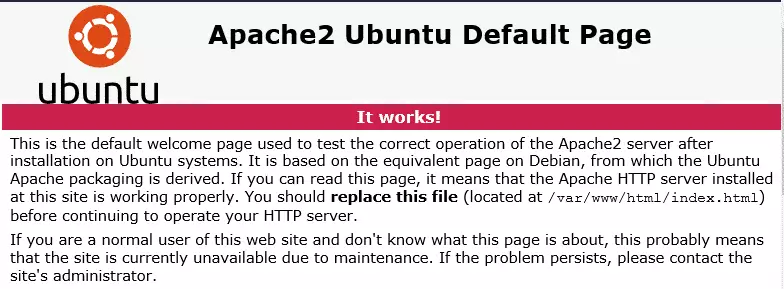
To verify whether the Apache2 HTTP server is installed and operating, open your browser and browse to the server’s hostname or IP address. If you see a page similar to the one below, Apache2 is working as expected.
http://localhost
Install PHP 7.2 and Related Modules
Some versions of Ubuntu won’t have PHP 7.2 available in their default repositories. To install it, you will have to get it from third-party repositories.
Run the commands below to add the third-party repository to upgrade to PHP 7.2 if Ubuntu doesn’t already have it available.
sudo apt-get install software-properties-common
sudo add-apt-repository ppa:ondrej/php
Then update and upgrade to PHP 7.2
sudo apt update
Next, run the commands below to install PHP 7.2 and related modules.
sudo apt install php7.2 libapache2-mod-php7.2 php7.2-common php7.2-gmp php7.2-curl php7.2-intl php7.2-mbstring php7.2-xmlrpc php7.2-mysql php7.2-gd php7.2-xml php7.2-cli php7.2-zip
After installing PHP 7.2, run the commands below to open the PHP default config file for Apache2.
sudo nano /etc/php/7.2/apache2/php.ini
Then, save the changes on the following lines below in the file. The value below is an ideal setting to apply in your environment.
file_uploads = On
allow_url_fopen = On
short_open_tag = On
memory_limit = 256M
upload_max_filesize = 100M
max_execution_time = 360
max_input_vars = 1500
date.timezone = America/Chicago
After making the change above, please save the file and close it.
After making changes, you must restart Apache2 to reload PHP configurations.
To restart Apache2, run the commands below
sudo systemctl restart apache2.service
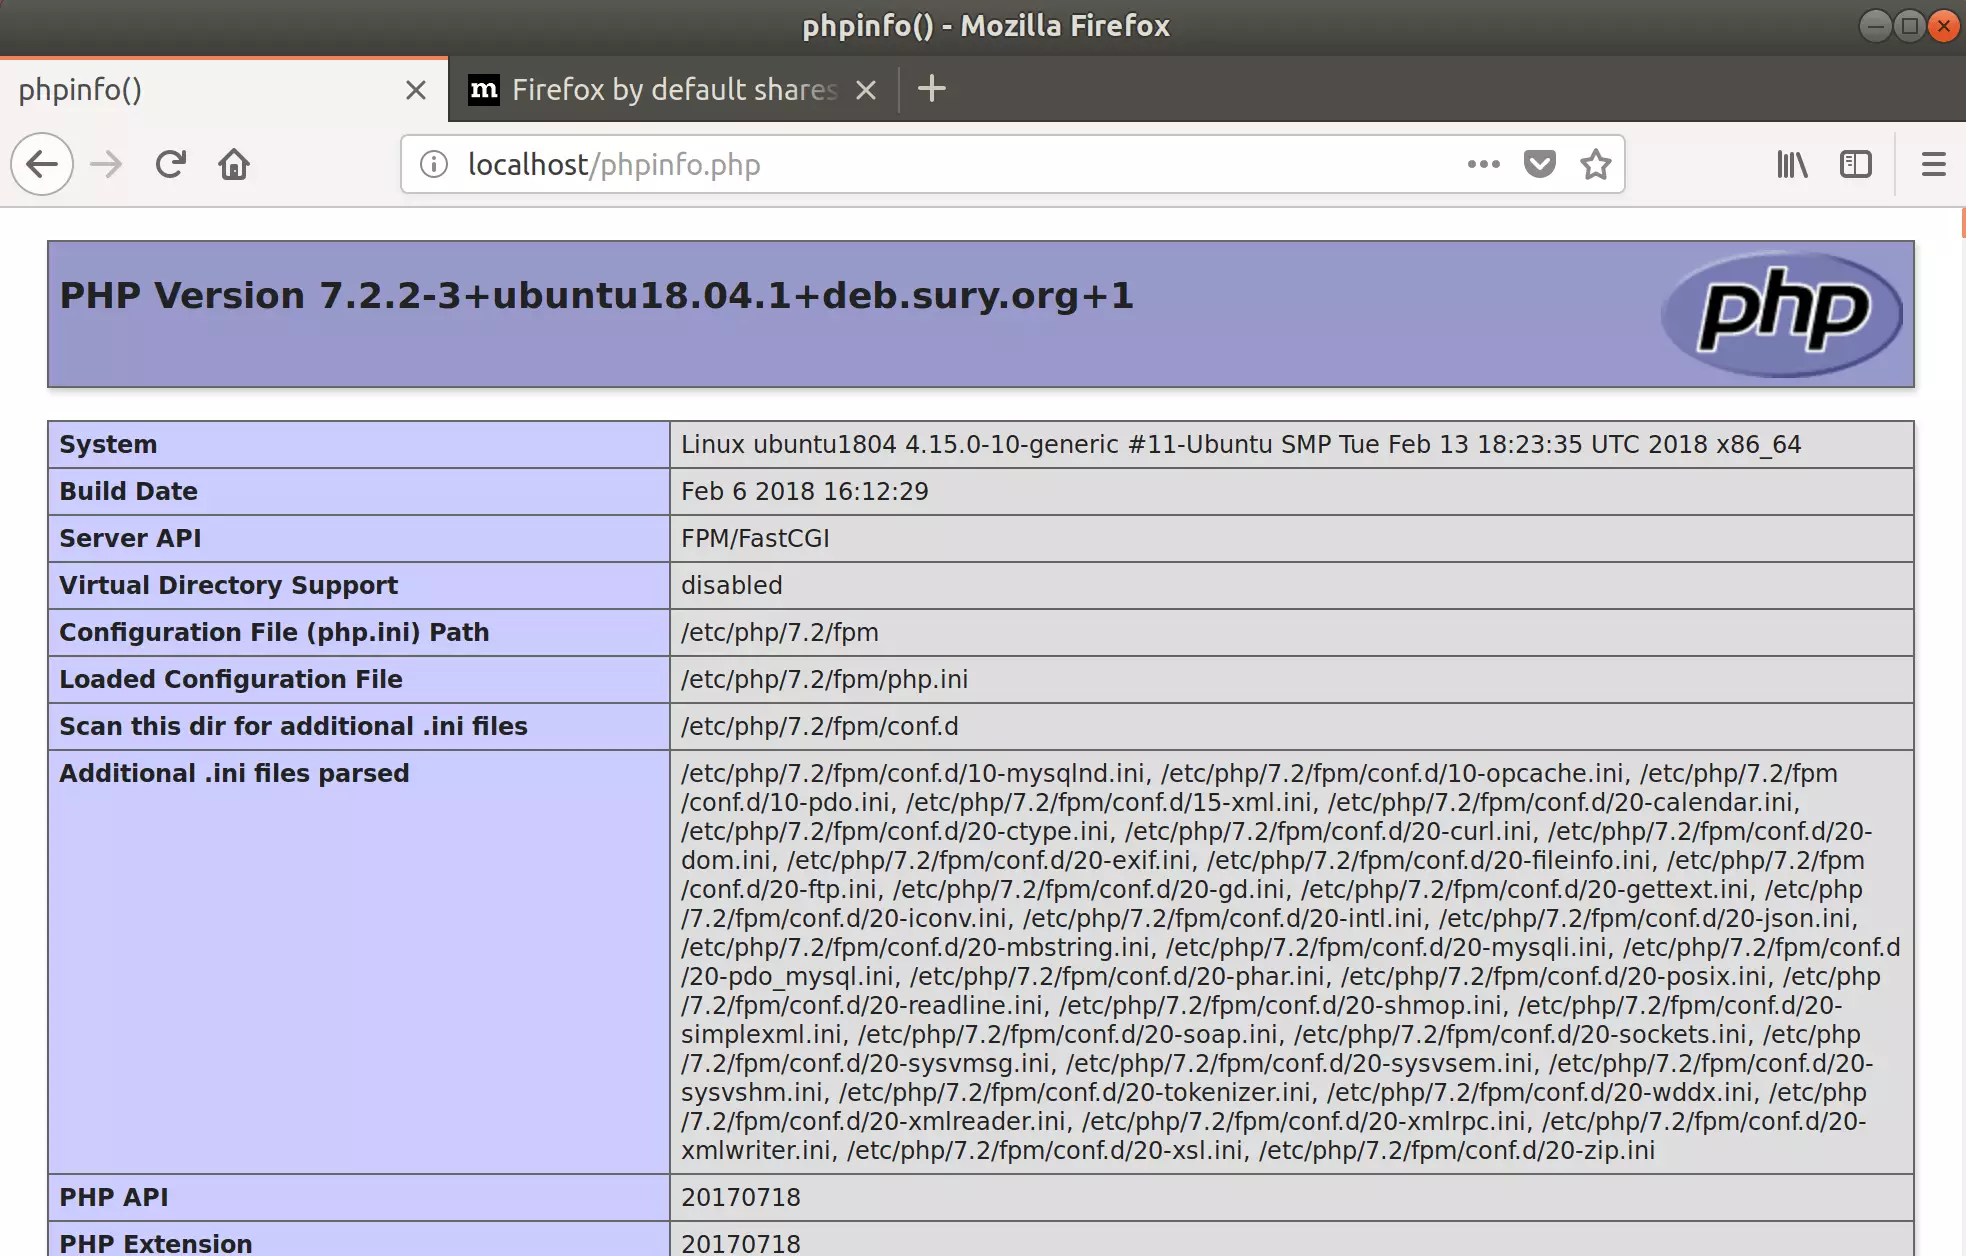
To verify whether PHP 7.2 is installed and find default settings configured with Apache2, create a phpinfo.php file in the Apache2 root directory by running the commands below
sudo nano /var/www/html/phpinfo.php
Then, type the content below and save the file.
<?php phpinfo( ); ?>
Save the file. Then browse to your server hostname followed by /phpinfo.php
http://localhost/phpinfo.php
You should see the PHP default test page.
Install Ganglia Package
Now that Apache2 and PHP are installed, run the commands below to install Ganglia
sudo apt update

sudo apt install ganglia-monitor rrdtool gmetad ganglia-webfrontend
Once installed, the commands below can stop, start, and enable Ganglia to start when the server boots up automatically.
sudo systemctl stop ganglia-monitor.service
sudo systemctl start ganglia-monitor.service
sudo systemctl enable ganglia-monitor.service
Configure Ganglia Service
Ganglia default configuration files are located under the/etc/ganglia directory. Its main configuration file is /etc/ganglia/gmetad.conf and has a basic setup configured in it. You’ll need to make some changes to suit your environment.
To validate if Ganglia is installed, run the commands below:
systemctl status ganglia-monitor.service
You should see Ganglia system status details as shown below:
● ganglia-monitor.service
   Loaded: loaded (/etc/init.d/ganglia-monitor; generated)
   Active: active (running) since Wed 2020-01-22 08:46:37 CST; 29s ago
     Docs: man:systemd-sysv-generator(8)
    Tasks: 2 (limit: 4674)
   CGroup: /system.slice/ganglia-monitor.service
           └─30412 /usr/sbin/gmond --pid-file /var/run/gmond.pid

Jan 22 08:46:37 ubuntu1804 systemd[1]: Starting ganglia-monitor.service.
Jan 22 08:46:37 ubuntu1804 ganglia-monitor[30410]: Starting Ganglia Monitor Daemon: gmond.
Jan 22 08:46:37 ubuntu1804 systemd[1]: Started ganglia-monitor.service.
First, you will need to edit gmetad.conf file and define your master node. You can do this with the following command:
sudo nano /etc/ganglia/gmetad.conf
Make the following highlighted changes to define the server IP address to serve as the master node.
# A list of machines which service the data source follows, in the
# format ip:port, or name:port. If a port is not specified then 8649
# (the default gmond port) is assumed.
# default: There is no default value
#
# data_source "my cluster" 10 localhost  my.machine.edu:8649  1.2.3.5:8655
# data_source "my grid" 50 1.3.4.7:8655 grid.org:8651 grid-backup.org:8651
# data_source "another source" 1.3.4.7:8655  1.3.4.8

data_source "my cluster" 50 192.168.101.101:8655
#
After making your changes, save them and exit them.
Next, open /etc/ganglia/gmond.conf and make the highlighted changes to reference the master node.
sudo nano /etc/ganglia/gmond.conf
Make the changes below, then save the file.
/* Feel free to specify as many udp_send_channels as you like.  Gmond
   used to only support having a single channel */
udp_send_channel {
  mcast_join = 192.168.101.101
  port = 8649
  ttl = 1
}

/* You can specify as many udp_recv_channels as you like as well. */
udp_recv_channel {
  mcast_join = 192.168.101.101
  port = 8649
  bind = 192.168.101.101
}

/* You can specify as many tcp_accept_channels as you like to share
   an xml description of the state of the cluster */
tcp_accept_channel {
  port = 8649
}

/* Each metrics module that is referenced by gmond must be specified and
   loaded. If the module has been statically linked with gmond, it does
Finally, copy Ganglia’s configuration file to the Apache virtual host directory. This can be done by running the commands below:
sudo cp /etc/ganglia-webfrontend/apache.conf /etc/apache2/sites-enabled/ganglia.conf
Next, restart ganglia monitor, gmetad, and apache services using the commands below:
sudo systemctl restart ganglia-monitor
sudo systemctl restart gmetad
sudo systemctl restart apache2
Access Ganglia Web Portal
Now that the Ganglia server has been installed and access is allowed from the local machine, use the address below to access the Ganglia portal.
http://192.168.101.101/ganglia
You should see Ganglia’s home page as shown below:

Install Ganglia Clients
Now that the Ganglia server is installed and running, install its client software on your desktops and other servers that should be reporting.
Simply run the commands below on Ubuntu and other Debian systems to install Ganglia’s client monitor package.
sudo apt install ganglia-monitor
After installing the Ganglia client, edit its gmond.conf file to define the master node.
sudo nano /etc/ganglia/gmond.conf
Make the following changes:
udp_send_channel {
 host = 192.168.101.101
  port = 8649
  ttl = 1
}
Save and exit, then start the ganglia-monitor service using the following command:
systemctl start ganglia-monitor
In no time, client machines should be reporting to the master node.
Congratulations! You have learned how to install the Ganglia monitoring platform on Ubuntu 16.04 | 18.04 LTS servers.
You may also like the post below:


Leave a Reply Cancel reply