
This brief tutorial shows students and new users how to install Flectra CRM | ERP on Ubuntu 20.04 | 18.04.
Flectra is an open-source CRM | ERP system that runs on Python with PostgreSQL backend data to power your business to the next level.
Whether you’re a small or medium business, Flectra has a modular suite of apps, including inventory, HR, CMS, POS, Project, etc., that will help you afford to run a successful business today.
It is an open-source alternative to popular CRM and HRP systems for little or no cost. Flectra is an excellent place to start when looking for a customer relationship management solution or ERP platform.
For more about Flectra, please check its homepage.
To get started with installing Flectra on Ubuntu, follow the steps below:
Install require dependencies
To install Flectra on Ubuntu, you’ll need to install Python packages and other dependencies. To do that, log in to the terminal and run the commands below:
sudo apt update
sudo apt install gcc python3-venv build-essential python3-pillow python3-wheel python3-lxml python3-dev python3-pip python3-setuptools npm nodejs git gdebi libldap2-dev libsasl2-dev libxml2-dev libxslt1-dev libjpeg-dev libpq-dev
When you’re done running the commands above, continue below to download and install wkhtmltopdf tool set.
To do that, run the commands below, download, and install it.
cd /tmp
wget https://github.com/wkhtmltopdf/wkhtmltopdf/releases/download/0.12.5/wkhtmltox_0.12.5-1.bionic_amd64.deb
sudo apt install ./wkhtmltox_0.12.5-1.bionic_amd64.deb
After that, continue below to the next step.
Install PostgreSQL
Flectra requires PostgreSQL to store its content in the database. To install PostgreSQL on Ubuntu, simply run the commands below:
sudo apt install postgresql
After installing PostgreSQL, it’s a good idea to create/change the default PostgreSQL user password… Run the below commands to create/change the user password in the bash shell, not the PostgreSQL interactive shell.
Set password for Linux user (Postgres)
sudo passwd postgres
It would be best if you were prompted to create a new Linux password for Postgres users.
Enter new UNIX password:
Retype new UNIX password:
passwd: password updated successfully
After installing PostgreSQL, run the commands below to set up a database user for Flectra. Use the PostgreSQL database utility to create the user.
su - postgres -c "createuser -s flectra"
Install Flectra
Now that you’ve installed the required dependencies and PostgreSQL, follow the steps below to get Flectra installed and set up.
First, create a new system account called flectra. Then run the second command to create a password for the flectra user account.
sudo useradd -m -U -r -d /opt/flectra -s /bin/bash flectra
sudo passwd flectra
After that, use Flectra user to download Flectra packages.
su - flectra
git clone --depth=1 --branch=1.0 https://gitlab.com/flectra-hq/flectra.git flectra
Once the packages are downloaded, run the commands below to create a Python virtual environment.
python3 -m venv flectra-venv
source flectra-venv/bin/activate
After activating the Python virtual environment, run the commands below to open the requirement.txt file and update the highlighted line below to the version of Python installed in Ubuntu.
nano flectra/requirements.txt
Confirm these lines are there in the file.
psycopg2==2.8.5; sys_platform != 'win32'
psycopg2==2.8.5; sys_platform == 'win32'
Update the lines above if different, and save the exit the requirements.txt file.
Then run these commands
pip3 install wheel
pip3 install -r flectra/requirements.txt
When you’re done, deactivate the virtual environment and exit.
deactivate
exit
Configure Flectra
At this point, Flectra packages should be downloaded and configured. To complete the setup, run the commands below to create directories to support Flectra installation.
sudo mkdir /opt/flectra/flectra-custom-addons
sudo mkdir /var/log/flectra
sudo touch /var/log/flectra/flectra.log
sudo mkdir /etc/flectra
Next, make sure that the flectra user is the owner of the above directories.
sudo chown -R flectra:flectra /opt/flectra/flectra-custom-addons
sudo chown -R flectra:flectra /var/log/flectra/
sudo chown -R flectra:flectra /etc/flectra
After that, open the Flectra configuration file
sudo nano /etc/flectra/flectra.conf
Then add the lines below and save.
[options]
admin_passwd = type_your_password_here
db_host = False
db_port = False
db_user = flectra
db_password = False
logfile = /var/log/flectra/flectra.log
logrotate = True
proxy_mode = True
addons_path = /opt/flectra/flectra/addons, /opt/flectra/flectra-custom-addons
Finally, run the commands below to create a systemd service to control how Flectra is started, stopped, and enabled. Run the commands below to create the service file.
sudo nano /etc/systemd/system/flectra.service
Add the lines below to the file and save.
[Unit]
Description=flectra
#Requires=postgresql-10.6.service
#After=network.target postgresql-10.6.service

[Service]
Type=simple
SyslogIdentifier=flectra
PermissionsStartOnly=true
User=flectra
Group=flectra
ExecStart=/opt/flectra/flectra-venv/bin/python3 /opt/flectra/flectra/flectra-bin -c /etc/flectra/flectra.conf
StandardOutput=journal+console

[Install]
WantedBy=multi-user.target
When you’re done, reload the systemd and start the Flectra service.
sudo systemctl daemon-reload
sudo systemctl start flectra
sudo systemctl enable flectra
To verify that Flectra is running, run the commands below:
sudo systemctl status flectra
That should display similar lines as shown below:
flectra.service - flectra
     Loaded: loaded (/etc/systemd/system/flectra.service; enabled; vendor preset: enabled)
     Active: active (running) since Thu 2021-03-18 19:39:57 CDT; 12s ago
   Main PID: 35996 (python3)
      Tasks: 4 (limit: 4654)
     Memory: 74.7M
     CGroup: /system.slice/flectra.service
             └─35996 /opt/flectra/flectra-venv/bin/python3 /opt/flectra/flectra/flectra-bin -c /etc/flectra/>

Mar 18 19:39:57 ubuntu2004 systemd[1]: Started flectra.
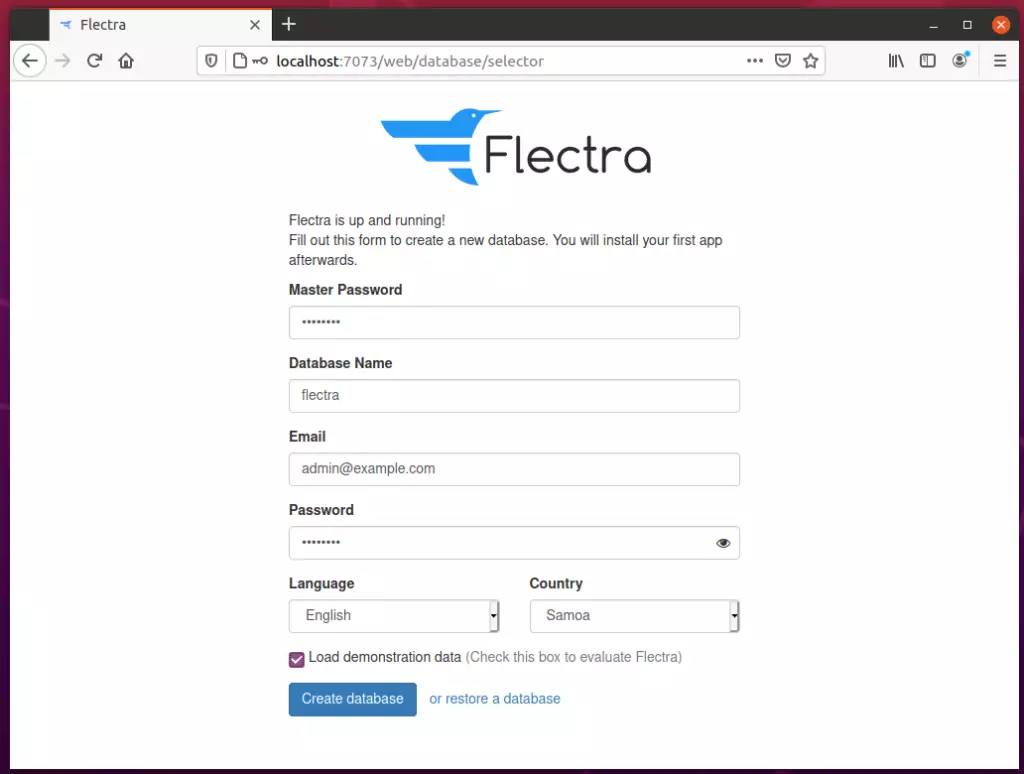
Flectra should be running on port 7073.
http://localhost:7073
You should be redirected to the Flectra setup wizard. Enter the master password from the configuration file above, the database name, the admin email address, and the password.
That should get you in. However, Flectra works excellently with a web server. So, you may need to install an Nginx proxy to use the Flectra web portal.
Install Nginx
Install the Nginx web server by running the commands below:
sudo apt install nginx
Then, create a virtual host file for Flectra.
sudo nano /etc/nginx/sites-available/example.conf
Copy and paste the lines below into the file and save.
#flectra server
upstream flectra {
 server 127.0.0.1:7073;
}

server {
   listen 80;
   server_name flectra.example.com;

proxy_read_timeout 720s;
proxy_connect_timeout 720s;
proxy_send_timeout 720s;

 # Add Headers for flectra proxy mode
 proxy_set_header X-Forwarded-Host $host;
 proxy_set_header X-Forwarded-For $proxy_add_x_forwarded_for;
 proxy_set_header X-Forwarded-Proto $scheme;
 proxy_set_header X-Real-IP $remote_addr;

 # log
 access_log /var/log/nginx/flectra.access.log;
 error_log /var/log/nginx/flectra.error.log;

 # Redirect requests to flectra backend server
 location / {
   proxy_redirect off;
   proxy_pass http://localhost:7073;
 }

 # common gzip
 gzip_types text/css text/less text/plain text/xml application/xml application/json application/javascript;
 gzip on;
}
Enable the site and restart Nginx.
sudo ln -s /etc/nginx/sites-available/example.conf /etc/nginx/sites-enabled/
sudo systemctl restart nginx
Now, you should be able to access the portal using the hostname defined in Nginx.
Conclusion:
This post showed you how to install and configure Flectra on Ubuntu 20.04 | 18.04. If you find any error above, please use the form below to report.


Leave a Reply to Romeo Cancel reply