This brief tutorial shows students and new users how to install ConfigServer Security & Firewall (CSF) on Ubuntu 20.04 | 18.04.
CSF is a free, open-source Stateful Packet Inspection (SPI) firewall software based on iptables that provides high security for Linux servers. It also provides login and intrusion detection that can help protect Linux systems from threats and other attacks.
Installing ConfigServer Security & Firewall (CSF) on Ubuntu Linux can help provide high security for your server. CSF is based on iptables and provides Stateful Packet Inspection (SPI) firewall software.
It also includes login and intrusion detection that can help protect your Linux system from threats and other attacks. With CSF, you can manage an iptables firewall on Linux via an intuitive web interface, making it an excellent option for beginners.
Additionally, CSF is free and open-source software that can be easily downloaded and installed on your Ubuntu system.
For more about CFS, please visit its web page.
To get started with installing CSF on Ubuntu, follow the steps below:
Install CSF on Ubuntu
By default, CSF packages are not available in Ubuntu repositories. You’ll have to download and run its install scripts to install.
To do that, run the commands below:
sudo apt update
wget http://download.configserver.com/csf.tgz
Once downloaded, run the commands below to extract the downloaded file and install it.
tar -xvzf csf.tgz
cd csf
sudo bash install.sh
After installing, you’ll get a success message.
To validate that CSF is installed and functioning, run the commands below:
sudo perl /usr/local/csf/bin/csftest.pl
That will output similar lines as shown below:
Testing ip_tables/iptable_filter.OK
Testing ipt_LOG.OK
Testing ipt_multiport/xt_multiport.OK
Testing ipt_REJECT.OK
Testing ipt_state/xt_state.OK
Testing ipt_limit/xt_limit.OK
Testing ipt_recent.OK
Testing xt_connlimit.OK
Testing ipt_owner/xt_owner.OK
Testing iptable_nat/ipt_REDIRECT.OK
Testing iptable_nat/ipt_DNAT.OK

RESULT: csf should function on this server
CSF has multiple configuration files, all stored in the /etc/cfs directory.
The following file is the main configuration files of CSF and their details:
- /etc/csf/csf.conf : The main configuration file.
- /etc/csf/csf.allow : The list of allowed IP’s and CIDR addresses on the firewall.
- /etc/csf/csf.deny : The list of denied IP’s and CIDR addresses on the firewall.
- /etc/csf/csf.ignore : The list of ignored IP’s and CIDR addresses on the firewall.
Configure CSF
After installing CSF on production, the first thing to do is to turn off its testing mode. By default, CSF is installed with testing mode enabled.
Open its main configuration file and edit the highlighted line shown below:
sudo nano /etc/csf/csf.conf
Then, edit the line below and change its value to 0.
You can turn on and enable many more settings in the configuration file. You can restrict and monitor services like SSH, FTP, and SMTP.
#
# lfd will not start while this is enabled
TESTING = "0"
After that, save your changes and reload CSF using the commands below:
sudo csf -r
sudo service lfd restart
To see a list of default firewall rules, run the commands below:
sudo csf -l
That should load the default rules in the tables.
ptables filter table
=====================
Chain INPUT (policy DROP 0 packets, 0 bytes)
num   pkts bytes target     prot opt in     out     source               destination
1     9072   21M LOCALINPUT  all  --  !lo    *       0.0.0.0/0            0.0.0.0/0
2     3024 2709K ACCEPT     all  --  lo     *       0.0.0.0/0            0.0.0.0/0
3     8786   21M INVALID    tcp  --  !lo    *       0.0.0.0/0            0.0.0.0/0
4        0     0 ACCEPT     icmp --  !lo    *       0.0.0.0/0            0.0.0.0/0
To add allow IP through the firewall, simply run the commands below:
sudo csf -a 192.168.1.1
To deny the IP address, run the commands below:
sudo csf -d 192.168.1.1
To remove blocked IP, run the commands below:
sudo csf -dr 192.168.1.1
To remove IP from the allowed list, run the commands below:
sudo csf -ar 192.168.1.1
To flush and restart CSF, run the commands below:
sudo csf -f
sudo csf -r
To disable CFS, run the commands below:
sudo csf -x
To enable, run the commands below:
sudo cfs -e
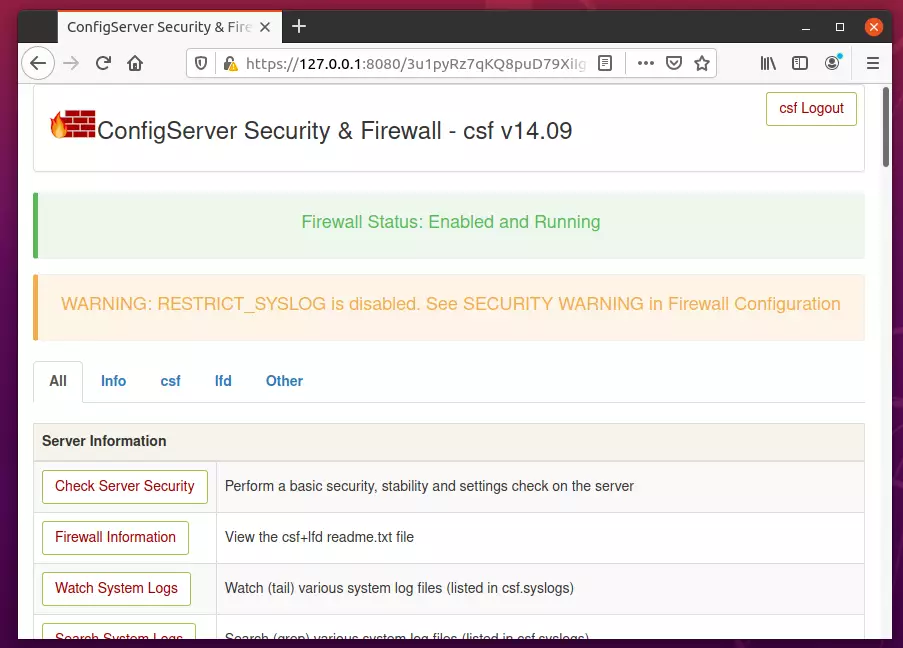
Access Web Interface
CSF Web comes with a web interface based on Perl. This allows you to manage CSF easily from any web browser. To install, run the commands below:
sudo apt-get install libio-socket-ssl-perl libcrypt-ssleay-perl libnet-libidn-perl libio-socket-inet6-perl libsocket6-perl
After installing, open the CSF configuration file and edit the web UI login, password, and port.
sudo nano /etc/csf/csf.conf
Then, change the highlighted lines
This options restricts the ability to modify settings within this file from
 the csf UI. Should the parent control panel be compromised, these restricted
 options could be used to further compromise the server. For this reason we
 recommend leaving this option set to at least "1" and if any of the
 restricted items need to be changed, they are done so from the root shell
 #
 0 = Unrestricted UI
 1 = Restricted UI
 2 = Disabled UI
 RESTRICT_UI = "1"
#
# 1 to enable, 0 to disable
UI = "1"

# Set this to the port that want to bind this service to. You should configure
# this port to be >1023 and different from any other port already being used
#
# Do NOT enable access to this port in TCP_IN, instead only allow trusted IP's
# to the port using Advanced Allow Filters (see readme.txt)
UI_PORT = "8080"

# Optionally set the IP address to bind to. Normally this should be left blank
# to bind to all IP addresses on the server.
#
# If the server is configured for IPv6 but the IP to bind to is IPv4, then the
# IP address MUST use the IPv6 representation. For example 1.2.3.4 must use
# ::ffff:1.2.3.4
#
# Leave blank to bind to all IP addresses on the server
UI_IP = ""

# This should be a secure, hard to guess username
#
# This must be changed from the default
UI_USER = "admin"

# This should be a secure, hard to guess password. That is, at least 8
# characters long with a mixture of upper and lowercase characters plus
# numbers and non-alphanumeric characters
#
# This must be changed from the default
UI_PASS = "strong_password_here"

# This is the login session timeout. If there is no activity for a logged in
# session within this number of seconds, the session will timeout and a new
Save the file and exit.
Next, add the IPs allowed to log in via the web interface.
sudo nano /etc/csf/ui/ui.allow
Restart
sudo service lfd restart
Now go to the server IP address followed by port 8080 and log in with the account defined in the configuration file.
http://127.0.0.1:8080
That’s it!
Conclusion:
This post showed you how to install CSF on Ubuntu 20.04 | 18.04. If you find any error above, please use the form below to report.

Leave a Reply Cancel reply